Learn how to set up WP Ghost using the Ghost Mode preset to activate all essential security features and protect your site from hacker bots in under 4 minutes.
VIDEO OUTLINE
Min. 0:13 – 0:44: Load Ghost Mode Preset (Instant Setup)
Click on Start Scan to run a comprehensive WordPress security audit.
Review the Action Items and follow the instructions to reach a 100% optimization score.
NOTE!
👋 How to Fix 403 Forbidden Error caused by mod_security
If your host uses ModSecurity rule #212340, it may prevent the Code Editor from working in Ghost Mode. If you encounter a 403 error, ask your host to whitelist Rule 212340 for your account.
Complete list of WordPress themes tested and compatible with WP Ghost, including Astra, Avada, Divi, Flatsome, Woodmart, and more. WP Ghost works with virtually all themes.
WP Ghost works on all major servers and hosts with two exceptions. WordPress.com blocks login path changes. Shared Nginx without config access limits path features. Workarounds for both documented here.
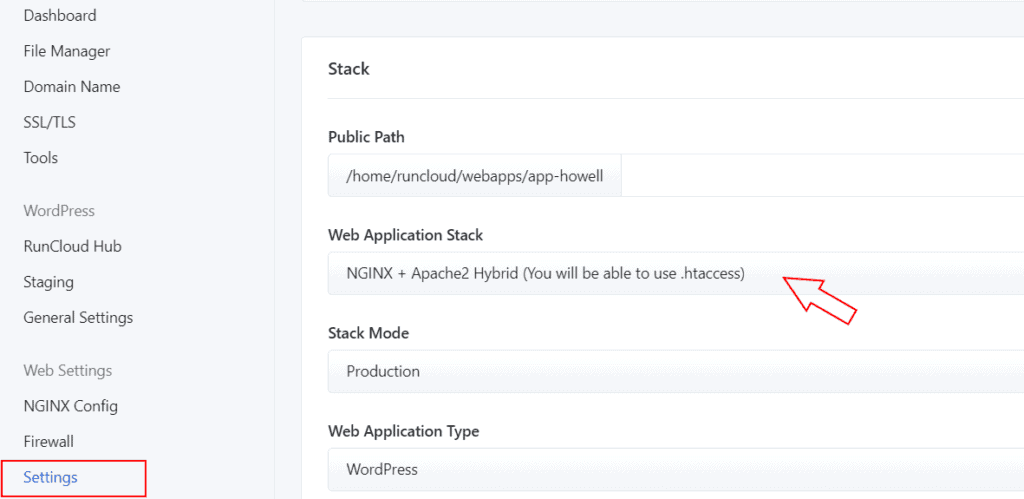
WP Ghost (formerly Hide My WP Ghost) works on RunCloud with both web application stacks. If you use NGINX + Apache2 Hybrid, WP Ghost works automatically through .htaccess. If you use Native NGINX, add one include line in RunCloud’s NGINX Config panel. Both options are one-time setup steps.
Option 1: NGINX + Apache2 Hybrid (Easiest)
If your RunCloud application uses NGINX + Apache2 Hybrid as the Web Application Stack, WP Ghost works automatically. All rewrite rules load from .htaccess through the Apache layer. No Nginx configuration needed.
Install WP Ghost, go to WP Ghost > Change Paths > Level of Security, select Safe Mode or Ghost Mode, click Save, and follow the Customize All WordPress Paths tutorial.
Option 2: Native NGINX
If your RunCloud application uses Native NGINX, you need to add the WP Ghost config file include through RunCloud’s NGINX Config panel.
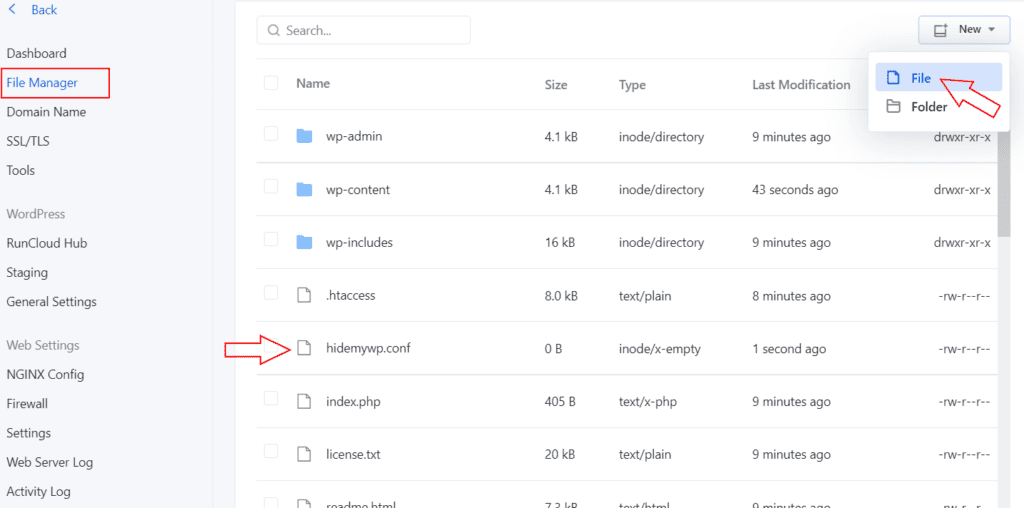
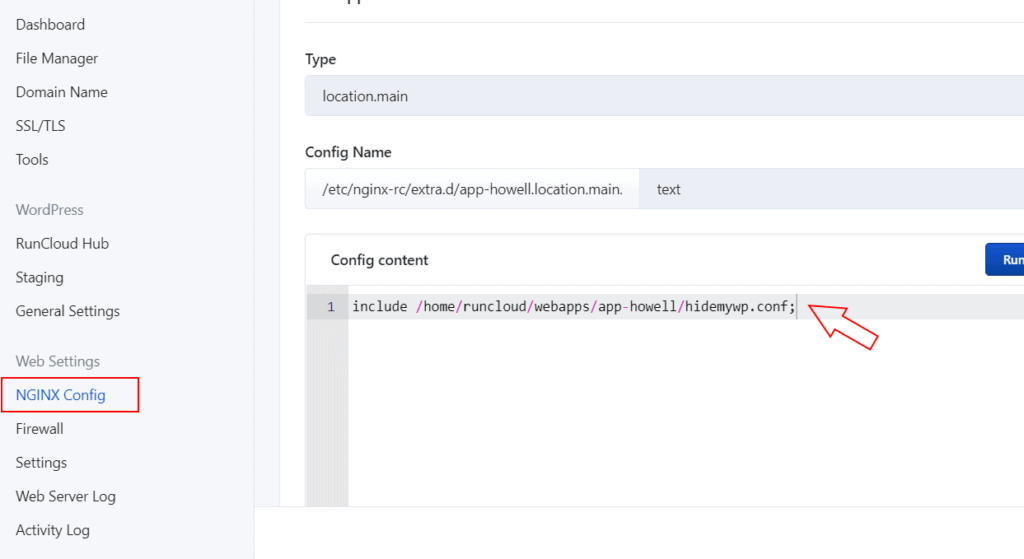
Step 1: Create the hidemywp.conf File
In RunCloud, go to your application’s File Manager. Create a file named hidemywp.conf in your website root directory.
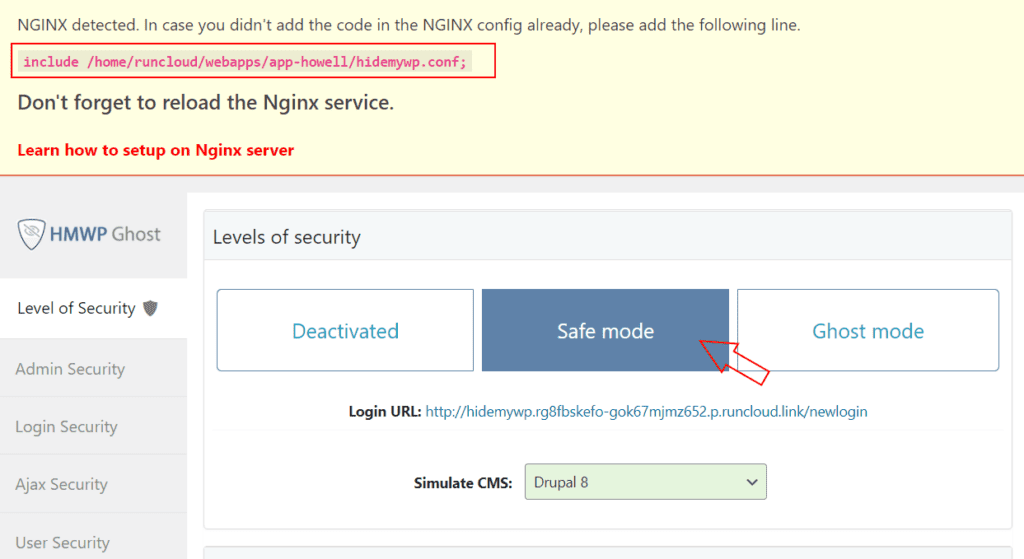
Step 2: Activate WP Ghost and Get the Include Line
In WP Ghost, go to Change Paths > Level of Security. Select Safe Mode or Ghost Mode. Click Save. WP Ghost detects Nginx and displays the include line you need to add to RunCloud’s config.
Step 3: Add the Include Line in RunCloud
In RunCloud, go to your application’s NGINX Config section. Add the include line from WP Ghost. Click Verify to check the syntax, then Save.
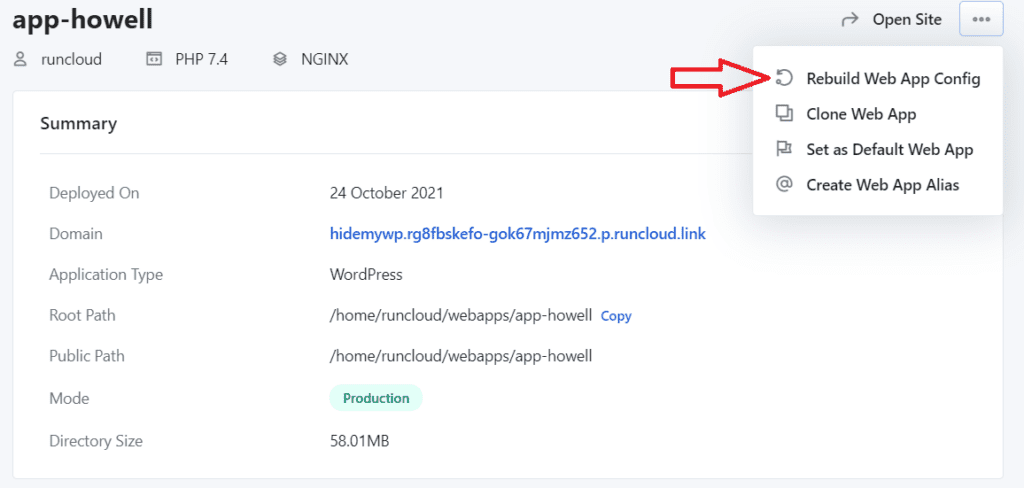
Step 4: Rebuild the Web App Config
After adding the include, click Rebuild Web App Config in RunCloud to apply the changes. This reloads the Nginx configuration with WP Ghost’s rewrite rules.
Rebuild after path changes
When you change paths in WP Ghost on a Native NGINX stack, click Rebuild Web App Config in RunCloud afterward to reload the updated rewrite rules. With the Hybrid stack, this is not needed.
Troubleshooting
Custom paths return 404 on Native NGINX. The include line was not added or the config was not rebuilt. Go to RunCloud NGINX Config, verify the include line is present, and click Rebuild Web App Config.
Paths work on Hybrid but not after switching to Native NGINX. The Hybrid stack uses .htaccess (Apache), while Native NGINX ignores .htaccess entirely. You need to add the hidemywp.conf include as described in Option 2.
Locked out after configuration. Use the Safe URL parameter or the Emergency Disable guide. RunCloud provides File Manager access where you can rename the plugin folder.
Frequently Asked Questions
Which RunCloud stack should I choose?
NGINX + Apache2 Hybrid is easiest for WP Ghost – no Nginx configuration needed. Native NGINX is faster (no Apache overhead) but requires the include line setup. If you already have a Native NGINX app, follow Option 2. If creating a new app, Hybrid is simpler.
Do I need to rebuild after every WP Ghost path change?
On Native NGINX, yes. WP Ghost updates the hidemywp.conf file automatically, but Nginx does not detect file changes until the config is rebuilt. Click Rebuild Web App Config in RunCloud after changing paths. On the Hybrid stack, this is not needed.
Can I switch from Hybrid to Native NGINX later?
Yes. If you switch stacks, you need to set up the hidemywp.conf include as described in Option 2. Your WP Ghost path settings are preserved – only the server configuration method changes.
Does WP Ghost modify WordPress core files?
No. WP Ghost writes rewrite rules to .htaccess (Hybrid) or hidemywp.conf (Native NGINX). No core files modified. Deactivating restores all defaults.
Block access to old WordPress image URLs with 404 or redirect them to new paths. Includes the HMW_HIDE_OLD_IMAGES constant, IMAGE vs MEDIA file options, SEO impact guidance, and troubleshooting.
WP Ghost and SiteGround Security are fully compatible and complement each other. WP Ghost handles path security and firewall. SiteGround handles activity logging and post-attack scanning. Feature comparison table included.
WP Ghost and WP Cerber Security complement each other. WP Ghost handles path security and firewall. WP Cerber handles anti-spam, malware scanning, and traffic inspection. Enable shared features in one plugin only.
WP Ghost and BBQ Firewall both use nG-series rules to block SQL injection and XSS. WP Ghost’s built-in 7G/8G firewall makes BBQ redundant. Use one firewall for efficiency. WP Ghost adds path security, 2FA, headers, and brute force that BBQ lacks.
WP Ghost and Sucuri Security are fully compatible with almost no overlap. WP Ghost handles server-level path security and firewall. Sucuri handles cloud WAF, DDoS protection, malware scanning, and post-hack cleanup. Both can run fully active.
WP Ghost and Anti-Malware Security are fully compatible. WP Ghost prevents attacks through path security and firewall. Anti-Malware detects and removes infections with definition-based scanning. Both can run fully active.
WP Ghost and Limit Login Attempts Reloaded overlap on login protection. WP Ghost includes all LLAR features plus path security, firewall, 2FA, and headers. LLAR Premium adds cloud IP intelligence. Enable login limits in one plugin only.
WP Ghost and Loginizer overlap heavily on login security. WP Ghost includes all Loginizer features (brute force, reCAPTCHA, IP blocking, 2FA) plus path security, firewall, and headers. Enable login protection in one plugin only.
WP Ghost and Wordfence are fully compatible. WP Ghost prevents attacks by changing paths and blocking bots. Wordfence detects threats with its application firewall, malware scanner, and live traffic. Enable shared features in one plugin only.
WP Ghost and WP Hide overlap on path security. WP Ghost covers everything WP Hide offers plus firewall, 2FA, brute force protection, and country blocking. Feature comparison and migration guide included.
WP Ghost and Shield Security complement each other. WP Ghost handles path security and firewall. Shield handles automated bot detection, spam filtering, and file scanning. Enable shared features in one plugin only.
WP Ghost and Solid Security complement each other. WP Ghost handles path security and firewall prevention. Solid Security handles monitoring, file detection, site scanning, and alerts. Enable shared features in one plugin only.
Connect new websites to your WP Ghost Premium license or move a license to a different site. Manage connected websites from your WP Ghost Dashboard. Includes license limit info and site removal steps.
Change the default wp_ database prefix to a random one with WP Ghost’s one-click Security Check tool. Prevent SQL injection attacks that target hardcoded WordPress table names.
Give a specific WordPress user access to WP Ghost settings without full admin access. Use the hmwp_manage_settings capability via User Role Editor. Optional: hide WP Ghost from other administrators.
Learn how to configure WP Ghost path security on Flywheel hosting. Activate Safe Mode or Ghost Mode, add redirect rules to Flywheel’s Redirect tool, clear cache, and verify your setup.
WP Ghost and Autoptimize are fully compatible. Learn how to configure both plugins together for optimal WordPress performance and hack prevention, including cache path mapping.
Configure WP Ghost on AWS Lightsail Bitnami WordPress by enabling AllowOverride All or adding rewrite rules to httpd-app.conf. Two options with step-by-step SSH commands and troubleshooting.
WP Ghost is fully compatible with Really Simple SSL. Save Really Simple SSL first, then re-save WP Ghost to ensure correct .htaccess rule order. One-time setup with troubleshooting for mixed content, redirect loops, and rule conflicts.
Configure WP Ghost to work with ManageWP by setting Plugin Loading Hook to Must Use Plugin. Ensures WP Ghost does not block ManageWP worker communication. Includes whitelisting, troubleshooting, and MainWP compatibility.
Use WP Ghost {blank} to remove WordPress class names entirely or {rand} to replace them with random strings. Advanced Text Mapping patterns for maximum CMS fingerprint removal.
WP Ghost adds a security monitoring widget to your WordPress Dashboard showing your security score (0-100), 7-day threats chart, brute force IPs blocked, and alert emails sent. Learn how to read and improve your security metrics.
Configure WP Ghost on Windows IIS by adding rewrite rules to web.config. Requires IIS URL Rewrite module. Step-by-step with 5 screenshots, IIS Manager restart, and Frontend Test verification.
If your theme breaks or site loads slowly after activating WP Ghost, the server is not reading the rewrite rules. Fix for Apache, LiteSpeed, Nginx, IIS, and managed hosting.
Enable AllowOverride All in Apache so WP Ghost .htaccess rewrite rules work. Step-by-step for Ubuntu/Debian and CentOS/RHEL with configtest safety check, mod_rewrite enable, and troubleshooting.