Installation & Setup
This tutorial has moved to the new WP Ghost Knowledge Base where each feature is presented in detail.
- Download the Plugin
- Activate the Plugin in Safe Mode or Ghost Mode
- Related Tutorials
Install WP Ghost (formerly Hide My WP Ghost) on your WordPress site, activate it in Safe Mode or Ghost Mode, and customize your security paths to protect your website from hacker bots and automated attacks.
WordPress powers over 43% of all websites on the internet. That popularity makes it the number one target for automated attacks. According to Patchstack’s 2026 State of WordPress Security report, 11,334 new vulnerabilities were discovered in the WordPress ecosystem in 2025 alone, a 42% increase compared to the year before. And 91% of those vulnerabilities were found in plugins, not WordPress core.
Here is the good news: most of these attacks come from bots, not humans. Bots follow predictable scripts. They look for default WordPress paths like /wp-admin, /wp-login.php, and /wp-content/plugins. If those paths are not where the bots expect them to be, the attack fails before it even starts.
That is exactly what WP Ghost (formerly Hide My WP Ghost) does. It changes and secures those default paths using server rewrite rules, without modifying any WordPress core files. Think of it this way: if bots cannot find the doors, they cannot try to break them down.
This tutorial walks you through everything, from downloading and installing the plugin to activating your first security level and customizing every path available in the Change Paths panel.
Download the Plugin
Why This Step Matters
Every minute you run a WordPress site with default paths exposed, automated bots are scanning for those exact paths. According to security researchers, WordPress faces an average of 90,000 attacks per minute. Getting WP Ghost installed is the fastest way to drop that exposure dramatically.
Download WP Ghost Premium
Your first step is to download WP Ghost from your account.
Install WP Ghost on WordPress
Download the ZIP file from your account, then follow these steps:
- Log in as an Admin on your WordPress site.
- Click Add New.
- Select and upload the hide-my-wp.zip file.
- Once the upload completes, click Activate Plugin.

Complete Plugin Activation
After installing the plugin, go to WP Ghost > Settings in your WordPress dashboard.

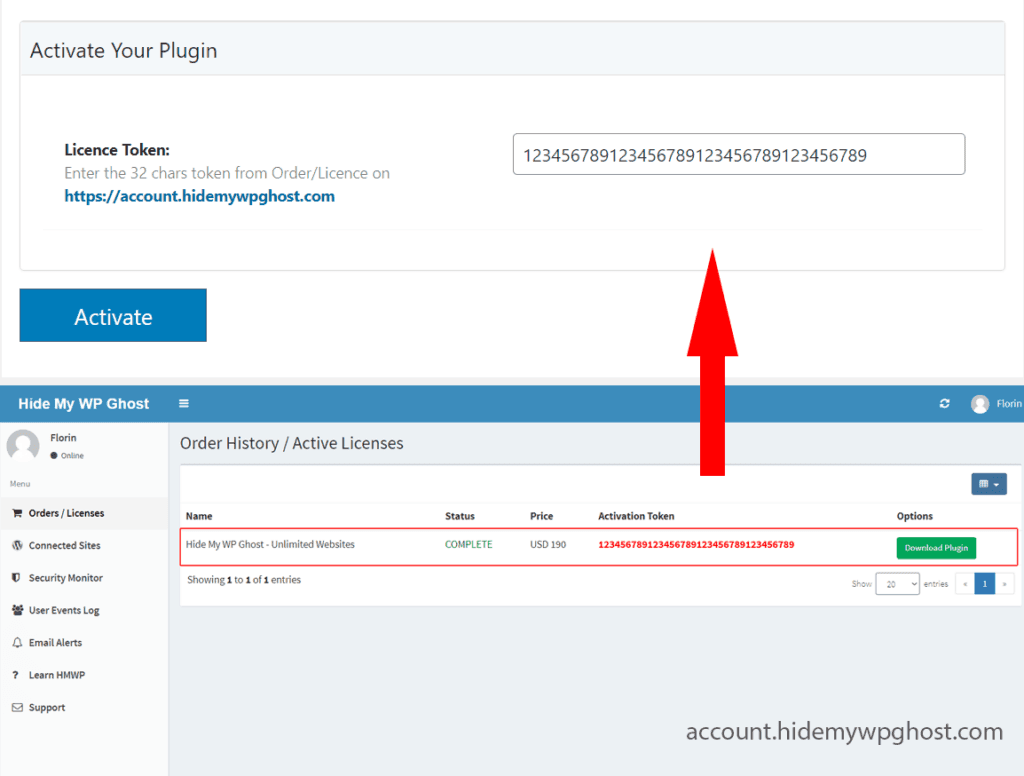
You will see a panel asking for your Activation Token. You can find this token inside your account under Order History > Active Licenses.
Go to: https://account.hidemywpghost.com/user/auth/orders
If you lost your login credentials or never received the account email after purchase, reset your password here: account.hidemywpghost.com/lostpass
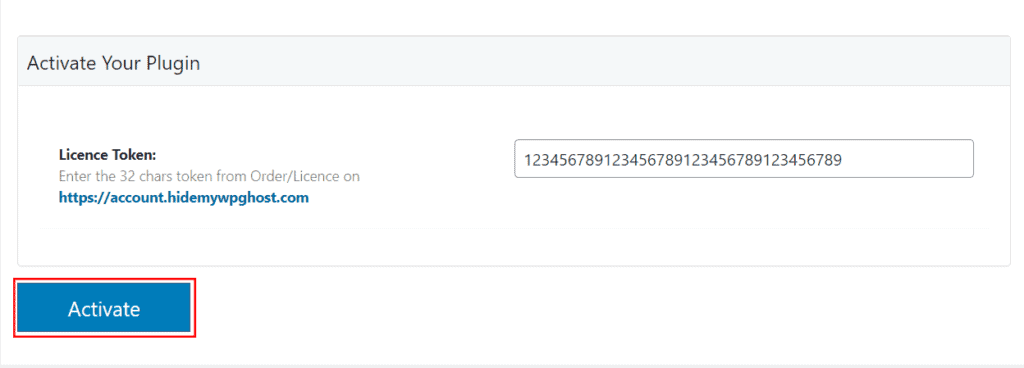
Paste the Activation Token from your account and click the Activate button.
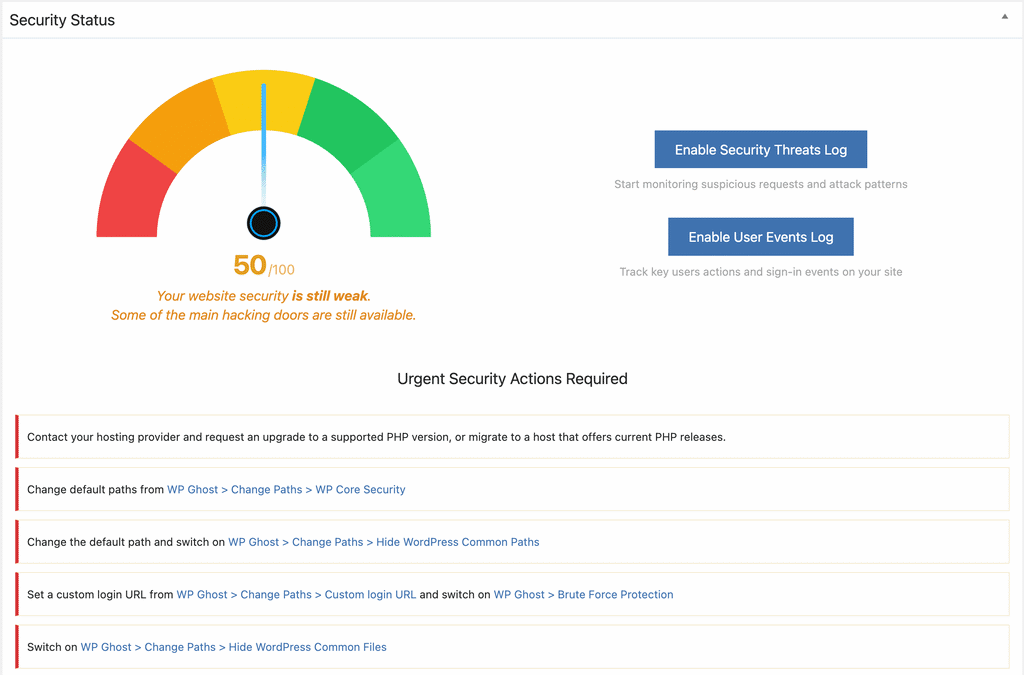
After activation, you land on the Overview section. Here you will see two things:
- A Security Score showing your site’s current level of protection (from 0 to 100).
- A security report listing the first actions you should take to improve your site’s security. WP Ghost generates this list automatically after scanning your site for common issues.
Your next step is to activate Safe Mode or Ghost Mode. This single action will fix most of the issues highlighted in that initial report.
Important: Back up your website before activating Safe Mode or Ghost Mode, just in case of any misconfiguration on your server.
Activate the Plugin in Safe Mode or Ghost Mode
Why Paths Security Matters
Every WordPress installation uses the same default paths: /wp-admin, /wp-login.php, /wp-content/plugins, /wp-content/themes. This uniformity makes it trivially easy for bots to scan thousands of sites per hour. They do not need to guess. They already know exactly where to look.
According to Patchstack, 57.6% of WordPress vulnerabilities can be exploited by a complete outsider without any credentials. Bots target these default paths and attempt brute force logins, SQL injections, and script injections automatically. By changing these paths with WP Ghost, you remove the entry points that bots are programmed to find. The result: significantly fewer successful attacks reaching your site.
Here is a quick comparison of what a default WordPress site looks like versus one protected by WP Ghost:
| Path | Default (Exposed to bots) | With WP Ghost (Secured) |
|---|---|---|
| Admin dashboard | /wp-admin | /custom-admin (or hidden) |
| Login page | /wp-login.php | /my-secret-login |
| Plugins directory | /wp-content/plugins | /modules |
| Themes directory | /wp-content/themes | /views |
| Uploads folder | /wp-content/uploads | /media |
| Core includes | /wp-includes | /core |
| REST API | /wp-json | /api-call |
| AJAX endpoint | /wp-admin/admin-ajax.php | /ajax-call |
The default paths on the left are identical on every WordPress site in the world. The secured paths on the right are unique to your site and invisible to automated scanners.
Choose Your Security Level
Go to WP Ghost > Change Paths > Level of Security and choose between Safe Mode or Ghost Mode.
Learn the differences between Safe Mode and Ghost Mode here.

What Safe Mode Changes
Safe Mode is the recommended starting point. It changes the following paths with predefined secure alternatives:
- Login Path: /wp-login.php
- Core Contents Path: /wp-content
- Core Includes Path: /wp-includes
- Uploads Path: /wp-content/uploads
- Plugins Path: /wp-content/plugins
- Themes Path: /wp-content/themes
- Comments Path: /wp-comments-post.php
Important: WP Ghost does NOT physically move or rename any files on your server. It uses rewrite rules in your server configuration to change the visible paths. Your actual files stay exactly where they are.
When you select Safe Mode, a popup appears showing all the predefined paths. Review them and click Continue >>.
What Ghost Mode Changes

Ghost Mode includes everything from Safe Mode plus additional protections. It changes all the paths listed above and also secures:
- Admin Path: /wp-admin
- Login Path: /wp-login.php
- Ajax URL: /wp-admin/admin-ajax.php
- Core Contents Path: /wp-content
- Core Includes Path: /wp-includes
- Uploads Path: /wp-content/uploads
- Plugins Path: /wp-content/plugins
- Themes Path: /wp-content/themes
- Comments Path: /wp-comments-post.php
Ghost Mode also uses rewrite rules and does not physically change any files. If you experience any compatibility issues with Ghost Mode, switch to Safe Mode as a stable alternative.
When you select Ghost Mode, a popup shows all predefined paths. Review them and click Continue >>.
Verify the Frontend Login
After you confirm either mode by clicking Save, a popup will ask you to perform a Frontend Login test. This makes sure CSS and JS files load correctly on your site.
Follow the instructions on screen. If everything looks good, click Yes, it’s working.
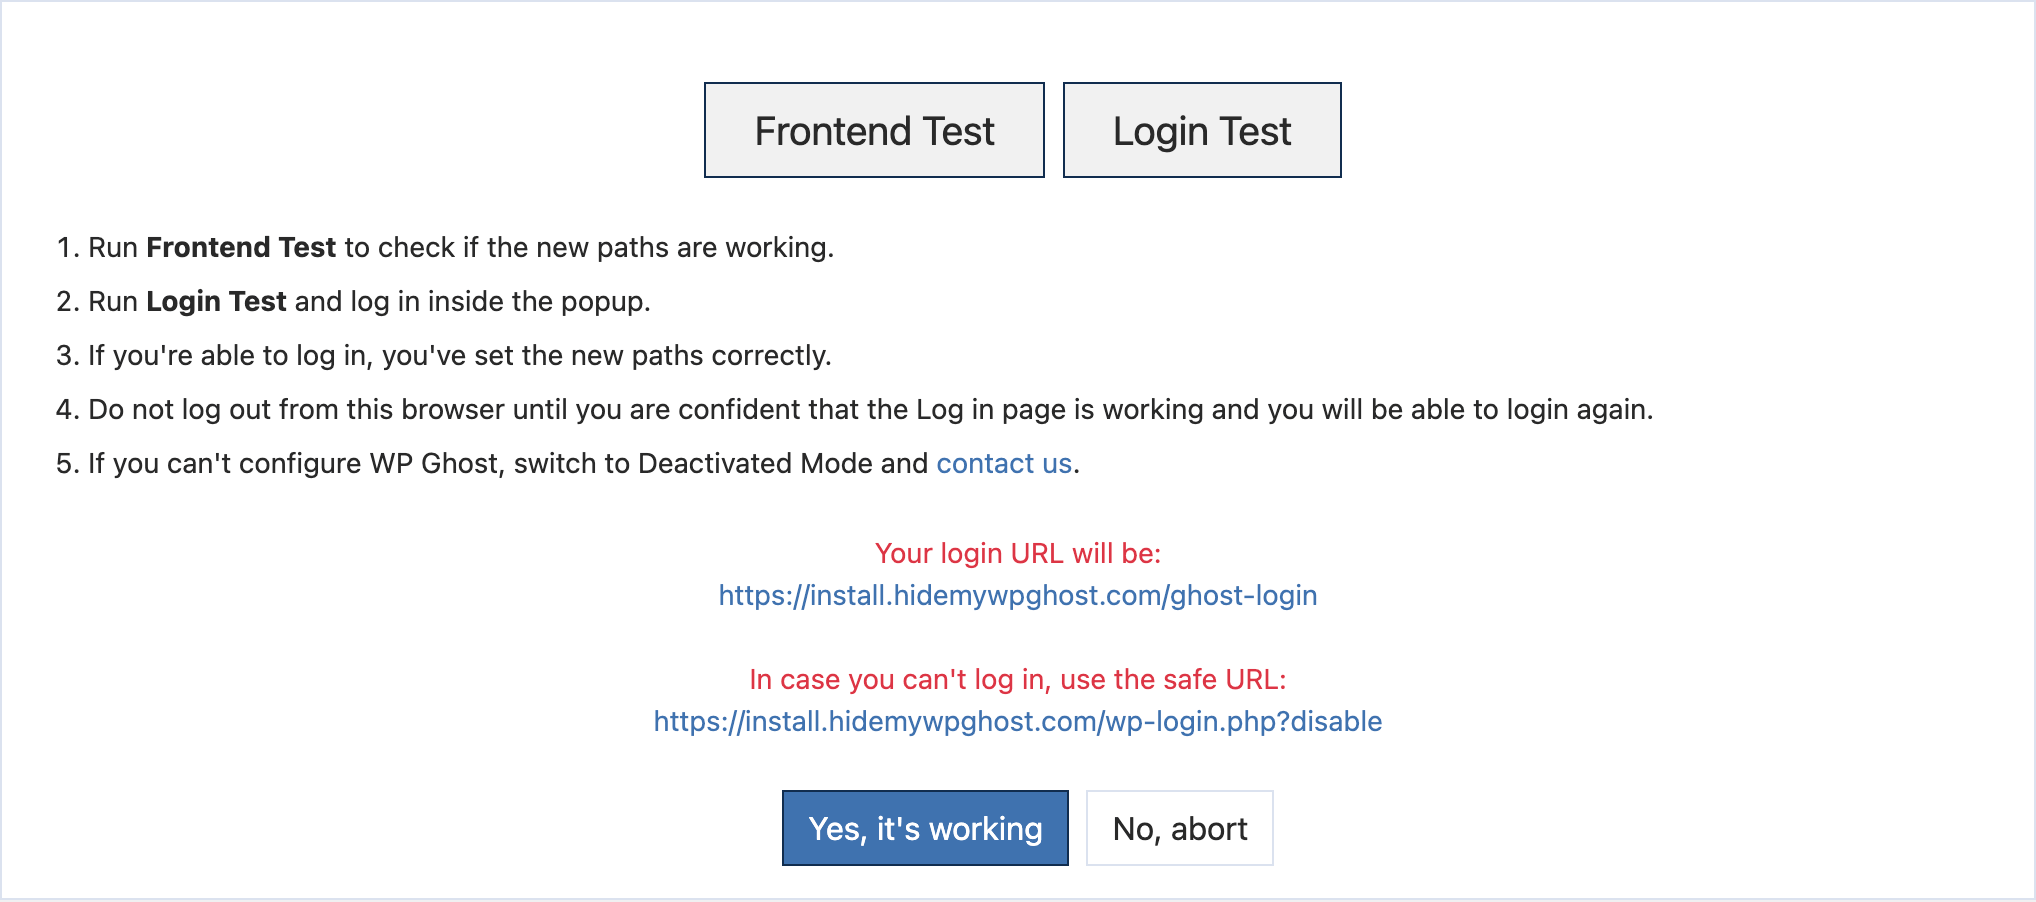
This verification popup appears on Apache servers. If you are running NGINX, you will see different instructions at the top of the screen instead.
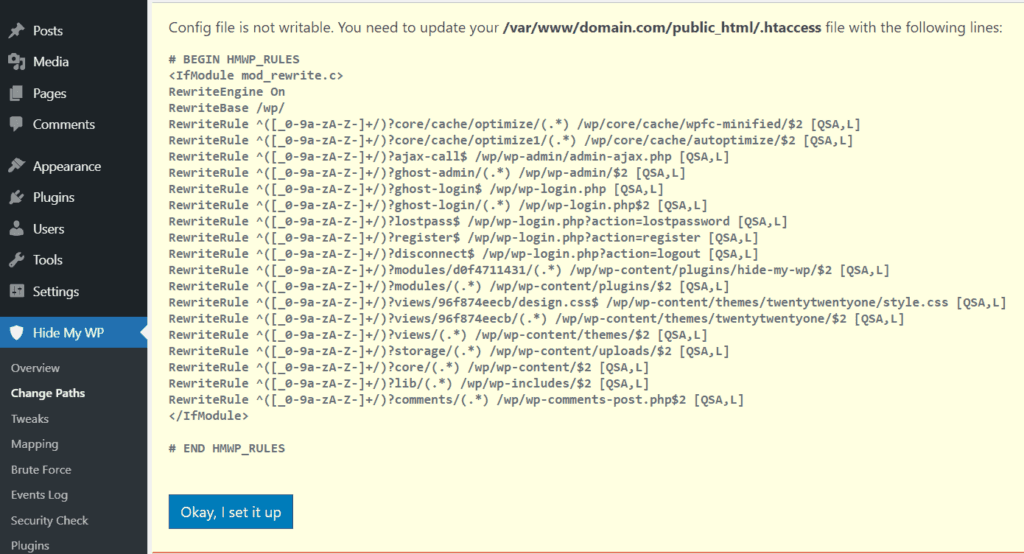
Manual Server Configuration (If Needed)
If WP Ghost cannot write the rewrite rules to your config files automatically (.htaccess for Apache, nginx.conf for NGINX, web.config for IIS), you will be asked to add them manually. Follow the on-screen instructions and click Okay, I set it up.
If you are running NGINX, you need access to the nginx.conf file or a managed hosting plan. Add the config line once, and all rewrite rules will load from the hidemywp.conf file automatically.
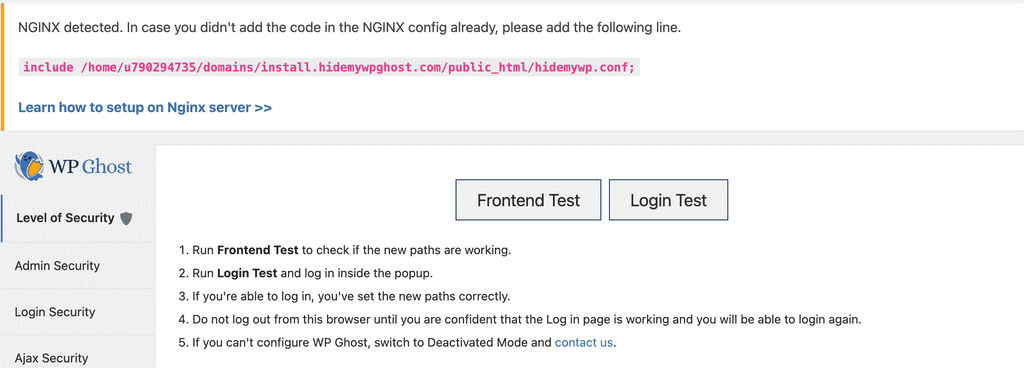
Learn how to include the config line in NGINX.
NGINX servers: Restart NGINX after each customization with the command: sudo nginx -s reload
Apache servers: Make sure AllowOverride All is set for your directory in httpd.conf or apache2.conf.
Customize Your Paths Further
Once Safe Mode or Ghost Mode is active, the paths are changed with predefined values. But you can fully customize every single path using the panels in the left menu.
Remember: You need to memorize or bookmark your new login path. You will use it every time you access your dashboard.
Here is every panel you can customize, and what each one does:
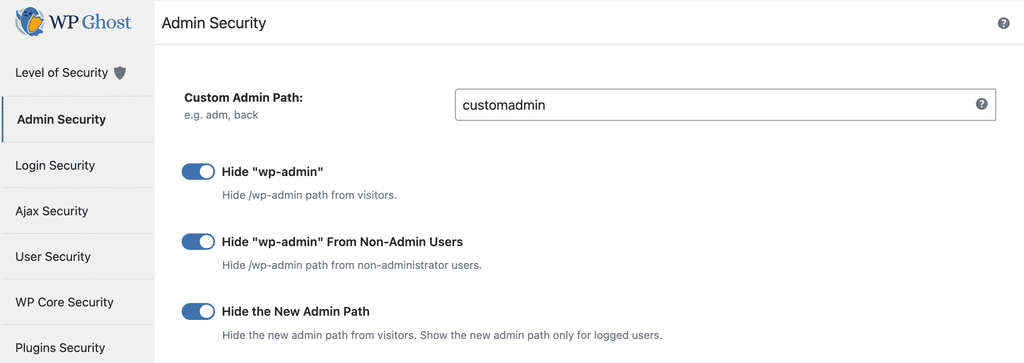
Admin Security
Go to Admin Security to customize the wp-admin path. This is recommended but not mandatory, as some servers do not support wp-admin path customization. You can also choose to hide the old wp-admin from visitors in this panel. Learn more in the Change wp-admin Path tutorial.
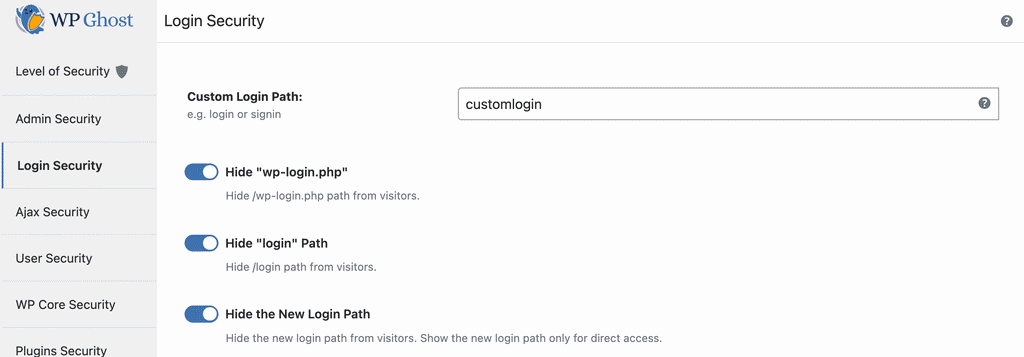
Login Security
Go to Login Security to customize the wp-login.php path and hide it from visitors. Do not use words like “admin” or “login” in your custom path, as bots try those by default. Learn more in the Change Login Path tutorial.
WP Ghost automatically checks if another plugin has already customized the login path. If a conflict is detected, you will see a notification. Keep in mind that installing another plugin with login path customization after WP Ghost might create conflicts if that plugin does not perform the same check.
Additional customizations available in this panel: the Lost Password Path, the Register Path, and the Logout Path. For WordPress Multisite, an Activation Path option is also included.
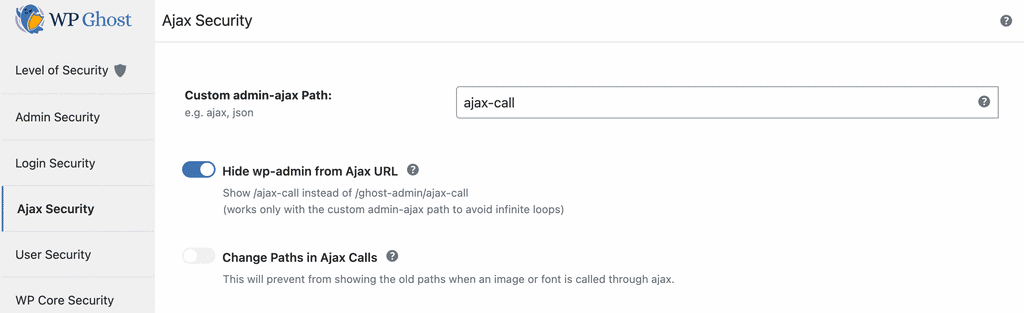
Ajax Security
Go to Ajax Security to customize the admin-ajax.php path on your frontend. You can also hide wp-admin from the Ajax URL (showing /ajax-call instead of /customadmin/ajax-call in Ghost Mode) and enable Change Paths in Ajax calls to prevent old paths from appearing when images or fonts load through Ajax. Learn more in the Change Ajax Path tutorial.
User Security
Go to User Security to customize the author path. You can also hide the Author ID URL so that URLs like domain.com?author=1 will not reveal your login username. This matters because bots use author enumeration to discover admin usernames for brute force attacks. Learn more in the Change Author Path tutorial.

WP Core Security
Go to WP Core Security to customize and secure the WordPress common paths. From this panel you can customize the wp-content path, the wp-includes path, the uploads path, and the comments path.
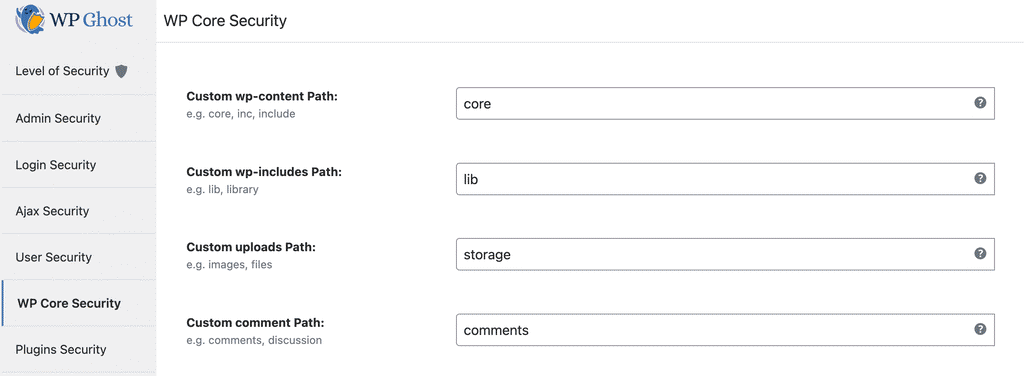
After customizing path names, you can also hide old paths entirely and select which file extensions to block on old paths (excluding images).
Two more important options in this section:
Hide WordPress Common Files – blocks access to files like wp-config.php, wp-config-sample.php, readme.html, and license.txt. These files can reveal your WordPress version and other details attackers use during reconnaissance.

Disable Directory Browsing – prevents anyone from viewing the contents of your site directories. Without this, a visitor could browse your uploads or plugins folder directly. See an example here of what potential attackers see when directory browsing is disabled.

Plugins Security
Go to Plugins Security to customize the plugins path and individual plugin names on the frontend.
You can set a custom plugins path (for example, changing wp-content/plugins to “modules”):
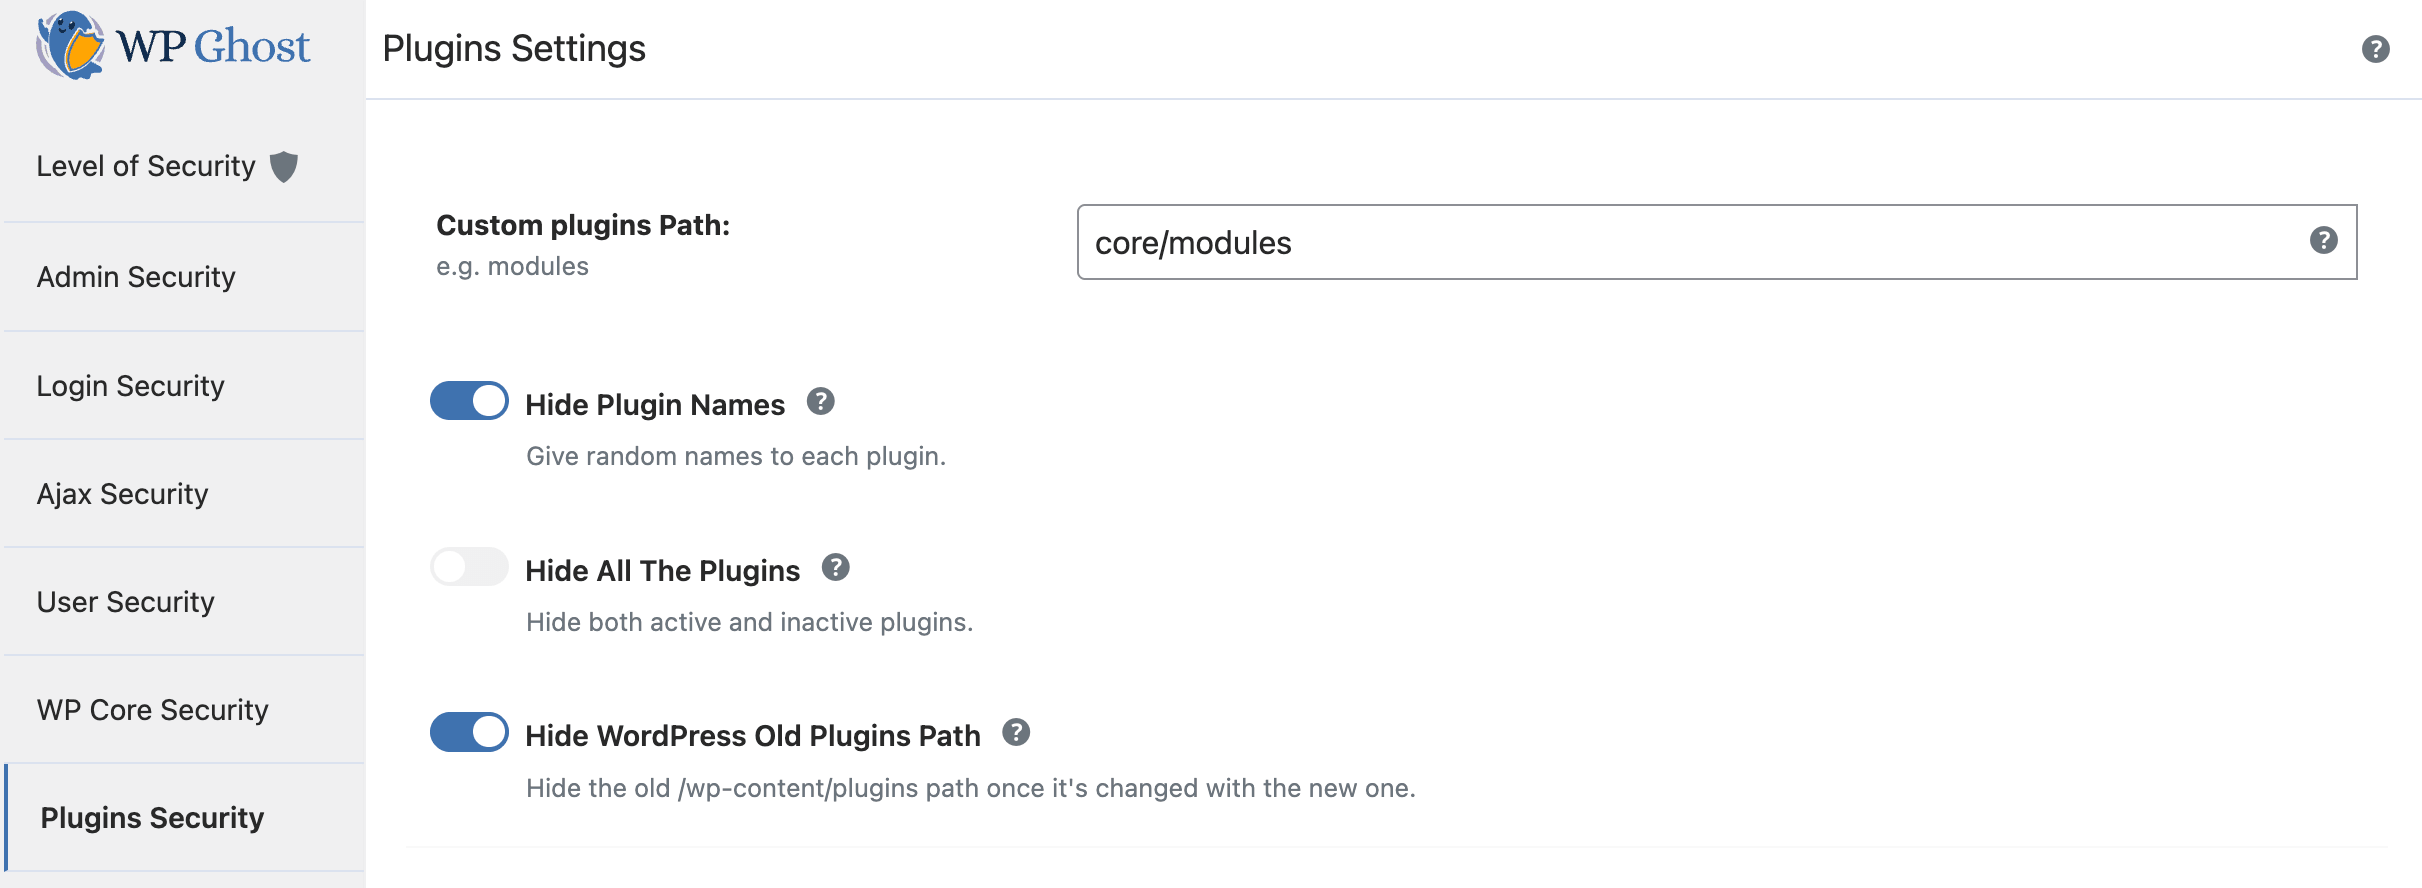
Additional options in this panel:
Hide Plugin Names – assigns random names to each active plugin. You can also enable Hide All the Plugins to include deactivated plugins.
Hide WordPress Old Plugin Path – hides the old /wp-content/plugins path after it has been changed.
Custom Plugin Names (Advanced) – toggle Show Advanced Options to manually rename individual plugins instead of using random names.
To rename a plugin:
- Select a plugin from the drop-down list. WP Ghost detects all active plugins automatically.
- Type a custom name. Do not reuse words from your Custom Plugins Path or other custom paths.
In this example, the WooCommerce plugin has been renamed to “shop”:

You can rename as many plugins as you want. Click the X to remove a custom name and revert to the random name.
For WordPress Multisite, WP Ghost displays all plugins regardless of the Hide All the Plugins setting.
Themes Security
Go to Themes Security to customize the themes path and individual theme names.
You can set a custom themes path (for example, changing wp-content/themes to “views”):
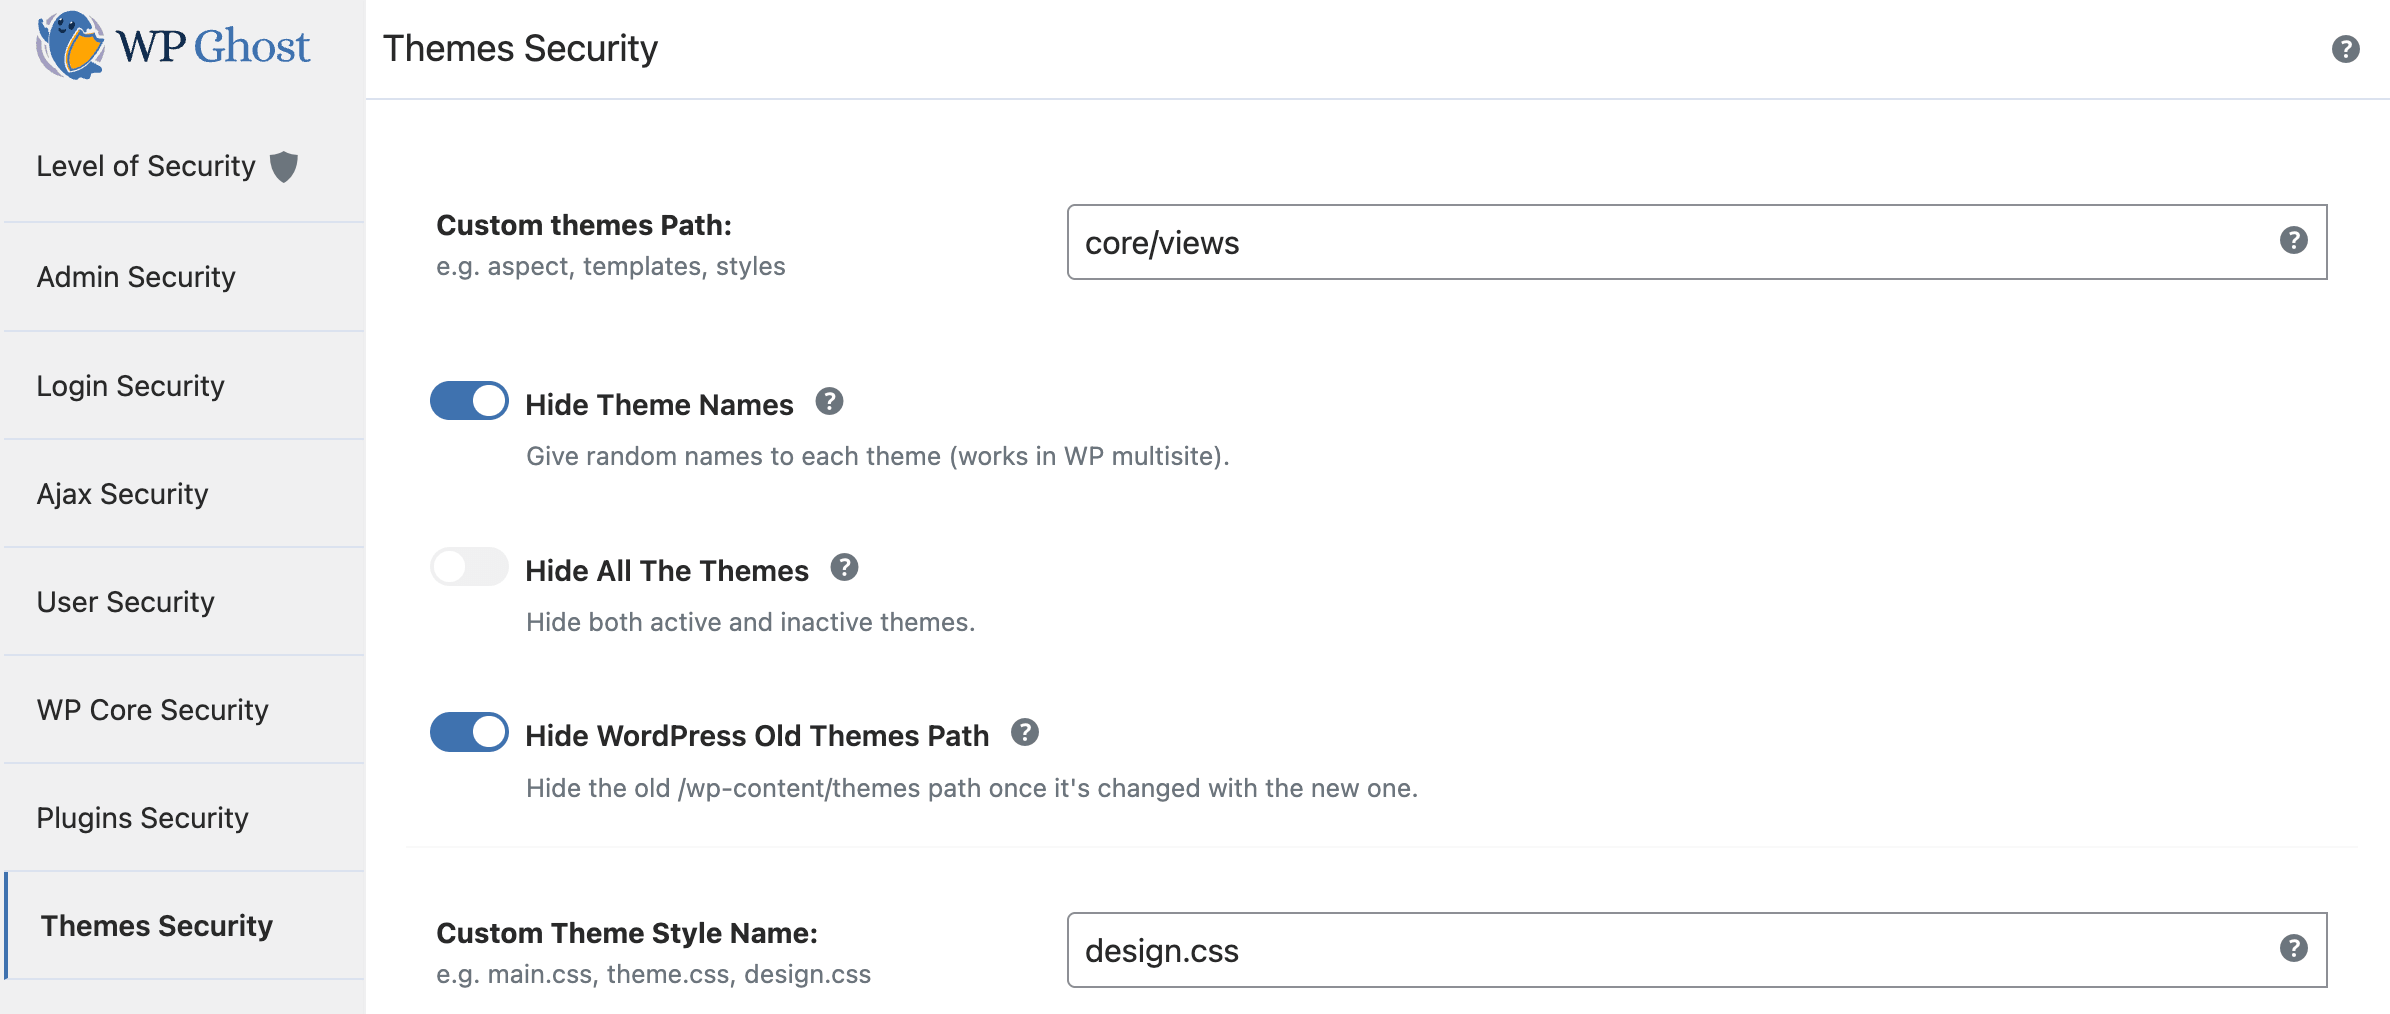
Additional options in this panel:
Hide Theme Names – assigns random names to each theme, including on Multisite.
Hide WordPress Old Themes Path – hides the old /wp-content/themes path after changing it.
Customize Theme Style Name – rename the default style.css file to something custom.

Custom Theme Names (Advanced) – toggle Show Advanced Options to manually rename individual themes.

To rename a theme:
- Select a theme from the drop-down list. WP Ghost detects all themes, including deactivated ones.
- Type a custom name. Do not reuse words from your Custom Themes Path or other custom paths.
You can rename as many themes as you want. Click the X to remove a custom name.
API Security
Go to API Security to customize the REST API path and manage XML-RPC access. Learn more in the Change REST API Path tutorial.
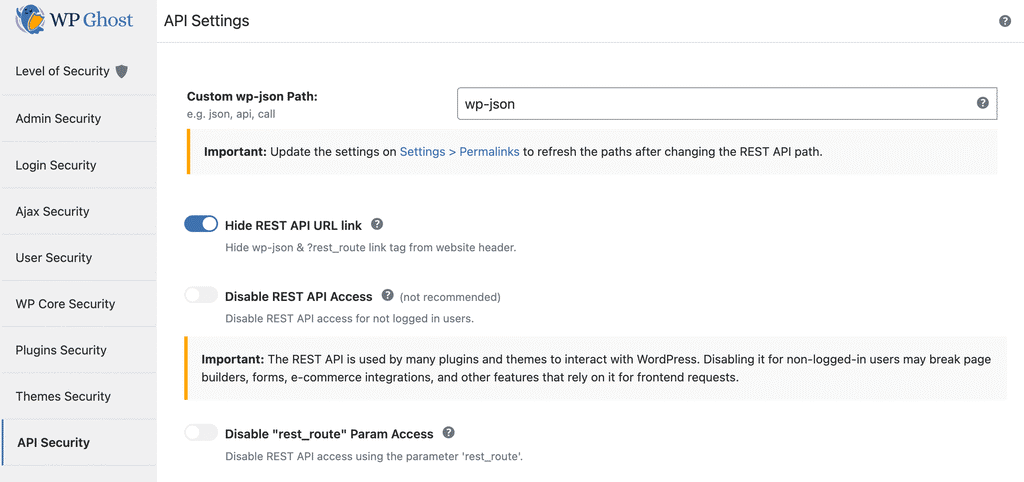
In both Safe Mode and Ghost Mode, WP Ghost keeps the default wp-json as the custom path by default because many plugins still rely on this path to access the REST API index. WP Ghost will hide this path from the frontend source code.
You also have the option to disable REST API access for visitors who are not logged in. When enabled, only logged-in users can access the API. This prevents most errors that could appear in the admin area while keeping your API protected.
Additional options: Disable XML-RPC access and disable RSD (Really Simple Discovery) endpoint from XML-RPC.
Firewall and Headers
Go to Firewall and Headers to activate the 7G/8G Firewall, add security headers, and protect against script and SQL injections. Learn more about Firewall and Security Headers.
Other Options
Go to Other Options to customize the category path and tags path.
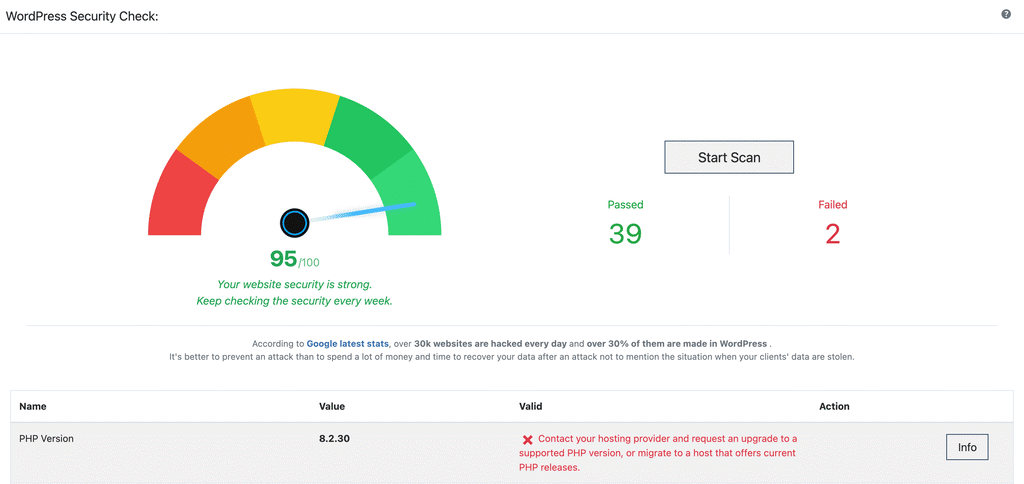
Save and Run a Security Check
After customizing your paths, click the Save button to apply all changes.
Then go to WP Ghost > Security Check and run a full test. This verifies that all settings are applied correctly. If there are still issues to fix, click the Info button next to each item to learn more. Many issues can be resolved with a single click using the Fix it button.

What To Do Next
Now that WP Ghost is active and your paths are secured, here are the next features to configure for complete protection:
- Secure Your WordPress Paths – the detailed tutorial for path customization
- Activate Brute Force Protection – protect login forms with reCAPTCHA and attempt limits
- Hide From WordPress Theme Detectors – make your site invisible to tools like BuiltWith and Wappalyzer
- Activate Security Events Log – monitor suspicious activity on your site
Simulate CMS
After activating Safe Mode or Ghost Mode, you can use the CMS Simulator to make your WordPress site appear as if it runs on Drupal or Joomla.
This adds an extra layer of misdirection for theme detectors and hacker bots. Tools like BuiltWith and Wappalyzer will identify your site as Drupal or Joomla instead of WordPress. Bots programmed to target WordPress-specific vulnerabilities will simply skip your site.
To activate it, go to WP Ghost > Tweaks > Change Options, select a Drupal or Joomla version from the CMS Simulator dropdown, and click Save. Learn more in the CMS Simulator tutorial.

Troubleshooting Common Error Messages
If you run into any issues during setup, here are the most common error messages and how to solve them.
The link you followed has expired
This happens if you log into the admin dashboard while checking the Frontend Login. The security codes change when you log in. To fix it, press F5 to refresh the WP Ghost settings page. This reloads the correct security key. Then click Yes, it’s working, and the settings will be saved.
Attention! Please check the rewrite rules in the config file
This error means the rewrite rules are not loading correctly. The cause depends on your server:
NGINX: The rules were not added to the NGINX config file, or the server was not reloaded after saving. Run sudo nginx -s reload after adding the rules.
Apache: AllowOverride is set to “None” instead of “All” in your server config. The rewrite rules in .htaccess will not load until this is changed. Learn how to set AllowOverride All.
LiteSpeed: Same issue as Apache. AllowOverride must be set to “All”. Learn more about LiteSpeed setup.
IIS: The URL Rewrite module is not installed. Install the IIS URL Rewrite add-on so the rules can load from the config file. Learn more about IIS setup.
403 Forbidden Error caused by ModSecurity
ModSecurity is an open-source web application firewall used by many hosting providers. If your host has ModSecurity Rule #212340 enabled (which most do by default), it can block the Code Editor from working in Ghost Mode.
To fix this, contact your hosting provider and ask them to either disable Rule 212340 or whitelist your IP address from that rule. Once done, the 403 error will stop appearing.
Related Tutorials
Continue setting up WP Ghost with these guides:
Customize All WordPress Paths with WP Ghost – detailed guide for every path option available in the Change Paths panel.
Brute Force Attack Protection – configure reCAPTCHA, attempt limits, and IP blocking for login forms.
Activate Security Tweaks – enable additional hardening options to remove WordPress fingerprints.
Firewall and Geo Security – set up the 8G Firewall, security headers, and country blocking.
Two-Factor Authentication – protect user accounts with 2FA by code, email, or passkeys.
Website Security Check – run a complete security audit with one-click fixes.
Security Presets – apply recommended security configurations in one click.
Safe Mode vs Ghost Mode – understand when to use each security level.
How to Disable WP Ghost in Case of Error – recover access if something goes wrong during setup.