How to Customize WordPress Paths with WP Ghost – Complete Guide
This tutorial has moved to the new WP Ghost Knowledge Base where each feature is presented in detail.
- Why Path Security Matters
- Change WordPress Admin Path
- Change WordPress Login Path
- Hide Language Switcher on Login Page
- Change Author Path and Hide Author ID
- Change Lost Password Path
- Change Register Path
- Change Logout Path
- Change Activation Path
- Change admin-ajax.php Path
- Change Paths in Ajax Calls
- Change wp-content Path
- Change wp-includes Path
- Change wp-content/uploads Path
- Change Comments Path
- Change Plugins Path and Names
- Change Themes Path and Names
- Change REST API Path
- Disable XML-RPC Access
- Hide RSD Endpoint from XML-RPC
- Hide WordPress Common Paths
- Hide WordPress Common Files
- Firewall, Security Headers, and Theme Detector Blocking
- Disable Directory Browsing
- Related Tutorials
Customize every WordPress path in WP Ghost (formerly Hide My WP Ghost) to secure your admin, login, plugins, themes, REST API, and core directories from automated bot attacks.
Every WordPress site on the internet shares the same default file structure. The admin panel lives at /wp-admin. The login page sits at /wp-login.php. Plugins are stored in /wp-content/plugins. This predictability is exactly what makes WordPress sites so easy to attack at scale.
According to Patchstack’s 2026 report, 91% of WordPress vulnerabilities are found in plugins. Bots do not need to guess where your plugins are – they already know the exact path. By customizing these paths with WP Ghost, you remove the default targets that automated scanners rely on.
This tutorial covers every path you can customize in the WP Ghost > Change Paths panel, from admin and login to plugins, themes, REST API, and more. Each section explains what the feature does, why it matters for your security, and how to activate it.
Why Path Security Matters
Automated bots are responsible for over 51% of all web traffic, according to security research from Imperva. These bots systematically probe WordPress sites using the same default paths. When a bot sends a request to /wp-admin and gets a response, it confirms the site runs WordPress and begins escalating its attack with brute force attempts, SQL injection, and script injection.
WP Ghost breaks this pattern by replacing all default paths with custom ones. The bot sends a request to /wp-admin, gets a 404 error, and moves on to the next target. Your site never even enters the attack pipeline.
Here is what changes when you customize your paths:
| What bots look for | Default path (vulnerable) | With WP Ghost (secured) |
|---|---|---|
| Admin dashboard | /wp-admin | Your custom name |
| Login page | /wp-login.php | Your custom name |
| AJAX endpoint | /wp-admin/admin-ajax.php | Your custom name |
| REST API | /wp-json | Your custom name |
| Plugin files | /wp-content/plugins/plugin-name | Custom path + random names |
| Theme files | /wp-content/themes/theme-name | Custom path + random names |
| Uploads folder | /wp-content/uploads | Your custom name |
| Author pages | /author/username | Custom path + hidden ID |
WP Ghost does not physically move or rename any files on your server. All path changes are handled through server rewrite rules, which means zero risk to your WordPress core, themes, or plugins. If you ever deactivate the plugin, your original paths are immediately accessible again.
Change WordPress Admin Path
The wp-admin path is the single most targeted path on any WordPress site. Every hacker bot on the internet knows it by default, and it is the first URL they probe when scanning for WordPress installations.
By changing the wp-admin path, you make the admin dashboard invisible to automated scanners. When a bot tries to access /wp-admin on your site, it gets a 404 error instead of the admin interface.
To change it, go to WP Ghost > Change Paths > Admin Security and enter your custom name in the Custom wp-admin Path field.
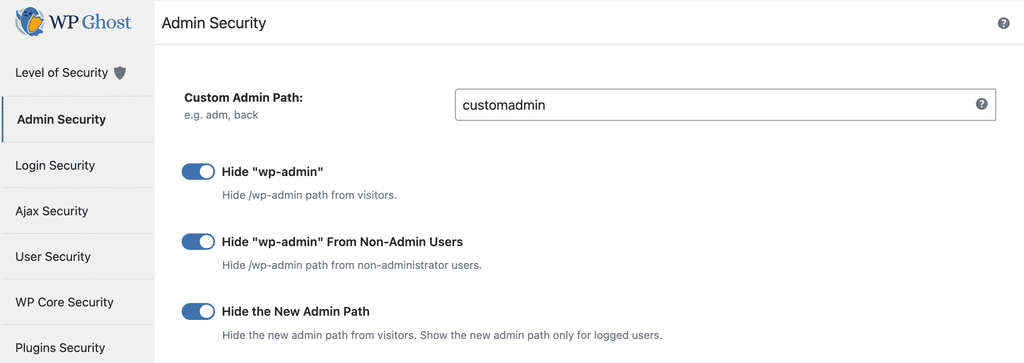
For the full walkthrough including hiding wp-admin from non-admin users and running a security check after the change, see the dedicated Change and Secure wp-admin Path tutorial.
Change WordPress Login Path
The paths wp-login.php, login.php, and login are the first targets for brute force attacks. Bots cycle through these URLs to find the login form, then start guessing credentials. Research shows that 8% of WordPress sites are hacked due to weak or stolen passwords, and most of those attacks begin by locating the default login page.
Changing the login path is one of the most effective things you can do to prevent unauthorized access. Once changed, bots trying the default login URLs will get a 404 error and move on.
To change it, go to WP Ghost > Change Paths > Login Security and enter your custom name in the Custom Login Path field.
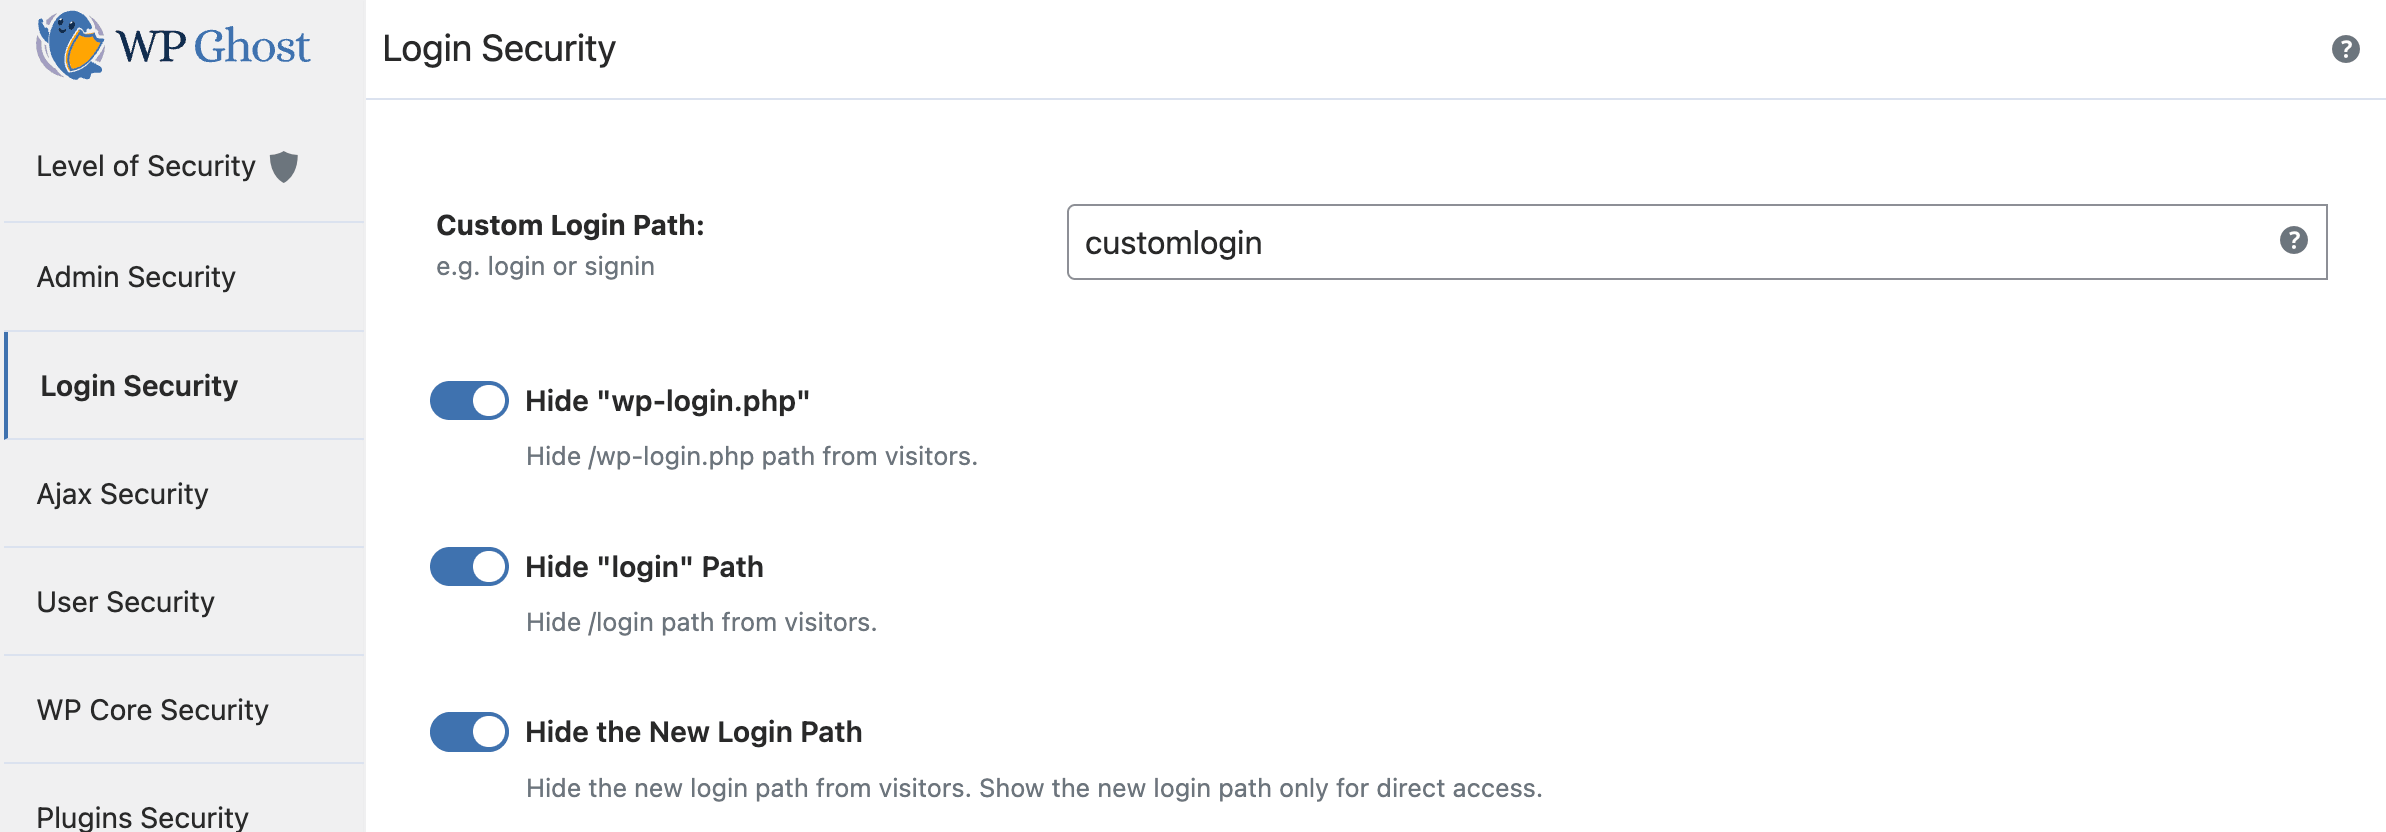
Avoid using words like “admin” or “login” in your custom path. Bots try common variations like /admin, /login, /user-login, and /dashboard by default. Choose something unique to your site.
For the complete guide, see the dedicated Change WordPress Login Path tutorial.
Hide Language Switcher on Login Page
If your site has multiple languages activated in Settings > General, or if you use a multilingual plugin, WordPress adds a language selector dropdown on the login page. This dropdown can reveal that your site runs WordPress, even after you changed the login path.

To remove it, go to WP Ghost > Change Paths > Login Security and switch on Hide Language Switcher.

Change Author Path and Hide Author ID
Author enumeration is one of the simplest ways bots discover your admin username. By visiting a URL like yourdomain.com/?author=1, WordPress automatically redirects to yourdomain.com/author/username/, revealing the login name of the user with ID 1, which is almost always the site administrator.
Once a bot has your username, it only needs to crack the password. This is why securing the author path and hiding author IDs is a critical step in preventing brute force attacks.
To change the author path, go to WP Ghost > Change Paths > User Security and enter a new name in the Custom Author Path field.
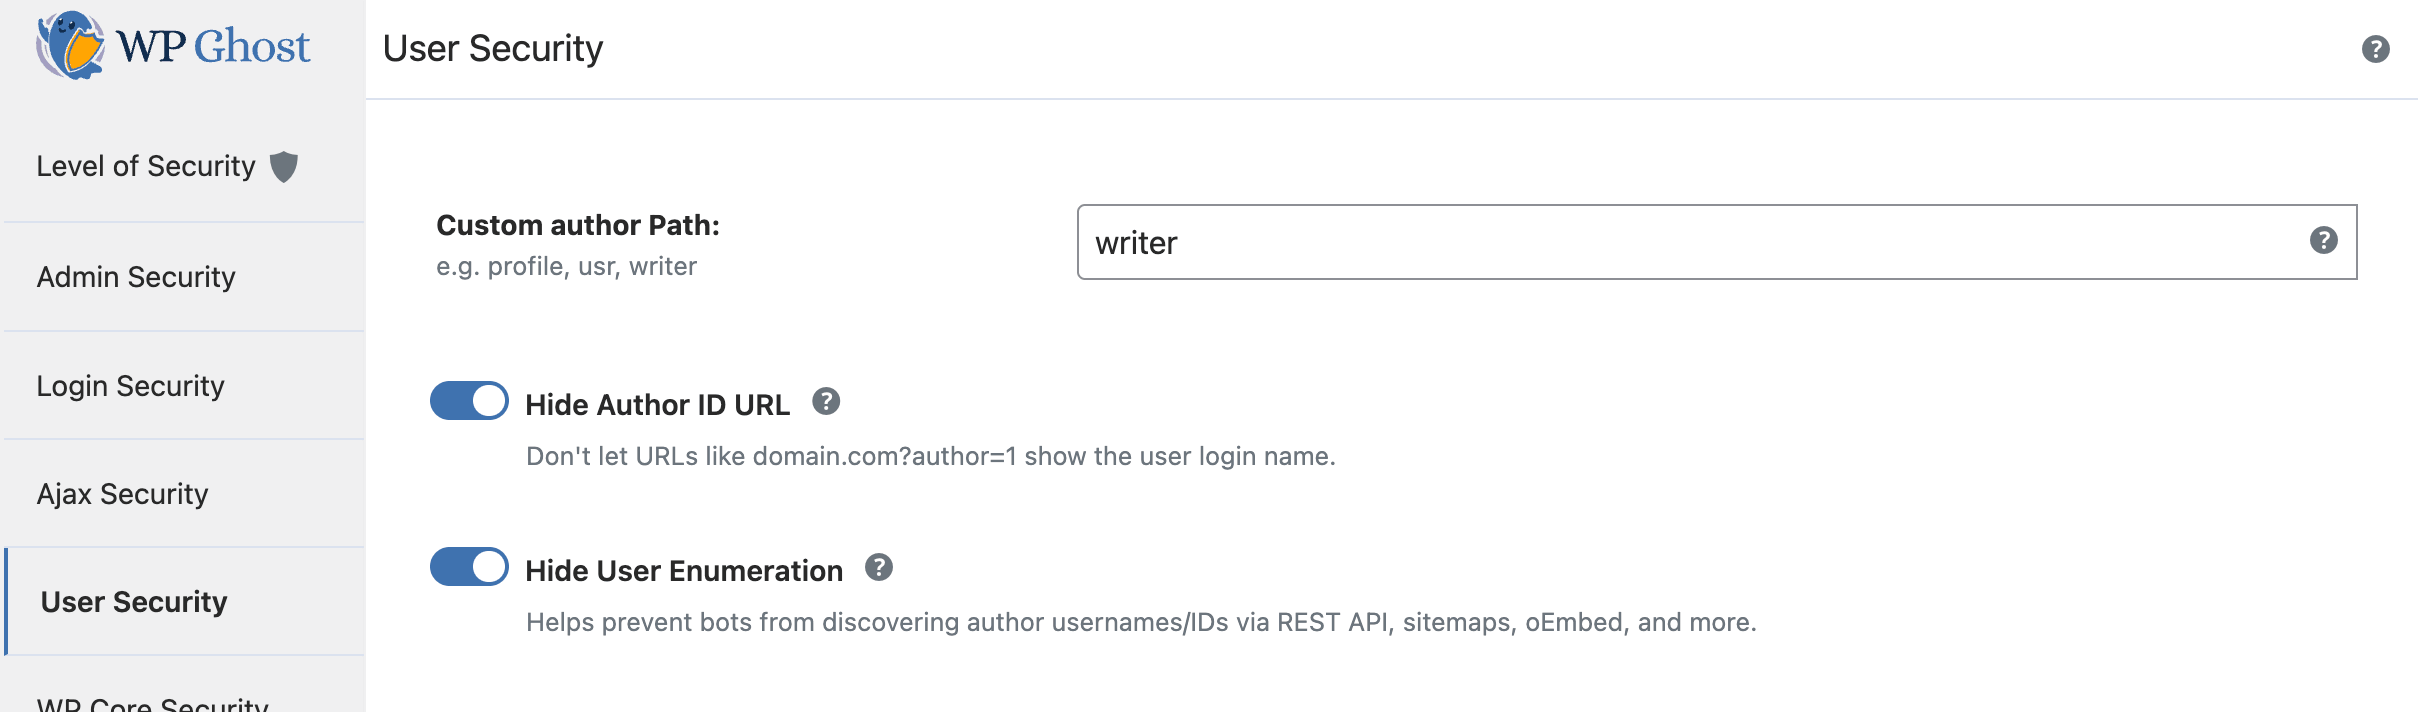
To prevent author ID enumeration, switch on Hide Author ID URL in WP Ghost > Change Paths > User Security.

With Hide Author ID URL enabled, URLs like yourdomain.com/?author=1 will no longer redirect to the author page or reveal the username. This blocks one of the most common reconnaissance techniques bots use before launching brute force attacks.
For the complete guide, see the dedicated Change Author Path and Hide Author ID tutorial.
Change Lost Password Path
The default lost-password path can be abused by bots to trigger spam password reset emails or to confirm that a username exists on your site. Changing this path adds another layer of protection to your authentication system.
Go to WP Ghost > Change Paths > Login Security and enter a new name in the Custom Lost Password Path field.

For the complete guide, see the dedicated Change Lost Password Path tutorial.
Change Register Path
If your site allows user registration, bots can target the default register path to create spam accounts. Changing this path blocks automated registration attempts at the source.
Go to WP Ghost > Change Paths > Login Security and enter a new name in the Custom Register Path field.

For the complete guide, see the dedicated Change Register Path tutorial.
Change Logout Path
Changing the logout path is not mandatory, but it is useful when you have a customized dashboard for customers. The custom logout path also works with plugins like WooCommerce on the account page, keeping the experience consistent and branded.
Go to WP Ghost > Change Paths > Login Security and enter a new name in the Custom Logout Path field.

For the complete guide, see the dedicated Change WordPress Logout Path tutorial.
Change Activation Path
This option is available on WordPress Multisite installations. When you add a new user to a sub-site, WordPress sends an activation email with a link containing the default wp-activate.php path. Changing this path keeps your CMS identity private from new users.
Go to WP Ghost > Change Paths > Login Security and enter a new name in the Custom Activation URL field.

For the complete guide, see the dedicated Change Activation Path tutorial.
Change admin-ajax.php Path
All frontend AJAX calls in WordPress go through the default URL /wp-admin/admin-ajax.php. Attackers exploit this endpoint to upload malicious scripts and probe your server. Changing this path eliminates one of the most frequently targeted attack vectors.
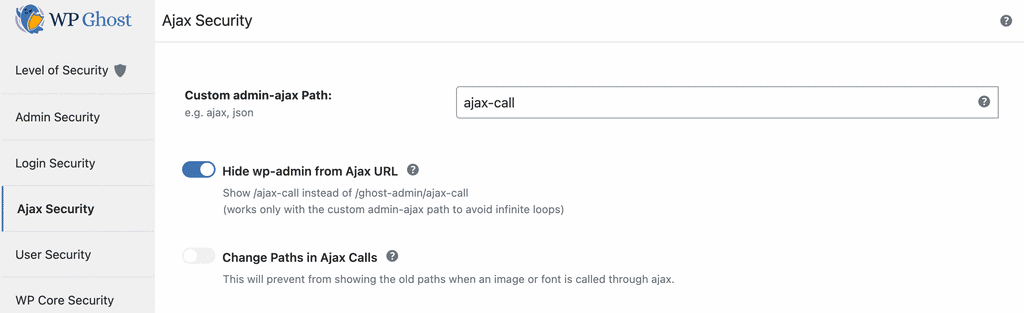
To change it, go to WP Ghost > Change Paths > Ajax Security and enter a new name in the Custom admin-ajax Path field.
You can also hide wp-admin from AJAX URLs. Switch on Hide wp-admin from ajax URL in WP Ghost > Change Paths > Ajax Security. This shows /ajax-call instead of /customadmin/ajax-call in Ghost Mode.

For the complete guide, see the dedicated Change admin-ajax.php Path tutorial.
Change Paths in Ajax Calls
Some plugins use lazy loading to load images and videos through AJAX requests. When this happens, the old WordPress paths can leak through those requests, revealing your site’s structure even after you changed the main paths.
Similarly, if your theme loads CSS stylesheets through AJAX, you might see duplicate styles if paths are inconsistent.
To prevent this, go to WP Ghost > Change Paths > Ajax Security and switch on Change Paths in Ajax Calls.

Change wp-content Path
The wp-content directory is the heart of your WordPress installation. It contains all your plugins, themes, and uploaded files. Every theme detector and every hacker bot knows to look for /wp-content in the source code to confirm a site runs WordPress.
Changing this path is essential if you want to make your site invisible to theme detectors like BuiltWith, Wappalyzer, and WhatCMS. Once changed, you can also restrict access to the old wp-content path.
Go to WP Ghost > Change Paths > WP Core Security and enter a new name in the Custom wp-content Path field.

For the complete guide, see the dedicated Change wp-content/uploads Path tutorial.
Change wp-includes Path
The wp-includes directory contains WordPress core scripts and stylesheets. Its presence in your source code is another clear indicator that your site runs WordPress. Changing this path removes that fingerprint from your frontend.
Go to WP Ghost > Change Paths > WP Core Security and enter a new name in the Custom wp-includes URL field.

Change wp-content/uploads Path
All uploaded images, documents, and media files live in the wp-content/uploads directory by default. This path appears frequently in your source code and is a strong signal to theme detectors and bots. You can also restrict access to vulnerable scripts in the uploads directory after changing this path.
Go to WP Ghost > Change Paths > WP Core Security and enter a new name in the Custom uploads Path field.

Change Comments Path
The default wp-comments-post.php path is used by spam bots to submit automated comments on your site. Changing this path breaks the connection between the bot and your comment system.
Go to WP Ghost > Change Paths > WP Core Security and enter a new name in the Custom comment Path field.

Change Plugins Path and Names
Since 91% of WordPress vulnerabilities are found in plugins (according to Patchstack), securing the plugins path is one of the highest-impact actions you can take. WP Ghost provides two layers of protection here: you can change the path to all plugins, and you can automatically assign custom names to each individual plugin.
Go to WP Ghost > Change Paths > Plugins Security and enter a new name in the Custom plugins Path field. For example, change wp-content/plugins to “modules”.
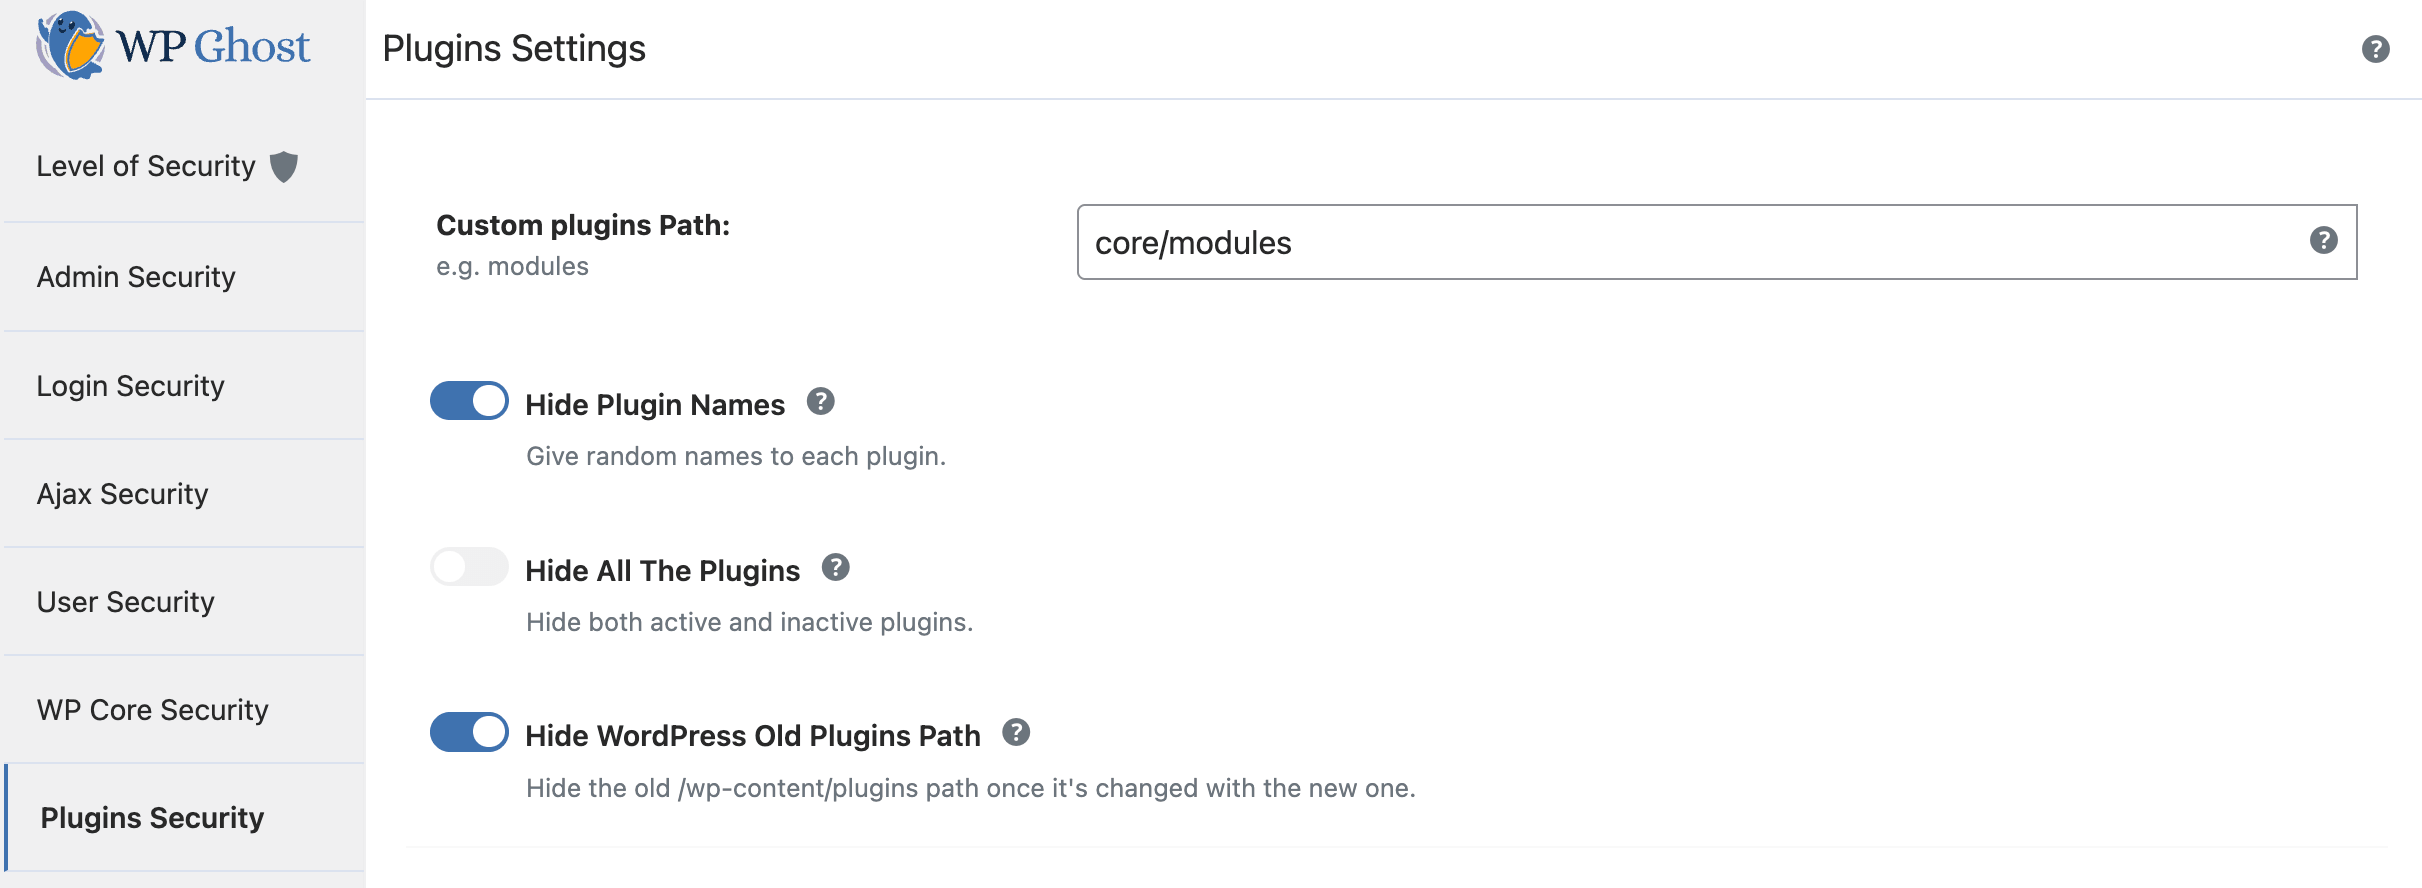
Switch on Hide Plugin Names to assign random names to every active plugin. Enable Hide All the Plugins to include deactivated plugins as well. After changing the path, restrict access to the old path for complete protection.
Custom Plugin Names (Advanced Options)
If you want specific control over individual plugin names instead of random ones, toggle Show Advanced Options. This option only appears when Hide Plugin Names is enabled.

To rename a specific plugin, select it from the dropdown and type your custom name. Use a name that does not match your Custom Plugins Path or any other custom path. WP Ghost auto-detects all active plugins. For WordPress Multisite, all plugins are shown regardless of the Hide All the Plugins setting.
You can rename as many plugins as you want. Click the X icon to remove a custom name and revert to the random name. Any plugin without a custom name keeps its random assignment.
Hide WordPress Old Plugins Path
After changing the plugins path, the old /wp-content/plugins URL might still be accessible. To block it completely, switch on Hide WordPress Old Plugins Path in WP Ghost > Change Paths > Plugins Security.
Change Themes Path and Names
Just like plugins, theme paths can reveal your WordPress identity and specific theme vulnerabilities. WP Ghost lets you change the themes directory path and assign custom names to each individual theme.
Go to WP Ghost > Change Paths > Themes Security and enter a new name in the Custom themes Path field.

Switch on Hide Theme Names to assign random names to all themes. This works on WordPress Multisite installations as well.
Custom Theme Names (Advanced Options)
To manually name individual themes instead of using random names, toggle Show Advanced Options. This option only appears when Hide Theme Names is enabled.
Select a theme from the dropdown (WP Ghost detects all themes, including deactivated ones), type your custom name, and save. Use a name that does not match your Custom Themes Path or other custom paths. Click the X icon to remove a custom name.
Hide WordPress Old Themes Path
After changing the themes path, block access to the old /wp-content/themes URL by switching on Hide WordPress Old Themes Path in WP Ghost > Change Paths > Themes Security.

Change REST API Path
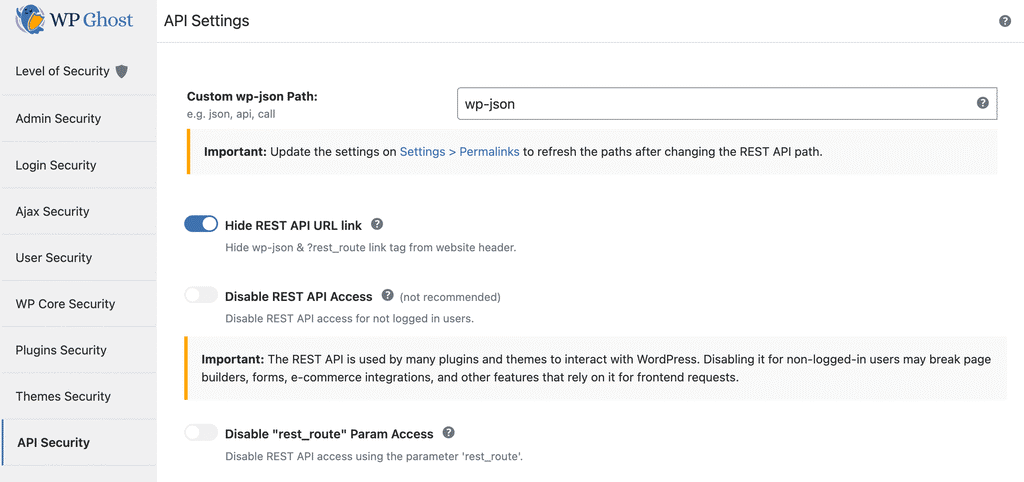
The WordPress REST API exposes your site data through the /wp-json endpoint. While many plugins rely on it for admin actions (including the block editor), leaving it at the default path allows bots to enumerate users, posts, and site configuration data without authentication.
WP Ghost keeps the default wp-json name as the custom path in both Safe Mode and Ghost Mode by default, because many plugins still use this path to access the REST API. However, you can customize it for stronger security.
Go to WP Ghost > Change Paths > API Security and enter a new name in the Custom wp-json Path field.

To hide the REST API link tag from your website header, switch on Hide REST API URL Link in WP Ghost > Change Paths > API Security.

You can also disable REST API access entirely for visitors who are not logged in. When enabled, only authenticated users can access the API. This prevents user enumeration and data scraping while keeping the API functional for your admin area.

For the complete guide, see the dedicated Change REST API Path tutorial.
Disable XML-RPC Access
XML-RPC is an older WordPress API that allows remote applications to interact with your site. While useful for some services, it is also a major target for brute force attacks because WordPress does not limit login attempts through XML-RPC by default. Attackers can send thousands of login attempts in a single request using the system.multicall method.
Before disabling XML-RPC, check if any of your active services depend on it. Read the full guide on XML-RPC to understand when it is safe to disable.
JetPack compatibility: If you use JetPack, you can hide XML-RPC from hackers while allowing JetPack’s servers to access it by adding the following code to the beginning of your .htaccess file:
<Files xmlrpc.php>
Order deny,allow
Deny from all
Allow from 127.0.0.1
Allow from *.wordpress.com
Allow from 192.0.64.0/18
Allow from 185.64.140.0/22
Allow from 2a04:fa80::/29
Allow from 76.74.255.0/22
Allow from 192.0.65.0/22
Allow from 192.0.80.0/22
Allow from 192.0.96.0/22
Allow from 192.0.123.0/22
Satisfy All
ErrorDocument 404 /
</Files>
With this in place, direct access to xmlrpc.php returns a 403 Forbidden error for everyone except the whitelisted IPs.

To completely disable XML-RPC, go to WP Ghost > Change Paths > API Security and switch on Disable XML-RPC access.

Hide RSD Endpoint from XML-RPC
Really Simple Discovery (RSD) is an XML format that makes blog services discoverable by client software. In practice, it adds a meta tag to every page of your site that reveals you are running WordPress. This is one of the first things theme detectors check.
When you activate this option, WP Ghost removes the RSD META link from your source code, removes the rsd_link header, and removes the PHP info header.
Go to WP Ghost > Change Paths > API Security and switch on Disable RSD (Really Simple Discovery) endpoint from XML-RPC.

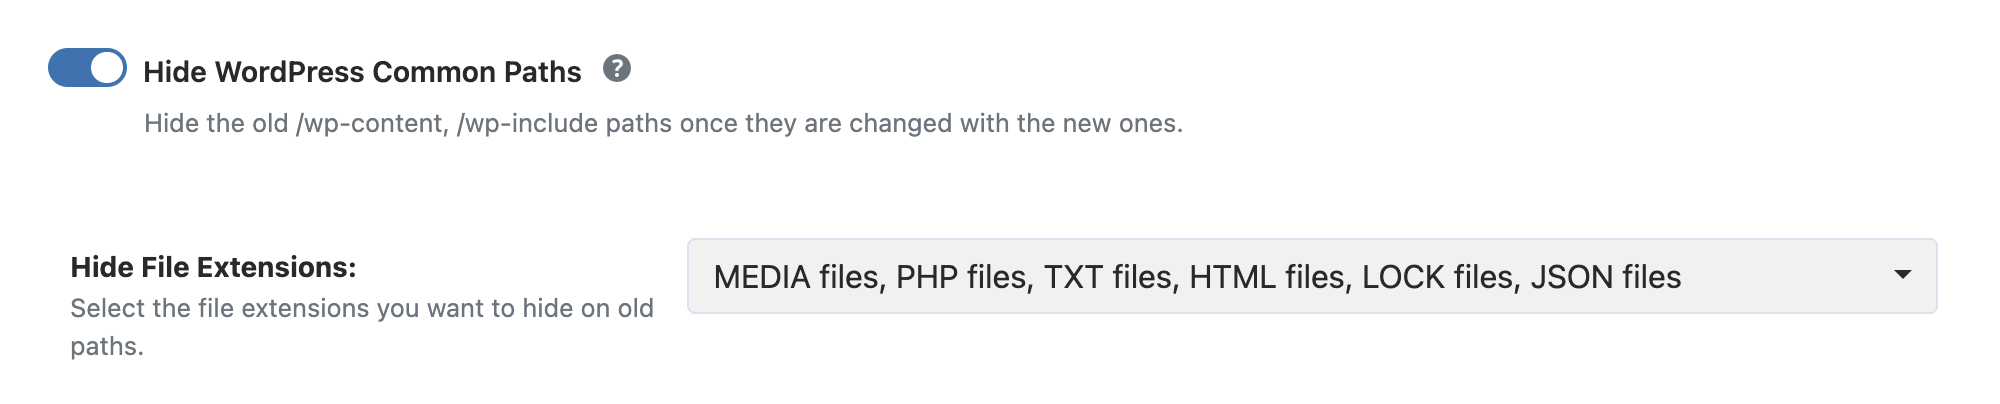
Hide WordPress Common Paths
After you have changed your path names, the old default paths may still be accessible on your server. This option adds a filter in your server config file that returns a 404 error when anyone who is not logged in tries to access those old paths.
The paths this option protects are: /wp-content, /wp-includes, /plugins, and /themes. It also hides upgrade.php and install.php from visitors.
Go to WP Ghost > Change Paths > WP Core Security and switch on Hide WordPress Common Paths.
Hide WordPress Common Files
WordPress ships with several files that reveal information about your installation. Files like wp-config-sample.php, readme.html, and license.txt can expose your WordPress version, and wp-config.php should never be accessible from the web at all.
WP Ghost blocks access to these files for visitors and bots by returning a 404 error.
Go to WP Ghost > Change Paths > WP Core Security and switch on Hide WordPress Common Files.
After activation, select which files to hide from the list. To reduce comment spam, include wp-comments-post.php in your selection (available after you change the comments path).
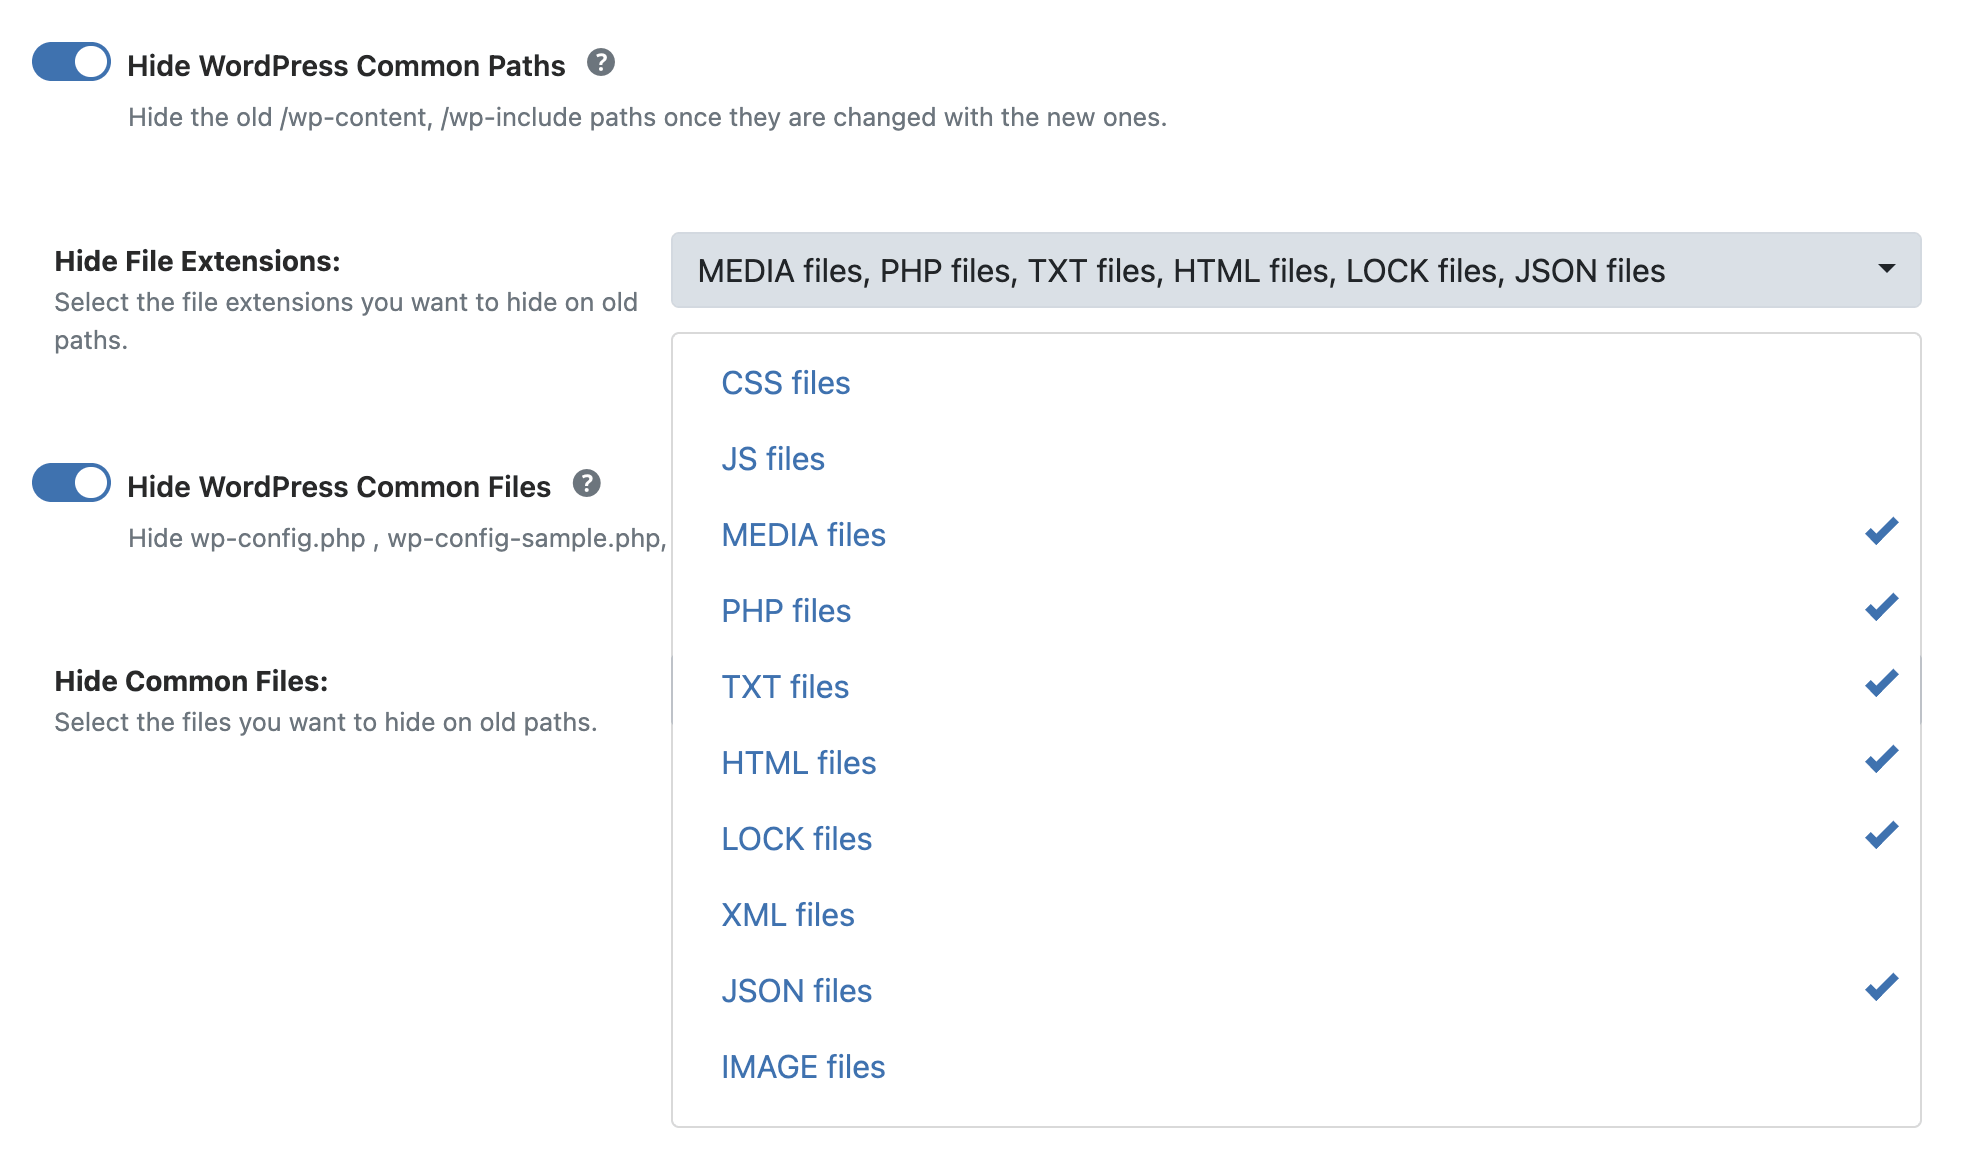
Note: Hiding wp-comments-post.php blocks direct bot access to the file, but it does not stop spam comments submitted through your comment forms. For complete spam protection, also use a dedicated anti-spam plugin that maintains a database of known spam sources.
Firewall, Security Headers, and Theme Detector Blocking
The firewall, security headers, theme detector blocking, and unsafe header removal features have their own dedicated section in the WP Ghost menu. You can find them at WP Ghost > Firewall.
From the Firewall panel you can activate the 8G/7G Firewall against script and SQL injection, add Security Headers (HSTS, CSP, X-Frame-Options, and more), remove unsafe server headers that reveal your PHP version and server info, block theme detector crawlers like BuiltWith and Wappalyzer, block AI crawler bots, and set up automated IP blocking for repeat attackers.
For the complete setup guide, see the Firewall and Geo Security tutorial. For advanced header configuration, see the Content Security Policy (CSP) tutorial.
Disable Directory Browsing
When a directory on your server does not contain an index file, some server configurations will display a full list of files in that directory to anyone who visits the URL. This makes it trivially easy for attackers to find vulnerable scripts, backup files, or uploaded content they can exploit.
Go to WP Ghost > Change Paths > WP Core Security and switch on Disable Directory Browsing.

With directory browsing disabled, anyone trying to browse your directories will see a 403 Forbidden error instead of a file list. See an example here of what visitors see when this option is active.
Related Tutorials
Continue securing your WordPress site with these related guides:
Getting Started with WP Ghost – install, activate, and choose your security level.
Brute Force Attack Protection – protect login forms with reCAPTCHA and attempt limits.
Activate Security Tweaks – remove WordPress fingerprints and enable additional hardening.
Firewall and Geo Security – configure the 8G Firewall, security headers, and country blocking.
URL Mapping and Text Mapping – change class names, IDs, and URLs in your source code.
Content Security Policy (CSP) – configure advanced security headers for your site.
Two-Factor Authentication – add 2FA with code, email, or passkeys.
Website Security Check – run a complete security audit with one-click fixes.
Hide From WordPress Theme Detectors – make your site invisible to BuiltWith, Wappalyzer, and others.
Safe Mode vs Ghost Mode – understand when to use each security level.