If you’re looking to protect your website from malicious attacks, Hide My WP Ghost is an excellent plugin that can help you secure your website. Hide My WP Ghost can be installed on a Cloud Panel server, and this article will guide you through the process.
Before you begin, make sure that you have a Cloud Panel server with Nginx installed and a WordPress websited.
Here are the steps to set up Hide My WP Ghost on a Cloud Panel server:
Step 1: Install Hide My WP Ghost on the Cloud Panel website.
The first step is to install Hide My WP Ghost on the Cloud Panel website. You can do this by downloading the plugin from the WordPress directory or the Hide My WP Ghost website and installing it like any other WordPress plugin.
Step 2: Select Cloud Panel server type
After you’ve installed Hide My WP Ghost, go to Hide My WP > Advanced > Compatibility and select the server type as Cloud Panel. This will ensure that the plugin is compatible with the Cloud Panel server.
Step 3: Setup new paths in Hide My WP Ghost
Once you’ve selected the server type as Cloud Panel, you’ll need to set up the custom paths in Hide My WP Ghost.
After you’ve set up the custom paths, save the settings and follow the notification to include the hidemywpghost.conf file in the Cloud Panel Vhost file on the Cloud Panel dashboard.
To do this, add the include file above the {{settings}} line in the Vhost file. Save the Vhost file and restart Nginx from the Cloud Panel admin section.
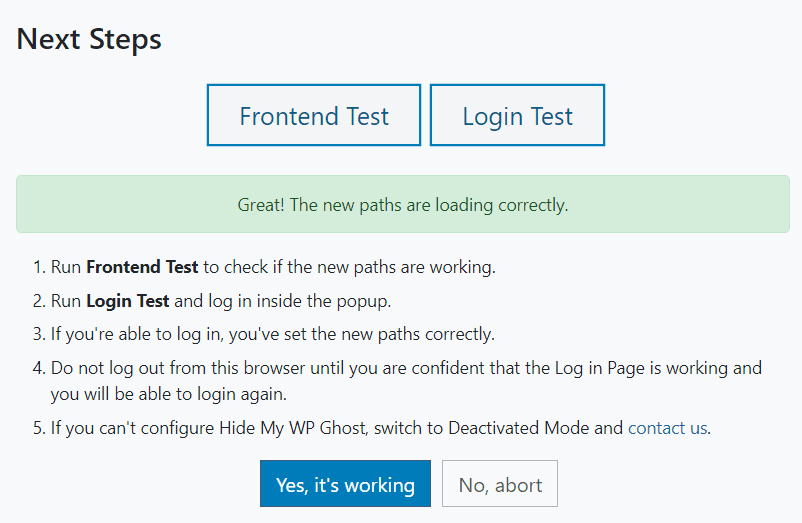
Step 4: Check the frontend and login page
Once you’ve restarted Nginx, check the frontend page and login page with Hide My WP Ghost. You can confirm that the plugin is working by clicking on “Yes, it’s working“.
Note! The custom wp-admin will be redirected to the default wp-admin once the used is logged to the server. This is because Cloud Panel can’t rewrite the wp-admin through Nginx config file.
Congratulations! You’ve successfully set up Hide My WP Ghost on a Cloud Panel server. With this plugin, you can protect your website from malicious attacks and ensure that your website is secure.
If you’re looking to optimize your WordPress website’s performance, Hummingbird is a great plugin to help you achieve that. And the best part is that it’s compatible with Hide My WP Ghost, allowing you to keep your website secure while improving its speed.
To take full advantage of Hummingbird, you need to activate the caching feature, which will store your website’s files on the server for faster delivery to your visitors. Once caching is enabled, you can use the Identify Cached Files option to find out which files are cached and where they’re located.
However, if you’re using Hide My WP Ghost, you need to make sure that the paths to these cached files are changed to prevent detection by potential attackers. To do this, you can use the plugin’s Change Paths in Cache Files option, which will automatically update the paths to your cached files.
But that’s not all. Hummingbird also comes with an Assets Optimization feature that can minify and combine your website’s CSS and JS files for faster load times. To take advantage of this feature, you need to activate the Minification option in the Basic Options section.
Once the Minification option is activated, Hummingbird will automatically combine and minify your website’s CSS and JS files, reducing their size and improving your website’s performance. And as with the caching feature, you can use Hide My WP Ghost’s Change Paths in Cache Files option to change the paths to these optimized files and keep your website secure.
Another important thing to keep in mind is that Hummingbird allows you to change the location of your cache files. By default, Hummingbird stores your cache files in the /wp-content/cache/hummingbird/ directory. However, you can change this location to a custom directory like /wp-content/cache/optimization in the Assets Optimization > Settings section.
By changing the location of your cache files, you can further improve your website’s security by making it harder for potential attackers to find your cached files.
By combining it with Hide My WP Ghost, you can keep your website secure while improving its speed. Just remember to activate the Minification option in Hummingbird’s Basic Options section, use the Identify Cached Files option to find your cached files, and change their paths using Hide My WP Ghost.
If you are looking for a cache plugin that works perfectly with Hide My WP Ghost, then Breeze is definitely the plugin for you. Breeze is a free, powerful and user-friendly WordPress cache plugin that helps improve the speed of your website. When you combine Breeze with Hide My WP Ghost, you can easily optimize your website speed and also secure it from hackers.
One of the features that make Breeze such a great match for Hide My WP Ghost is the plugin’s minification option, which is located in the Basic Options section. When you activate the minification option, Breeze will automatically minify and combine your CSS and JS files. This helps to reduce the number of HTTP requests and also the file size, which ultimately results in a faster loading website.
When using Hide My WP Ghost, it’s important to hide your plugins and themes from all Theme Detectors. With Breeze and Hide My WP Ghost, you can easily achieve this. By hiding your plugins and themes, you can make it more difficult for hackers to find vulnerabilities in your website. This is important because hackers often target websites that are easy to hack and leave themselves open to vulnerabilities.
In order to use Breeze with Hide My WP Ghost, you’ll need to follow these steps:
Install and activate Breeze and Hide My WP Ghost plugins.
Go to Breeze settings and activate the minification option in the Basic Options section.
Once you have activated minification, go to the Advanced Options section and select the “Don’t cache these pages” option.
Next, add the following pages to the “Don’t cache these pages” option: custom login path, custom admin, and any other pages that require user interaction.
Finally, go to Hide My WP Ghost settings and activate the option “Change Paths in Cache Files”. This will automatically change the paths in background using the cron option.
By following these steps, you can easily optimize your website speed and secure it from hackers. With Breeze and Hide My WP Ghost working together, your website will load faster, and your plugins and themes will be hidden from all Theme Detectors.
In addition to minification, Breeze also offers other optimization features such as Gzip compression, browser caching, and database optimization. When combined with Hide My WP Ghost, you can achieve the perfect balance between website speed and security.
In conclusion, if you are looking for a cache plugin that works perfectly with Hide My WP Ghost, then Breeze is the plugin for you. With Breeze’s minification option and Hide My WP Ghost’s ability to hide plugins and themes from all Theme Detectors, you can easily optimize your website speed and secure it from hackers. By following the steps outlined above, you can achieve a faster-loading, more secure website.
WordPress is the most widely used content management system (CMS) on the web, powering more than 40% of all websites. However, its popularity makes it a prime target for hackers and cybercriminals. As a website owner, it’s your responsibility to secure your site and protect it from malicious attacks. One way to do that is by using a firewall.
Firewalls are security programs that protect your website from unauthorized access and malicious traffic. They can help block suspicious traffic, prevent brute-force attacks, and protect against SQL injections and other types of attacks.
The 7G Firewall is an advanced firewall created by Jeff Starr, a well-known WordPress security expert. It offers lightweight, server-level protection against a wide range of threats, including malicious requests, bad bots, automated attacks, spam, and other types of nonsense. The firewall works by analyzing incoming traffic and blocking any suspicious requests before they reach your website.
One of the benefits of using the 7G Firewall is that it’s highly customizable. You can choose from several levels of protection, including minimal, medium, and maximum. The minimal level is suitable for most websites and provides basic protection against common threats. The medium level offers additional protection against more advanced threats, while the maximum level is recommended for high-traffic websites that are frequent targets of attacks.
However, it’s worth noting that the 7G Firewall may not work with all server configurations. If you’re not sure whether it’s compatible with your server, you can select minimal or medium protection to ensure compatibility.
If you’re using Hide My WP Ghost to secure your WordPress website, you can easily activate the 7G Firewall by following the tutorial provided by the plugin. Once activated, the firewall will run silently in the background, protecting your website from a wide range of threats without impacting its performance.
In conclusion, if you’re looking to secure your WordPress website, a firewall is an essential tool to have in your security arsenal. Hide My WP Ghost’s 7G Firewall protection for Apache-based servers is a powerful and customizable solution that can help keep your site safe from malicious attacks.
By following the plugin’s tutorial, you can easily activate the firewall and enjoy the peace of mind that comes with knowing your website is protected.
Our plugin is designed to provide users with the highest level of security and customization. One unique feature of our plugin is the ability to whitelist specific IP addresses, which allows users to grant access to certain users while blocking others.
This can be particularly useful for businesses or organizations that want to grant access to employees or trusted partners while blocking access to unauthorized users.
If you want to disable the plugin for logged users with specific roles, you can add this code in the functions.php file of the theme:
If you’re a WordPress user, you may be familiar with the concept of theme detection. A WordPress theme detector is a tool that allows you to see which theme a WordPress site is using.
This can be useful for a variety of reasons, including allowing you to see which theme a competitor is using, or simply to find out more about a particular theme you like the look of.
Here are the top WordPress theme detectors, based on their popularity and user reviews:
This popular theme detector allows you to easily identify the theme and plugins used on any WordPress site. Simply enter the URL of the site you want to inspect and the tool will provide a detailed report on the theme and plugins used.
WP Theme Detector is a free online tool that allows you to quickly and easily identify the theme and plugins used on any WordPress site. Simply enter the URL of the site you want to inspect and the tool will provide a detailed report on the theme and plugins used.
WordPress Theme Detector is a free online tool that allows you to easily identify the theme and plugins used on any WordPress site. Simply enter the URL of the site you want to inspect and the tool will provide a detailed report on the theme and plugins used.
However, some WordPress users may not want others to be able to detect the theme they are using on their site. This is where the Hide My WP Ghost plugin comes in. This plugin adds an extra layer of protection to your WordPress site by hiding the fact that you are using WordPress.
Hide My WP Ghost complements other security plugins and tools by adding a different kind of security layer that the others don’t offer. It helps protect your site against common attacks such as script and SQL injection and brute force by camouflaging vulnerabilities without physically changing any files or directories. This makes it difficult for hackers and other malicious actors to detect and exploit vulnerabilities on your WordPress site.
In addition to its camouflage feature, Hide My WP Ghost also includes a security check feature that scans your entire site to indicate its current security level and uncover urgent threats that leave your site exposed to different types of attacks. It provides clear guidance on how to fix each issue, and many can be fixed with just one click.
Overall, Hide My WP Ghost is a valuable addition to any WordPress user’s security toolkit. By hiding the fact that you are using WordPress and providing extra protection against common attacks, it can help keep your site safe and secure.
The simplest way to test if apache uses your .htaccess file, or if it otherwise ignores it, is to intentionally break it.
Edit the .htaccess file, so the first line reads ‘Test.’:
Test.

# Set the default handler
DirectoryIndex index.php index.html index.htm

...
Now, if you refresh the page in your browser, you should see an error page like this:
If you see this error, that’s actually good! This means that Apache is parsing the .htaccess file, and it encounters the error we’ve put in there! So far, so good!
If you do not see an ‘Internal Server Error’, your Apache setup ignores the .htaccess file, and you need to fix that. Generally, Apache ignores the .htaccess file because of the following Apache configuration AllowOverride none. Check your virtual host configuration and add/amend to AllowOverride All.
Example:
    <Directory /var/www/site/example.com/>
        Options Indexes FollowSymLinks
        AllowOverride All
        Require all granted
    </Directory>
Test if mod_rewrite is working
To test if mod_rewrite is working correctly, do the following:
Edit .htaccess file with the contents as below.
<IfModule mod_rewrite.c>
    RewriteEngine On
    RewriteRule ^.*$ /redirected
</IfModule>
In your browser, add the URL like http://yourdomain/test.
If the URL is redirected to http://yourdomain/redirected it means that the mod_rewrite is working.
My htaccess is broken? What do?
There are many reasons why it might not work on your system, and these reasons vary so wildly, that we can’t give an exhaustive solution for that. That said, here are a few pointers that might help you fix it:
Enable .htaccess in your httpd.conf or apache.conf
It’s unusual, but possible that .htaccess is not enabled on your site. If you are hosting it yourself, it’s easy enough to fix. Open your httpd.conf or apache.conf in a text editor, and locate the <Directory> section:
<Directory "/var/www/htdocs">
    AllowOverride None
Change the AllowOverride line to:
AllowOverride All
Be sure to restart Apache after making any modifications to this file. Now, your .htaccess should work. You can also make this change inside a virtual host, which would normally be preferable, but that depends on the way Apache is set up.
If your site is hosted elsewhere, check your control panel (Plesk, DirectAdmin, CPanel, whatever) to see if you can enable .htaccess there. If not, contact your hosting provider to do it for you.
Hiding the wp-admin and wp-login.php paths from source code it’s important especially when you use obscurity through security solution like Hide My WP Ghost.
The fastest way to change it is to use the mapping feature from Hide My WP Ghost. This way you can change the /wp-admin to a random name which will redirect the user to a page or a 404 page.
It is a very good idea to set read-only access to certain folders and files. Although you can’t do this in your .htaccess, you can do it at the server panel or OS level.
It’s important that you set permissions on your configuration files and files that include connection settings as read-only.
Apache/Litespeed/Nginx Servers
For Unix/Linux systems set the .htaccess permission file to 444.
WinSCP sFTP client
If you cannot do this with your FTP software, try using the File Manager supplied with your webhosting account.
Cpanel .htaccess permission
Windows Servers
For Windows server systems, simply set the file as “Read-Only” for “Everyone” and especially the IUSR_xxxxx (Internet Guest Account) user if running IIS, or the “System” account or “apache user” if running Apache.
Ploi.io service is similar with RunCloud and it helps you install your WordPress websites in minutes without being an expert. We found Ploi being a secure and accessible service.
When you select the Safe Mode or Ghost Mode in Hide My WP Ghost will detect the Nginx and will show you the hidemywp.conf file you need to add in Ploi.io panel in order to load the rewrite rules.
First, create the hidemywp.conf file on the website root directory through File Manager
Now, save the Safe Mode in Hide My WP Ghost and you will get the line you need to include in Ploi.io.
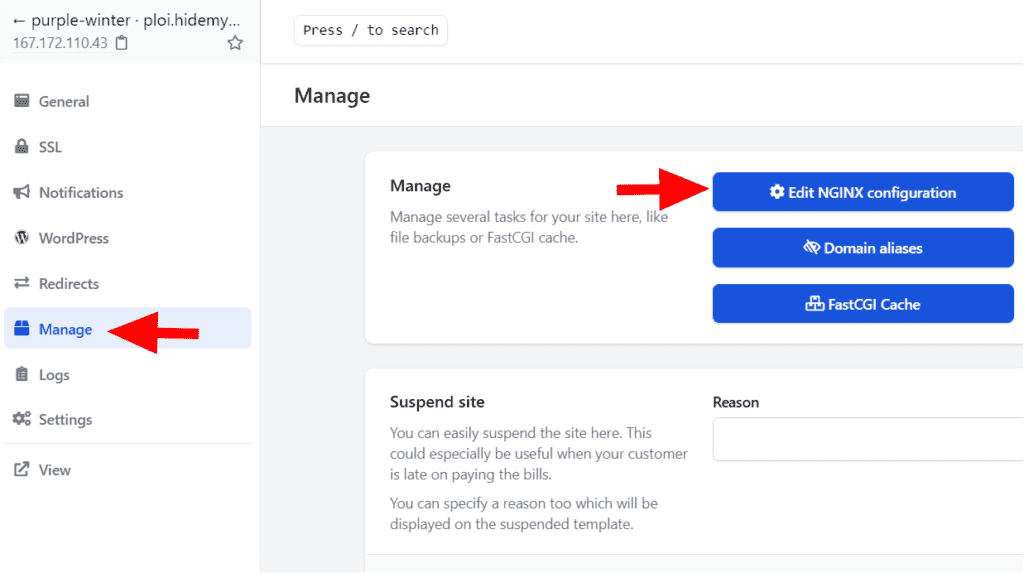
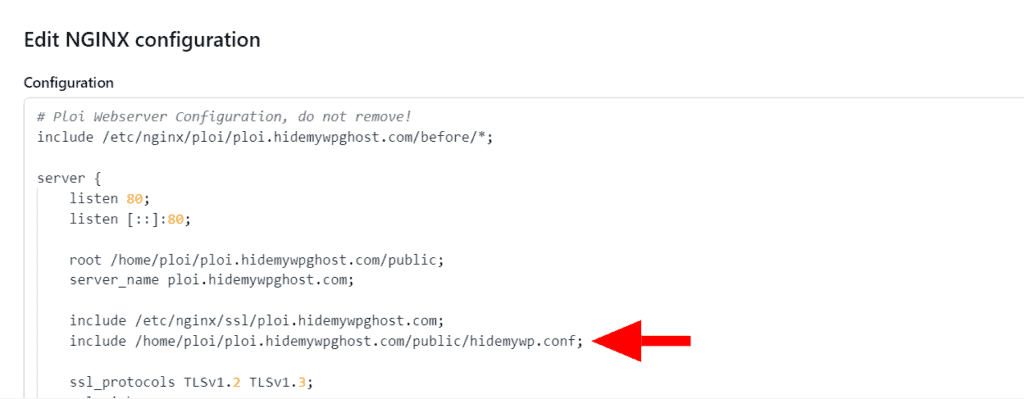
On Ploi.io panel, go to Manage and click on Edit NGINX configuration.
Add the include line that you copied from Hide My WP Ghost notification and add it before the ssl protocol definition.
Save the NGINX configuration and the changes will be applied automatically.
Go back to your website and test the login page. If the login is loading correctly, confirm the changes and you’re done.
Troubleshooting
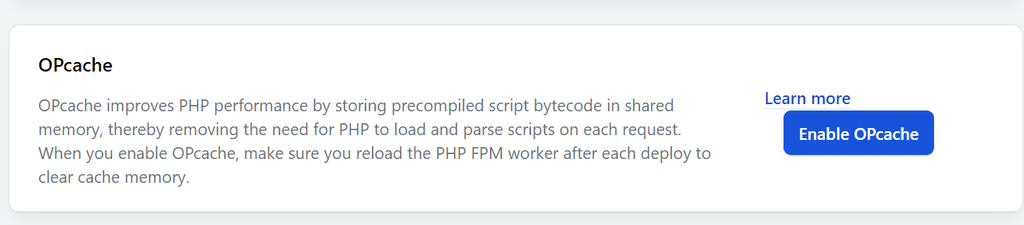
I get an error when changing the admin path on Ploi server.
To avoid any cache error when changing the admin path, make sure OPCache on Ploi server is turned off until the plugin configuration is finished.
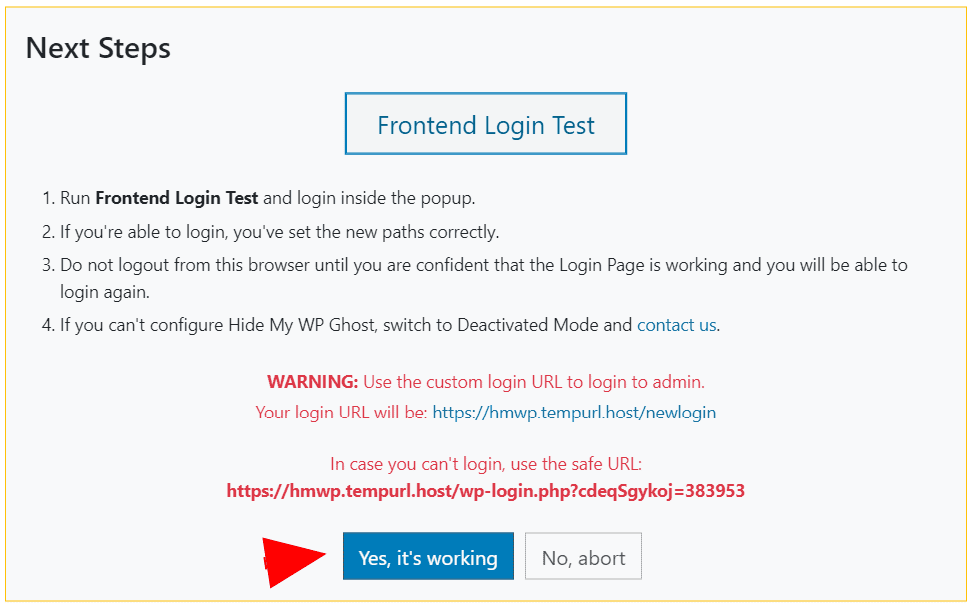
We’ve received valuable feedback from many of you about challenges faced while configuring Nginx with WPMUDEV support. Based on this feedback, we want to ensure a smooth experience for everyone using our tutorial. Therefore, we recommend considering an alternative hosting solution for Nginx or utilizing the plugin solely for customizing/hiding the login path, rather than applying it to all WordPress common paths.
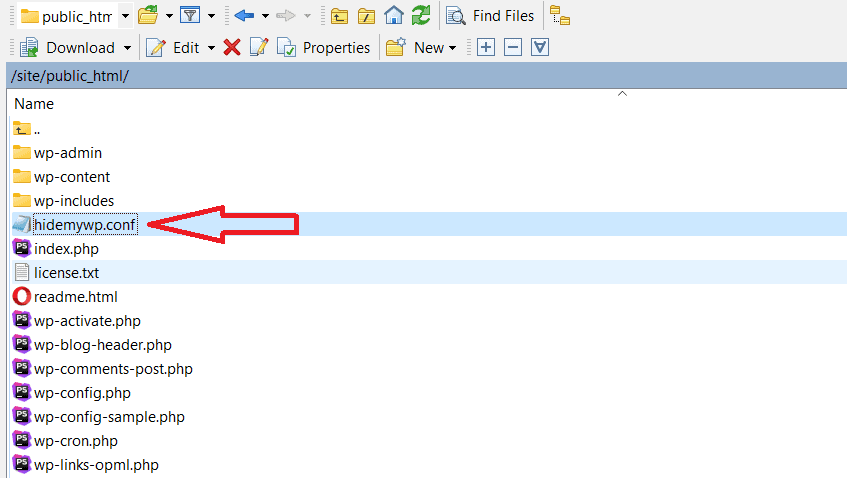
Here’s how to set up the Hide My WP Ghost plugin on WPMUDEVserver:
Configure Hide My WP Ghost for your site the way you want it and make sure to save your settings using the Save button;
Go to the website root directory using File Manager and download the hidemywp.conffile;
Open a support ticket with WPMUDEV’s support team and send them thehidemywp.conf file in order to add the new paths to your website (your host will add the hidemywp.conf filein the Nginx and restart the server);
(your host will be able to add the config line in the Nginx and restart the Nginx server);
Back up the settings in HMWP Ghost from Hide My WP > Backup / Restore and deactivate the plugin until the rules are added by WPMUDEV support.
Once you get the reply that the rules have been added, activate HMWP Ghost plugin and restore the settings in HMWP Ghost.
Verify the login and confirm if the website loads correctly with the new paths.
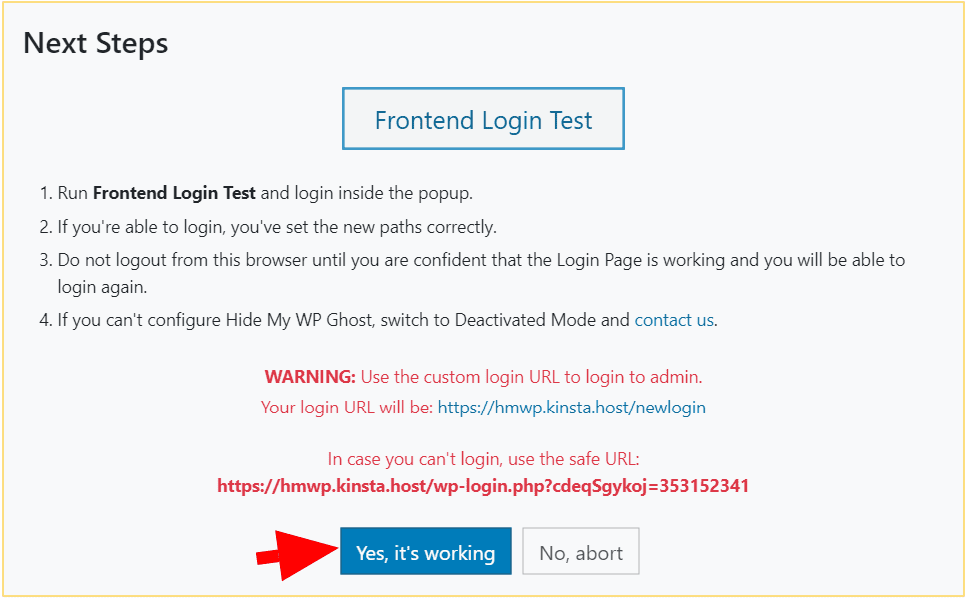
Here’s how to set up the Hide My WP Ghost plugin on Kinsta server:
Configure Hide My WP Ghost for your site the way you want it and make sure to save your settings using the Save button;
Go to the website root directory using File Manager and download the hidemywp.conffile;
Contact Kinsta’s support teamand send them thehidemywp.conf file in order to add the new paths to your website (your host will add the hidemywp.conf filein the Nginx and restart the server);
Back up the settings in HMWP Ghost from Hide My WP > Backup / Restore and deactivate the plugin until the rules are added in Nginx and the Nginx server is restarted.
Once the rules are added, activate HMWP Ghost plugin and restore the settings to load the new paths.
Verify the login and confirm if the website loads correctly with the new paths.
Events Log Settings >> Log Users Events – Recommended: ON
Log User Roles – Recommended: Leave as is (Hide My WP will log all user roles), or select specific user roles whose activity you want Hide My WP Ghost to log.
Click on Visit Site to see the changes you’ve enabled using Hide My Ghost take effect.
Log out from your account if you want to test things like: Right Click, View Source, and you’ll see that this functionality has been disabled for your site (based on your settings)
Take a look at your site’s source code to see the modified paths.
IMPORTANT! The settings shown in this video will work best for most sites – and present a way to quickly, safely, and effectively set up Ghost Mode for your site.
However, the ideal settings can look different from case to case, and you can always further customize these settings based on your needs and wants.
We advise you to always read the documentation that we link to from within the plugin and ensure you clearly understand what each setting enables you to do.
NOTE!
👋 How to Fix 403 Forbidden Error in WordPress caused by ModSecurity (mod_security)
ModSecurity is an open-source firewall application (or WAF) supported by different web servers (such as Apache, Nginx, IIS) and used by a lot of hosts.
The issue: If they have rule #212340 in place – which they most likely do by default – then it will prevent the Code Editor from working in Ghost Mode from Hide My WP Ghost.
The solution: If you encounter this issue, make sure to contact your host to turn off Rule 212340 or whitelist you from it.
Once you do that, you should no longer see the 403 Forbidden Error.
Hide My WP Ghost is compatible with the most popular themes. We are continuously working on this to further extend the list of themes that Hide My WP Ghost is compatible with.
We’ve tested Hide My WP Ghost with over 1,000 plugins and themes so far, and we’ll keep at it. But if you DON’T see a theme you may be using on our list here just yet, it doesn’t mean Hide My WP Ghost won’t work with it or cause issues.
Hide My WP Ghost doesn’t physically change any path or file. Rewrites happen when a browser accesses files and paths.
Here are some of the latest themes we checked to make sure they work with Hide My WP Ghost.
Compatibility issues are unlikely, especially if you use the Safe Mode from Hide My WP Ghost.
Compatibility problems were fixed for:
Builders
Server hosting
Cache Plugins
Security Plugins
We fixed for those, because that’s where most issues were found in the past and we keep working on making it more compatible with them.
If you want us to test other WordPress plugins or themes, please contact usand send us the plugin/theme URL.
We are open to testing Hide My WP Ghost with more plugins and themes, as we are continuously looking for new ways to make Hide My WP Ghost as valuable as possible for a wide range of users.
If you are using a custom login path for your WordPress website and want to automatically redirect logged users to the admin dashboard, you can use a hook code.
Here is how you can do it:
Open the wp-config.php file or your theme’s functions.php file.
Add the following hook code at the end of the file:
add_action('hmwp_login_init',function(){
   global $current_user;
   if (isset($current_user->ID)){
      wp_redirect(admin_url());
      exit;
    }
});
Save the changes and upload the file to your server.
Once you have added the hook code, any logged-in user accessing the custom login path will be automatically redirected to the admin dashboard. This can be a useful feature for your users and can save them time and effort.
Using a WordPress Plugin
Alternatively, if you are using the Hide My WP Ghost plugin, you can use the built-in option to redirect logged users to the admin dashboard. Here is how you can do it:
Install and activate the Hide My WP Ghost plugin on your WordPress website.
Go to Hide My WP > Tweaks in the WordPress dashboard menu.
Click on the “Redirects” tab.
Check the box next to “Redirect Logged Users to Dashboard”.
Save the changes.
Once you have activated the option, any logged-in user accessing the custom login path will be automatically redirected to the admin dashboard.
That’s it! You have now learned how to redirect logged users to the admin dashboard when using a custom login path on your WordPress website.
Automattic does NOT allow for the wp-admin and the wp-login paths to be customized. WordPress usesJetpackfor login security and doesn’t accept any changes made to wp-admin and wp-login.php.
you CAN, however, use Hide My WP Ghost to customize and hide other paths, such as WordPress Common Paths, in order to secure vulnerabilities related to plugins and themes. You can learn more about this here.
Hide My WP Ghost will not Work with Shared & Unmanaged NGINX Servers IF:
user is unable to add the hidemywp.conf file to nginx.conf (this is required in order for all rewrites to be loaded). So, in order to use Hide My WP Ghost, user needs to have access to NGINX config file and access to restart the service. Or, user needs to be able contact the host to add the path_to_file/hidemywp.conf file in NGINX and restart the service for them.
the host refuses to make changes in the nginx.conf file and restart NGINX.
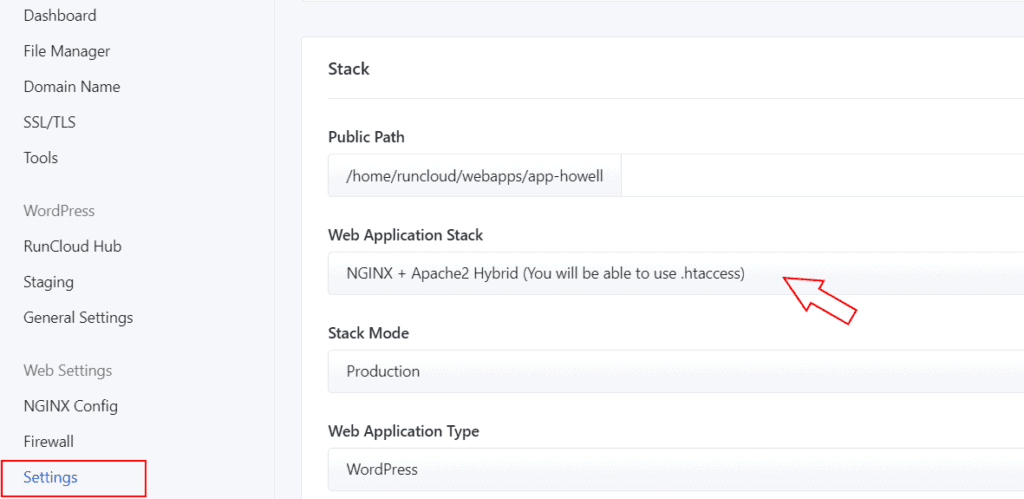
If you run the service RunCloud, there are 2 easy options you can select on Application type who will run with Hide My WP Ghost plugin.
RunCloud – NGINX + Apache2 Hybrid
After you select to create the application WordPress on your server through RunCloud select the option NGINX + Apache2 Hybrid at the Web Application Stack. This way all the paths are loaded from .htaccess and there is no need for custom Nginx configuration.
Now, follow the Hide My WP configuration like in this tutorial:
Before hiding the images with old paths, it’s important to understand what this process entails and what are the risks involved.
Given the fact that images DON’T represent a security risk for your site, hiding them is NOT a necessity, or something we recommend doing to increase protection of your WordPress site.
From an SEO standpoint, if the images have already been indexed by Google, this is what will happen when someone lands on your site via Google Images: they will see a 404 Page Not Found error.
Even if you don’t use Hide My WP Ghost to hide images, over time, Google will index all images with the new paths without affecting SEO.
However, if you still wish to hide the images with the old paths, follow the steps below:
Hide Old Images
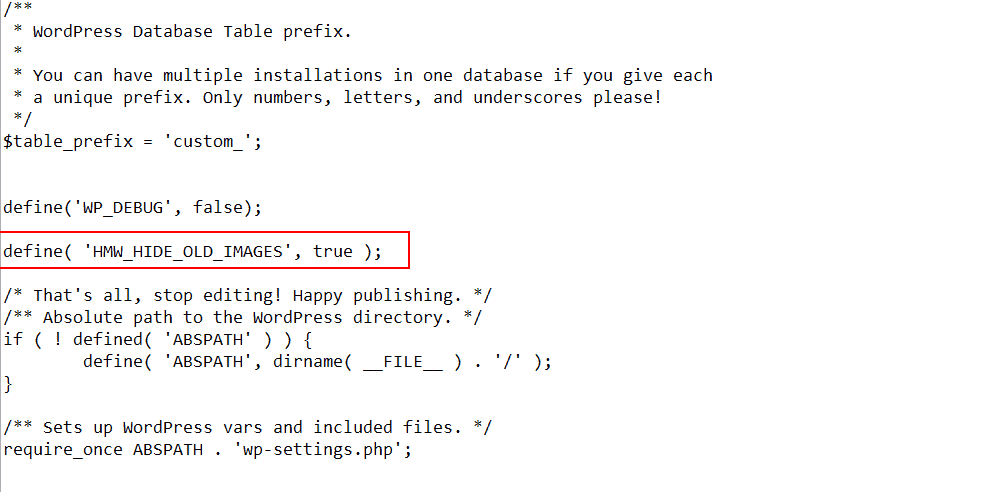
Add the following line to your wp-config.php:
define( 'HMW_HIDE_OLD_IMAGES', true );
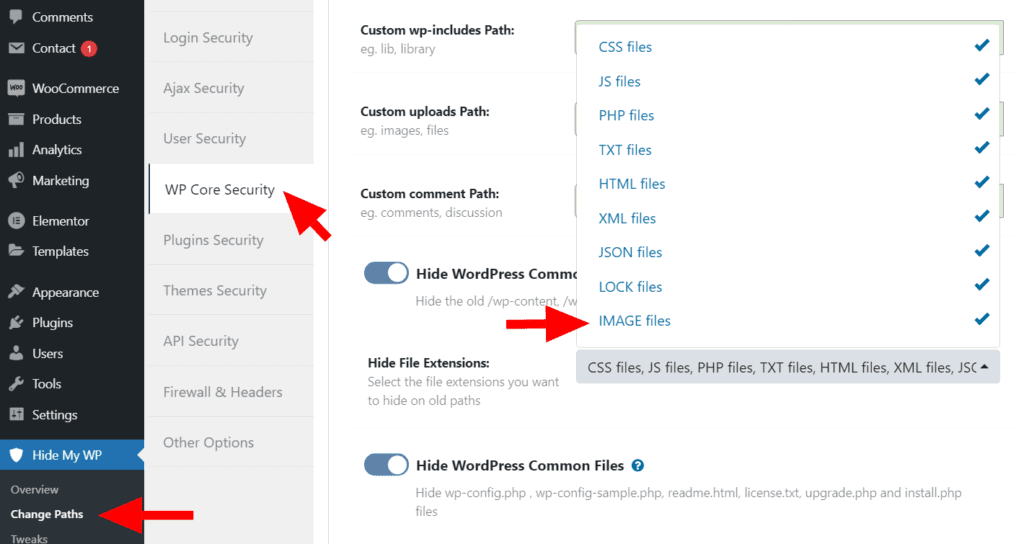
Once you’ve added this, go to Hide My WP > Change Paths > WP Core Security, and you will see the option to hide Images files in the drop-down under the Hide WordPress Common Paths section (as shown in the screenshot below).
Select the IMAGE files option and Save your settings.
Once you do this, you can go ahead and check using another browser (or by going Incognito) to see if the old images can still be accessed.
Possible errors that might appear as a result of hiding old images
If your theme or other plugins load images into CSS or JS, then it’s possible for images not to load in frontend. A solution for this is using a cache plugin and activating the option to modify the paths in cache files using Hide My WP Ghost.
Hide My WP Ghost can be completely white-labeled and appear under YOUR brand’s name and logo.
This is a great option for agencies who want to be able to offer clients a premium WordPress security plugin – and have it be perceived as their own tool.
🚨 White Label Requirements
The plugin must be ACTIVE on the client’s site.
If you’re worried that a client of yours may deactivate the plugin, you can use CSS to remove the Hide My WP Ghost plugin from the Plugins list.
That way, your end users won’t be able to deactivate your white-labelled plugin.
Technically it can’t be done in a different way.
Otherwise, your instances wouldn’t be able to connect to the main update branch and the plugins you install to others would never get updates when we release them.
💡 Tip – if you want to hide the plugin without using CSS, there is the admin menu editor plugin that you can use to hide the Plugins section: Admin Menu Editor.
IMPORTANT! If ANY of your clients finds a way to de-activate the plugin, it will NOT AFFECT your other installed plugins. Every other instance will still be white-labelled and continue to get updates.
For example, if one client is a coder and figures out you’ve used CSS to hide the plugin and he will also remove your code and then go on to deactivate the plugin:
he will see Hide My WP Ghost in the plugins list;
nobody else on your 200+ sites, for example, will notice anything;
everyone will keep getting updates;
every other instance will still be white labelled.
The customize White Label button shown in the screenshot above will automatically show if your account meets the requirement to enable Whitelabel option.
A Quick Look at How it all Works
Next up, we’ll go through every setting you can make inside the Plugin Customization Panel and provide more details about what each item helps you achieve (and how they translate into actual plugin changes).
1. Plugin Name
This option allows you to set a custom plugin name. The name you add here will appear in the WordPress > Plugins list instead of showing our branded name – as long as the plugin is active on a client’s site.
Example: If I go to setup and say my plugin name is: Hide Custom and my domain name is: example.com, end-users will see the active plugin in their Plugins list as: Hide Custom, and if they click the “By Hide Custom” link they will go to example.com, which means they won’t keep going to the hidemywp.xyz website.
2. Plugin Menu Icon & Plugin Menu Name
Once you change the plugin menu name and icon, your clients will NOT see the Hide My WP name in the WordPress menu. Instead, they will see the custom plugin menu name. Same with the icon image or class name.
If you want to customize the plugin menu icon, you can also use the WordPress dashicons classes:
This White Label option in Hide My WP Ghost enables you to change the default, branded plugin logo with your custom logo URL.
To ensure the best look, we recommend using images that fit the following image size guidelines: 180px width and 35px height.
Note! The image needs to be on your website. Only add the image URL in the Plugin Logo field (nothing else is needed).
4. Plugin Website
(Optional) If you want to create a separate plugin website with a different plugin Knowledge Base, you can add your own website here. This way, all the Help links will take users to the website you specified, instead of taking them to hidemywp.xyz/knowledge-base.
Example: If you add a different domain like https://domain.com, then all the help links within Hide My WP will take users to: https://domain.com/knowledge-base instead of taking them to https://hidemywpghost.com/knowledge-base. Note that this means you will have to have a website whose structure mirrors the paths (URLs) that exist on hidemywp.xyz.
Let’s take for example: https://hidemywpghost.com/kb/customize-paths-in-hide-my-wp-ghost/ – there will need to exist a corresponding URL for this on your website (https://domain.com/kb/customize-paths-in-hide-my-wp-ghost/). Same applies for ALL the other URLs we link to from within the plugin.
Note! As our content is copyright-protected, you can’t copy-paste the content from hidemywp.xyz to your website. You will have to create your own, original content (different from ours).
5. Deep Settings
Setting up this plugin for every client can be time-consuming for developers and agencies managing multiple websites. However, deep feature customization allows you to configure the plugin once and apply the settings across all your client sites easily.
You can configure the plugin with suitable settings by going through each setting tab, ensuring all your client sites are protected with optimal security practices while maintaining a consistent brand presence.
How to Install Your Customized Hide My WP Ghost Plugin on a Client’s Site
After you’re done configuring the White Label options, download Hide My WP Ghost (the ZIP file).
Log In as an Admin on your client’s WordPress website.
In the menu displayed on the left, there is a Plugins tab. Click on it.
Click on: Add New.
There, you’ll see a button that reads: Upload Plugin. Click on it.
Upload the configured hide-my-wp.zip file.
Once the upload is complete, activate the plugin. The plugin will be automatically renamed according to your White Label customization.
Managing Licenses/Websites under Your Account from a Single Dashboard
We also provide access to a dedicated dashboard to manage and monitor all your customers’ licenses through the SaaS Side of Hide My WP Ghost (the cloud app for it on: https://account.hidemywp.xyz).
Go to your Cloud Account > Connected Sites to reach it.
You will see the list of sites under your account and be able to deactivate their access to the plugin, in case they quit working with your agency, for example.
Note! WhiteLabel method for the plugin, which uses API to check license. If it’s the proper license, then the plugin will work under your own private label. Once the license is deactivated, it will revert back to the HMWP brand.
If a client of yours quits your service, you can go to the SaaS side of Hide My WP Ghost (the cloud app) and look at the list of connected sites (as shown in the screenshot below).
Delete their website from that list to deactivate their license, and they will lose access. The plugin inside their WP will tell those customers they need to re-connect and they won’t be able to use it.
White Label List
Here you will be able to see the list of all customized plugins you’ve set up using the White-Label settings. This makes it easy to keep track of all the configurations you’ve made using the White-Label options.
Also from this panel: you can easily download the ZIP file(s) containing all those configurations by using the Download Plugin button associated with the customized version you want to download.
Still have questions?
Please contact us if you have any questions, and we’ll do our best to get back to you as soon as possible.
Even if both plugins are considered WordPress Security plugins, SiteGround Security and Hide My WP Ghost work together to add security layers on your websites by stopping the hackers’ attacks and preventing data loss.
Both plugins have complementary features that will boost your website security.
Both plugins load fast and work with SEO and Cache plugins.
Both plugins work on all server types (Apache, Nginx, IIS, LiteSpeed, etc).
Hide My WP Ghost works as security through obscurity and prevents hacker bots access to vulnerable files, plugins and themes.
SiteGround Security prevent a number of threats such as brute-force attacks, compromised login, data leaks, and more.
HMWP Ghost will complement SiteGround Security Plugin by offering an extra layer of protection that the other doesn’t offer:
With Hide My WP Ghost you prevent attacks from happening, by hiding vulnerabilities in themes, WP core and plugins.
Hackers and hacker bots can’t attack what they can’t find.
It does a bit more, as you will see on the Features list.
This offers an extra layer of protection that you don’t get from other plugins, because those focus on helping you while you are attacked and after you were attacked, by cleaning files, detecting malware, injections etc.
With Hide My WP Ghost you can avoid getting injections in the first place.
Even if both plugins are considered WordPress Security plugins, SiteGround Security and Hide My WP Ghost work together to add TWO DIFFERENT KINDS of security layers on your websites by stopping the hackers’ attacks and preventing data loss.
Hide My WP Ghost
Protect your WordPress site against hacker bots and spammers.
Protect your site against common attacks, such as script and SQL injection and brute-force, by camouflaging those vulnerabilities without physically changing any file or directory.
SiteGround Security
With the carefully selected and easy to configure functions the plugin provides everything you need to secure your website and prevent a number of threats such as brute-force attacks, compromised login, data leaks, and more.
User both plugins on your server to boost your security.
What Features to activate in Hide My WP Ghost when SiteGround Security plugin is activated.
Even if both plugins are considered WordPress Security plugins, WP Cerber Security and Hide My WP Ghost work together to add security layers on your websites by stopping the hackers’ attacks and preventing data loss.
Advantages:
Both plugins have complementary features that will boost your website security.
Both plugins load fast and work with SEO and Cache plugins.
Both plugins work on all server types (Apache, Nginx, IIS, LiteSpeed, etc).
Hide My WP Ghost works as security through obscurity and prevents hacker bots access to vulnerable files, plugins and themes.
Wp Cerber Security defends WordPress against hacker attacks, spam, trojans, and malware.
Hide My WP Ghost will complement WP Cerber Security Plugin by offering an extra layer of protection that the other doesn’t offer:
With Hide My WP Ghost you prevent attacks from happening, by hiding vulnerabilities in themes, WP core and plugins.
Hackers and hacker bots can’t attack what they can’t find.
It does a bit more, as you will see on the Features list.
This offers an extra layer of protection that you don’t get from other plugins, because those focus on helping you while you are attacked and after you were attacked, by cleaning files, detecting malware, injections etc.
With Hide My WP Ghost you can avoid getting injections in the first place.
Even if both plugins are considered WordPress Security plugins, WP Cerber Security and Hide My WP Ghost work together to add TWO DIFFERENT KINDS of security layers on your websites by stopping the hackers’ attacks and preventing data loss.
Hide My WP Ghost
Protect your WordPress site against hacker bots and spammers.
Protect your site against common attacks, such as script and SQL injection and brute-force, by camouflaging those vulnerabilities without physically changing any file or directory.
WP Cerber Security
WP Cerber Security mitigates brute-force attacks by limiting the number of login attempts through the login form, XML-RPC / REST API requests, or using auth cookies.
Tracks user and bad actors activity with flexible email, mobile and desktop notifications. tops spammers by using a specialized anti-spam engine.
User both plugins on your server to boost your security
What Features to activate in Hide My WP Ghost when WP Cerber Security plugin is activated.
Even if both plugins are considered WordPress Security plugins, BBQ Firewall and Hide My WP Ghost work together to add security layers on your websites by stopping the hackers’ attacks and preventing data loss.
Advantages:
Both plugins have complementary features that will boost your website security.
Both plugins load fast and work with SEO and Cache plugins.
Both plugins work on all server types (Apache, Nginx, IIS, LiteSpeed, etc).
Hide My WP Ghost works as security through obscurity and prevents hacker bots access to vulnerable files, plugins and themes.
BBQ Firewall protects your site against a wide range of threats.
HWMP Ghost will complement BBQ Firewall Plugin byoffering an extra layer of protection that the other doesn’t offer:
With Hide My WP Ghost you prevent attacks from happening, by hiding vulnerabilities in themes, WP core and plugins.
Hackers and hacker bots can’t attack what they can’t find.
It does a bit more, as you will see on the Features list.
This offers an extra layer of protection that you don’t get from other plugins, because those focus on helping you while you are attacked and after you were attacked, by cleaning files, detecting malware, injections etc.
With Hide My WP Ghost you can avoid getting injections in the first place.
Hide My WP Ghost:
Protect your WordPress site against hacker bots and spammers.
Protect your site against common attacks, such as script and SQL injection and brute-force, by camouflaging those vulnerabilities without physically changing any file or directory.
BBQ Firewall
BBQ checks all incoming traffic and quietly blocks bad requests containing nasty stuff like:
eval(, base64_, and excessively long request-strings.
User both plugins on your server to boost your security
What Features to activate in Hide My WP Ghost when BBQ Firewall plugin is activated.
Even if both plugins are considered WordPress Security plugins, Sucuri Security and Hide My WP Ghost work together to add security layers on your websites by stopping the hackers’ attacks and preventing data loss.
Advantages:
Both plugins have complementary features that will boost your website security.
Both plugins load fast and work with SEO and Cache plugins.
Hide My WP Ghost works as security through obscurity and prevents hacker bots access to vulnerable files, plugins and themes.
Sucuri Security defend your website against hacks and DDoS attacks and more.
Hide My WP Ghost will complement Sucuri Security Plugin by offering an extra layer of protection that the other doesn’t offer:
With Hide My WP Ghost you prevent attacks from happening, by hiding vulnerabilities in themes, WP core and plugins.
Hackers and hacker bots can’t attack what they can’t find.
It does a bit more, as you will see on the Features list.
This offers an extra layer of protection that you don’t get from other plugins, because those focus on helping you while you are attacked and after you were attacked, by cleaning files, detecting malware, injections etc.
With Hide My WP Ghost you can avoid getting injections in the first place.
Even if both plugins are considered WordPress Security plugins, Sucuri Security and Hide My WP Ghost work together to add TWO DIFFERENT KINDS of security layers on your websites by stopping the hackers’ attacks and preventing data loss.
Hide My WP Ghost:
Protect your WordPress site against hacker bots and spammers.
Protect your site against common attacks, such as script and SQL injection and brute-force, by camouflaging those vulnerabilities without physically changing any file or directory.
Sucuri Security
Sucuri safely remove any malicious code in your website file system and database.
Sucuri website firewall (WAF) blocks attacks by filtering malicious traffic.
User both plugins on your server to boost your security
What Features to Activate in Hide My WP Ghost when Sucuri Security plugin is activated.
Both plugins have complementary features that will boost your website security.
Both plugins load fast and work with SEO and Cache plugins.
Both plugins work on all server types (Apache, Nginx, IIS, LiteSpeed, etc).
Hide My WP Ghost works as security through obscurity and prevents hacker bots access to vulnerable files, plugins and themes.
Hide My WP Ghost will complement Anti-Malware Security and Brute-Force Firewall Plugin by offering an extra layer of protection that the other doesn’t offer:
With Hide My WP Ghost you prevent attacks from happening, by hiding vulnerabilities in themes, WP core and plugins.
Hackers and hacker bots can’t attack what they can’t find.
It does a bit more, as you will see on the Features list.
This offers an extra layer of protection that you don’t get from other plugins, because those focus on helping you while you are attacked and after you were attacked, by cleaning files, detecting malware, injections etc.
With Hide My WP Ghost you can avoid getting injections in the first place.
Even if both plugins are considered WordPress Security plugins, Anti-Malware Security and Hide My WP Ghost work together to add TWO DIFFERENT KINDS of security layers on your websites by stopping the hackers’ attacks and preventing data loss.
Hide My WP Ghost:
Protect your WordPress site against hacker bots and spammers.
Protect your site against common attacks, such as script and SQL injection and brute-force, by camouflaging those vulnerabilities without physically changing any file or directory.
Anti-Malware Security and Brute-Force Firewall
Download Definition Updates to protect against new threats. Firewall block SoakSoak and other malware from exploiting Revolution Slider and other plugins with known vulnerabilites. Upgrade vulnerable versions of timthumb scripts.
User both plugins on your server to boost your security
What Features to Activate in Hide My WP Ghost when Anti-Malware Security plugin is activated.
Even if both plugins are considered WordPress Security plugins, Limit Login Attempts Reloaded and Hide My WP Ghost work together to add security layers on your websites by stopping the hackers’ attacks and preventing data loss.
Advantages:
Both plugins have complementary features that will boost your website security.
Both plugins load fast and work with SEO and Cache plugins.
Both plugins work on all server types (Apache, Nginx, IIS, LiteSpeed, etc).
Hide My WP Ghost works as security through obscurity and prevents hacker bots access to vulnerable files, plugins and themes.
Limit Login Attempts Reloaded works like a shield against brute force attacks on login page.
HWMP Ghost will complement Limit Login Attempts Reloaded Plugin by offering an extra layer of protection that the other doesn’t offer:
With Hide My WP Ghost you prevent attacks from happening, by hiding vulnerabilities in themes, WP core and plugins.
Hackers and hacker bots can’t attack what they can’t find.
It does a bit more, as you will see on the Features list.
This offers an extra layer of protection that you don’t get from other plugins, because those focus on helping you while you are attacked and after you were attacked, by cleaning files, detecting malware, injections etc.
With Hide My WP Ghost you can avoid getting injections in the first place.
Hide My WP Ghost:
Protect your WordPress site against hacker bots and spammers.
Protect your site against common attacks, such as script and SQL injection and brute-force, by camouflaging those vulnerabilities without physically changing any file or directory.
Limit Login Attempts Reloaded
Limit Login Attempts Reloaded stops brute-force attacks and optimizes your site performance by limiting the number of login attempts that are possible through the normal login as well as XMLRPC, Woocommerce and custom login pages.
User both plugins on your server to boost your security
What Features to Activate in Hide My WP Ghost when Limit Login Attempts Reloaded plugin is activated.
Even if both plugins are considered WordPress Security plugins, Loginizer and Hide My WP Ghost work together to add security layers on your websites by stopping the hackers’ attacks and preventing data loss.
Advantages:
Both plugins have complementary features that will boost your website security.
Both plugins load fast and work with SEO and Cache plugins.
Both plugins work on all server types (Apache, Nginx, IIS, LiteSpeed, etc).
Hide My WP Ghost works as security through obscurity and prevents hacker bots access to vulnerable files, plugins and themes.
Loginizer works like a shield against brute force attacks on login page .
HWMP Ghost will complement Loginizer Plugin by offering an extra layer of protection that the other doesn’t offer:
With Hide My WP Ghost you prevent attacks from happening, by hiding vulnerabilities in themes, WP core and plugins.
Hackers and hacker bots can’t attack what they can’t find.
It does a bit more, as you will see on the Features list.
This offers an extra layer of protection that you don’t get from other plugins, because those focus on helping you while you are attacked and after you were attacked, by cleaning files, detecting malware, injections etc.
With Hide My WP Ghost you can avoid getting injections in the first place.
Hide My WP Ghost:
Protect your WordPress site against hacker bots and spammers.
Protect your site against common attacks, such as script and SQL injection and brute-force, by camouflaging those vulnerabilities without physically changing any file or directory.
Loginizer
It helps you fight against brute force attack by blocking login for the IP after it reaches maximum retries allowed.
You can blacklist or whitelist IPs for login using Loginizer. You can use various other features like Two Factor Auth, reCAPTCHA, PasswordLess Login, etc
Use both plugins on your server to boost your security.
What Features to Activate in Hide My WP Ghost when Loginizer plugin is activated.
Even if both plugins are considered WordPress Security plugins, WordFence and Hide My WP Ghost work together to add security layers on your websites by stopping the hackers’ attacks and preventing data loss.
Advantages:
Both plugins have complementary features that will boost your website security.
Both plugins load fast and work with SEO and Cache plugins.
Both plugins work on all server types (Apache, Nginx, IIS, LiteSpeed, etc).
Hide My WP Ghost works as security through obscurity and prevents access to vulnerable files, plugins and themes.
Wordfence works like a firewall to prevent Brute Force attacks, integrity scan, malware scan and more.
Hide My WP Ghost will complement Wordfence Security Plugin by offering an extra layer of protection that the other doesn’t offer:
With Hide My WP Ghost you prevent attacks from happening, by hiding vulnerabilities in themes, WP core and plugins.
Hackers and hacker bots can’t attack what they can’t find.
It does a bit more, as you will see on the Features list.
This offers an extra layer of protection that you don’t get from other plugins, because those focus on helping you while you are attacked and after you were attacked, by cleaning files, detecting malware, injections etc.
With Hide My WP Ghost you can avoid getting injections in the first place.
Even if both plugins are considered WordPress Security plugins, Wordfence Security and Hide My WP Ghost work together to add TWO DIFFERENT KINDS of security layers on your websites by stopping the hackers’ attacks and preventing data loss.
Hide My WP Ghost:
Protect your WordPress site against hacker bots and spammers.
Protect your site against common attacks, such as script and SQL injection and brute-force, by camouflaging those vulnerabilities without physically changing any file or directory.
Wordfence Security
Wordfence firewall leverages user identity information in over 85% of the firewall rules, something cloud firewalls don’t have access to. And the firewall doesn’t need to break end-to-end encryption like cloud solutions.
User both plugins on your server to boost your security
What Features to Activate in Hide My WP Ghost when Wordfence plugin is activated.
HWMP Ghost will complement WP Hide & SE PRO Plugin by offering an extra layer of protection that the other doesn’t offer:
With Hide My WP Ghost you prevent attacks from happening, by hiding vulnerabilities in themes, WP core and plugins.
Hackers and hacker bots can’t attack what they can’t find.
It does a bit more, as you will see on the Features list.
This offers an extra layer of protection that you don’t get from other plugins, because those focus on helping you while you are attacked and after you were attacked, by cleaning files, detecting malware, injections etc.
With Hide My WP Ghost you can avoid getting injections in the first place.
Hide My WP Ghost
Protect your site against hacker bots attacks, such as Script and SQL injection, brute-force, XSS, and more, by camouflaging those vulnerabilities without physically changing any file or directory.
WP Hide & SE PRO
Change the default WordPress login urls from wp-admin and wp-login.php to something totally arbitrary. No one will ever know where to try to guess a login and hack into your site.
Even if both plugins are considered WordPress Security plugins, Shield Security and Hide My WP Ghost work together to add security layers on your websites by stopping the hackers’ attacks and preventing data loss.
Advantages:
Both plugins have complementary features that will boost your website security.
Both plugins load fast and work with SEO and Cache plugins.
Both plugins work on all server types (Apache, Nginx, IIS, LiteSpeed, etc).
Hide My WP Ghost works as security through obscurity and prevents access to vulnerable files, plugins and themes.
Shield Security works like a firewall against hackers and malicious bots, of all types and more.
HWMP Ghost will complement Shield Security Plugin by offering an extra layer of protection that the other doesn’t offer:
With Hide My WP Ghost you prevent attacks from happening, by hiding vulnerabilities in themes, WP core and plugins.
Hackers and hacker bots can’t attack what they can’t find.
It does a bit more, as you will see on the Features list.
This offers an extra layer of protection that you don’t get from other plugins, because those focus on helping you while you are attacked and after you were attacked, by cleaning files, detecting malware, injections etc.
With Hide My WP Ghost you can avoid getting injections in the first place.
Even if both plugins are considered WordPress Security plugins, Shield Security and Hide My WP Ghost work together to add TWO DIFFERENT KINDS of security layers on your websites by stopping the hackers’ attacks and preventing data loss.
Hide My WP Ghost:
Protect your WordPress site against hacker bots and spammers.
Protect your site against common attacks, such as script and SQL injection and brute-force, by camouflaging those vulnerabilities without physically changing any file or directory.
Shield Security
It gives you a toolkit with everything you need to expertly secure your site, without being a security expert.
Instead, Shield does most of the heavy lifting for you, so you can get back to focusing on the work you love to do.
User both plugins on your server to boost your security
What Features to Activate in Hide My WP Ghost when Shield Security plugin is activated.
This website uses cookies to improve your experience while you navigate through the website. Out of these, the cookies that are categorized as necessary are stored on your browser as they are essential for the working of basic functionalities of the website. We also use third-party cookies that help us analyze and understand how you use this website. These cookies will be stored in your browser only with your consent. You also have the option to opt-out of these cookies. But opting out of some of these cookies may affect your browsing experience.
Necessary cookies are absolutely essential for the website to function properly. These cookies ensure basic functionalities and security features of the website, anonymously.
Cookie
Duration
Description
cookielawinfo-checkbox-analytics
11 months
This cookie is set by GDPR Cookie Consent plugin. The cookie is used to store the user consent for the cookies in the category "Analytics".
cookielawinfo-checkbox-functional
11 months
The cookie is set by GDPR cookie consent to record the user consent for the cookies in the category "Functional".
cookielawinfo-checkbox-necessary
11 months
This cookie is set by GDPR Cookie Consent plugin. The cookies is used to store the user consent for the cookies in the category "Necessary".
cookielawinfo-checkbox-others
11 months
This cookie is set by GDPR Cookie Consent plugin. The cookie is used to store the user consent for the cookies in the category "Other.
viewed_cookie_policy
11 months
The cookie is set by the GDPR Cookie Consent plugin and is used to store whether or not user has consented to the use of cookies. It does not store any personal data.
Functional cookies help to perform certain functionalities like sharing the content of the website on social media platforms, collect feedbacks, and other third-party features.
Analytical cookies are used to understand how visitors interact with the website. These cookies help provide information on metrics the number of visitors, bounce rate, traffic source, etc.