Skip to contentSkip to main navigation Skip to footer

Protect My WordPress Website

This is the question we asked ourselves as a software company many years ago when we switched our business to WordPress CMS. It’s hard to trust an open-source CMS where our websites will probably end up being hacked.

As a developer, I wanted to know how to protect my WordPress website and how to protect my clients’ websites. I started studying WordPress CMS, its weak points and strong points and I found out that not the WordPress core itself is the main issue but the installed plugins and themes.

Many free plugins and themes were built by beginner programmers without any security knowledge and frankly, they probably didn’t even care about their users. As WordPress CMS can’t work without a plugin or a theme, most probably each production website had installed, at one point, a vulnerable plugin or a theme.

How To Protect My WordPress Website

Luckily, there are many security plugins now that verify the plugin integrity and vulnerability but they can’t keep up with all the last updates and the new plugins on the market.

About 4 years ago our company came up with the idea of creating a security plugin that will protect all the vulnerable plugins and themes by blocking the attacks on the common WordPress URLs and Paths.

This idea led us to create the Hide My WP Ghost plugin. A plugin that allows you to change all the common paths with hidden paths and block the hacker’s bots access to the known vulnerable paths.

We successfully reduced the number of SQL and Script injection attacks up to 99% with the Hide My WP Ghost plugin. We significantly reduced the number of Brute Force and XSS Attacks.

The best part is that Hide My WP Ghost works together with all other security plugins on the market by adding a layer of security for each business.

Some of the popular security plugins are Wordfence, iThemes Security, Shield Security, etc.

We look forward on keeping WordPress the safest open-source CMS and reducing the bot attacks as low as possible.

Secure Hosting Companies

Choosing a safe hosting is also important when you create a website for your business. There are many WordPress dedicated hosting companies who offer security and management.

Some of the great WordPress hosting companies are WpEngine, InMotion, CloudWays, etc.

Note! Keep in mind to choose a plan that will keep a daily backup on your website’s data.

Once you have a secure hosting plan and security plugins installed on your server, you don’t have to worry about getting hacked and you can focus on getting the best out of your online business.

If you have any question, please contact us

Hide My WP Ghost Advanced Pack

Advanced Pack takes the basic security provided by the free version and enhances it with cutting-edge features like Two-Factor Authentication (2FA), Temporary Login, and more.

You can download the Hide My WP Ghost Advanced Pack directly here.


Key Features of the Hide My WP Ghost Advanced Pack

  1. Two-Factor Authentication (2FA)
    One of the standout features of the Advanced Pack is the addition of Two-Factor Authentication (2FA). 2FA adds a layer of security to your login process, requiring users to enter not just a password, but also a second verification code, typically sent to their mobile device or email. This feature protects against brute force attacks, where hackers attempt to guess your password. Even if your password is compromised, unauthorized users will be unable to log in without the second authentication factor. 2FA is a must-have for any site where security is a top priority.
  1. Temporary Login Without a Password
    The Temporary Login feature is an incredibly useful tool for site administrators who need to grant short-term access to a developer, client, or team member. With this feature, you can create temporary login links that allow users to access your site without a password for a set amount of time. After the time expires, the link automatically becomes invalid. This feature eliminates the need to create additional user accounts or share sensitive credentials and is ideal for scenarios where temporary access is required. It’s particularly useful for troubleshooting, website audits, or content updates.

How the Advanced Pack Works with the Free Version

The Hide My WP Ghost Advanced Pack is designed to fully work with the free version of the plugin, complementing its basic functionalities. If you’re already using the free version, upgrading to the Advanced Pack is seamless. The Advanced Pack installs as an additional feature set, unlocking some premium capabilities while retaining all the core features you’re accustomed to.

Conclusion

The Hide My WP Ghost Advanced Pack is a powerful upgrade that enhances your website with important security features like Two-Factor Authentication, Temporary Login, advanced file scanning, and brute force protection. Whether you run a small blog or a large e-commerce site, these additional layers of security offer significant protection against a wide range of threats.

Use Hide My WP Ghost with LiteSpeed

Setup LiteSpeed

LiteSpeed is a high-performance plugin that provides an excellent caching solution.

If you want to optimize your WordPress website’s performance, LiteSpeed is a great plugin to help you achieve that. The best part is that it’s compatible with Hide My WP Ghost, allowing you to keep your website secure while improving its speed.

To take full advantage of LiteSpeed, you need to activate the caching feature, which will store your website’s files on the server for faster delivery to your visitors. Once caching is enabled, you can use the Identify Cached Files option to determine which files are cached and where they’re located.

However, if you’re using Hide My WP Ghost, you need to make sure that the paths to these cached files are changed to prevent detection by potential attackers. To do this, you can use the plugin’s Change Paths in Cache Files option, which will automatically update the paths to your cached files.

But that’s not all. LiteSpeed also comes with CSS/JS Optimization feature that can minify and combine your website’s CSS and JS files for faster load times. To take advantage of this feature, you need to activate the Minification option in the LiteSpeed > Page Optimization section.

Once the Minification option is activated, LiteSpeed will automatically combine and minify your website’s CSS and JS files, reducing their size and improving your website’s performance. As with the caching feature, you can use Hide My WP Ghost’s “Change Paths in Cache Files” option to change the paths to these optimized files and keep your website secure.


QUIC.cloud

QUIC.cloud is a content delivery network (CDN) and dynamic content accelerator that works seamlessly with LiteSpeed to improve website performance and load times by caching and delivering content from servers close to your users.

When Hide My WP Ghost is in Ghost Mode, it may block or interfere with external services attempting to connect to your website, including QUIC.cloud. To ensure smooth connectivity between LiteSpeed and QUIC.cloud while Hide My WP Ghost is active, you’ll need to whitelist specific IP addresses and perform a few additional steps.

Whitelist QUIC.cloud IP Addresses

First, you need to whitelist the IP addresses used by QUIC.cloud to allow these servers to communicate with your website without being blocked by Hide My WP Ghost.

  1. Log in to your WordPress dashboard.
  2. Navigate to Hide My WP > Firewall > Whitelist > Whitelist IPs.
  3. Visit the QUIC.cloud IP addresses page at QUIC.cloud IPs to get the latest list of IP addresses used by QUIC.cloud.
  4. Copy the IP addresses from the QUIC.cloud page.
  5. Paste these IP addresses into the Whitelist IP section in Hide My WP Ghost.
  6. Save your changes.

By whitelisting these IPs, you’re allowing QUIC.cloud servers to bypass the Ghost Mode restrictions, ensuring they can interact with your site without being blocked.

Obtain and Configure the LiteSpeed Domain Key

After whitelisting the IPs, the next step is to get the Domain Key required for connecting your site to QUIC.cloud via LiteSpeed.

  1. Go to LiteSpeed Cache > General in your WordPress dashboard.
  2. Locate the Domain Key section.
  3. Click on the “Request Domain Key” button.
  4. LiteSpeed will now attempt to connect to QUIC.cloud to retrieve the Domain Key.

Because you’ve whitelisted the necessary IPs, this process should complete successfully. Once obtained, this key will authenticate your domain with QUIC.cloud, enabling the full suite of performance and caching features.

How to Add Files to “Hide WordPress Common Files”

Understanding the Goal

You want to hide additional common WordPress files, specifically wp-cron.php, using the Hide My WP Ghost plugin. This is accomplished by adding a filter to modify the list of files to be hidden.


Adding the Filter in WordPress

You need to add a filter to either the functions.php file of your active theme or the wp-config.php file. This filter will modify the hidden files list.

Option A: Editing functions.php

  1. Navigate to your WordPress admin dashboard.
  2. Go to Appearance > Theme File Editor.
  3. Select the functions.php file from the right-hand side menu.
  4. Add the following code at the end of the functions.php file
add_filter('hmwp_hide_commonfiles_files', function($files){
  $files[] = 'wp-cron.php';
  return $files;
});

Option B: Editing wp-config.php

  1. Access your WordPress site’s root directory via FTP or your hosting control panel’s file manager.
  2. Open the wp-config.php file for editing.
  3. Add the following code at the end of the wp-config.php file
add_filter('hmwp_hide_commonfiles_files', function($files){
  $files[] = 'wp-cron.php';
  return $files;
});

Adding Multiple Files

If you want to hide additional files such as wp-trackback.php and xmlrpc.php, you can modify the code as follows:

add_filter('hmwp_hide_commonfiles_files', function($files){
    $files[] = 'wp-cron.php';
    $files[] = 'wp-trackback.php';
    $files[] = 'xmlrpc.php';
    return $files;
});

Hiding the File in Hide My WP Ghost

After adding the filter, you need to select the file and save the settings in the Hide My WP Ghost to apply the changes.

  1. Navigate to the Hide My WP > Change Paths > WP Core Security > Hide WordPress Common Files.
  2. Select the file from the list, in our case is wp-cron.php file
  3. Click the Save Settings button to ensure the file is hidden.

Note! For Nginx server, you need to restart the Nginx service after saving the settings in Hide My WP Ghost plugin.


Important

  • Avoid Breaking Functionality: Be careful not to hide files that are essential for WordPress functionality. For instance, hiding xmlrpc.php can prevent remote publishing and applications that use XML-RPC from functioning correctly.
  • Testing: After adding the filter, thoroughly test your website to ensure it continues to function as expected. Check for any broken features or errors.

By following this tutorial, you can easily extend the functionality of the Hide My WP Ghost plugin to hide additional files, increasing your WordPress site’s security.

Always test your changes and avoid hiding critical WordPress files to maintain the site’s functionality.

How to Remove the Sitemap Author in WordPress

Why Remove the Sitemap Author?

The sitemap author provides information about who created the sitemap. While this might seem harmless, it can reveal that your site is powered by WordPress, making it a target for theme detectors and hackers.

Additionally, the sitemap author does not contribute to SEO, so removing it won’t negatively impact your site’s search engine performance.


Step-by-Step Guide

  1. In your WordPress dashboard, navigate to Hide My WP > Tweaks > Feed & Sitemap.
  2. Activate the option Change Paths in Sitemaps XML to load the support for Sitemap in Hide My WP Ghost.
  3. Now, activate the Remove the sitemap style & author name option.

Activating Remove the sitemap style & author name removes the sitemap style and author name and loads the standard view of the sitemap.

Activating Change Paths in Sitemaps XML changes the image paths in the Sitemap XML This ensures that Google indexes the new image paths, enhancing your site’s security without affecting your SEO.

After making the necessary adjustments, scroll down and click Save Changes to apply the new settings.

Hide My WP Ghost with WP Security Ninja

Introduction

WordPress, powering over 43% of all websites globally, remains a prime target for bot attacks. WordPress security plugins offer essential features like malware scanning, firewall protection, and login security to secure websites from malicious activities. Hide My WP Ghost and WP Security Ninja are two such plugins that provide a robust defense against potential threats, ensuring the smooth operation of your website.


WP Security Ninja

WP Security Ninja has carved a niche for itself in the WordPress security ecosystem. It provides a broad spectrum of security features designed to protect your website from a variety of threats.

Key Features of WP Security Ninja

  • Malware Scanning: WP Security Ninja performs comprehensive scans to detect malware, vulnerabilities, and suspicious code. It ensures your website is free from harmful elements that can compromise its functionality.
  • Firewall Protection: The plugin includes a powerful firewall that blocks malicious traffic, preventing unauthorized access to your website.
  • Security Checks: WP Security Ninja runs over 50 security tests to identify potential vulnerabilities. It checks for issues such as outdated plugins, weak passwords, and open ports.
  • Automatic Updates: Keeping your WordPress core, themes, and plugins updated is crucial for security. WP Security Ninja offers automatic updates to ensure your website is always running the latest, most secure versions.
  • Brute Force Protection: This feature limits login attempts, thwarting hackers who use brute force methods to gain access to your website.

Hide My WP Ghost

Hide My WP Ghost, while complementing the features offered by WP Security Ninja, brings a unique set of additional capabilities that enhance your website’s security posture.

Key Features of Hide My WP Ghost

  • Two-Factor Authentication (2FA): This feature adds an extra layer of security by requiring users to verify their identity through a second method, such as a mobile app or email, in addition to their password.
  • Temporary Login: Hide My WP Ghost allows for the creation of temporary login links. This is particularly useful for granting temporary access to developers or guest authors without sharing permanent login credentials.
  • Magic Link Login: Allows users to log in with a secure link sent to their email.
  • 8G Firewall: The 8G Firewall is a robust security measure designed to block a wide range of malicious requests and attacks. It operates at the server level, offering a high degree of protection against various types of threats.
  • Country Blocking: This feature enables you to restrict access to your website from specific countries. By blocking traffic from regions known for high levels of cyber-attacks, you can significantly reduce the risk of unauthorized access.
  • Header Security: Hide My WP Ghost enhances your website’s security by securing HTTP headers. This helps protect against attacks such as cross-site scripting (XSS) and clickjacking.
  • Customizable and Hidden WP Paths: By changing default WordPress paths and hiding them, Hide My WP Ghost makes it more difficult for hackers to identify your site as a WordPress site, thus reducing the likelihood of targeted attacks. This is the most efficient way to protect vulnerable themes and plugins.
  • Brute Force Protection: This feature limits login attempts, thwarting hackers who use brute force methods to gain access to your website.

Using Hide My WP Ghost and WP Security Ninja Together

Integrating WP Security Ninja and Hide My WP Ghost is a simple process, and both plugins can be installed and configured through the WordPress dashboard.

Here’s a step-by-step guide to leverage the combined power of these plugins:

  • Install and configure WP Security Ninja: Configure the settings to enable malware scanning, firewall protection, and run a security check to fix the security tasks.
  • Install and configure Hide My WP Ghost: Go through the setup to customize and hide the WP common paths, configure two-factor authentication, 8G Firewall, brute force protection, country blocking, header security, and more.
  • Monitor and Maintain: Regularly check the security logs and alerts from both plugins. Ensure that your WordPress core, themes, and plugins remain updated. Periodically review and adjust the settings in both plugins to adapt to emerging threats and changing website requirements.

Conclusion

By implementing both plugins, you can create a multi-layered security strategy that secures your website from existing vulnerabilities and most threats. Regular monitoring and maintenance ensure that your site remains secure, providing peace of mind and allowing you to focus on growing your online presence.

How To Implementing Website Security Headers

What are Security Headers?

Security headers are directives included in the HTTP responses from web servers that instruct the web browser on how to handle the content of a web page.

These headers help protect web applications from various security threats by mitigating risks associated with cross-site scripting (XSS), cross-site request forgery (CSRF), clickjacking, and other common vulnerabilities.

By setting security policies at the browser level, these headers provide an additional layer of defense against potential attacks.

How to add security headers using Hide My WP Ghost plugin.


Strict-Transport-Security (HSTS)

The Strict-Transport-Security (HSTS) header ensures that a web application is accessed only over HTTPS, preventing man-in-the-middle attacks and cookie hijacking.

Implementation

To implement HSTS, add the following header to your HTTP response:

Strict-Transport-Security: max-age=31536000; includeSubDomains; preload

Details

  • max-age=31536000: Specifies the duration (in seconds) that the browser should remember to only access the site via HTTPS.
  • includeSubDomains: Applies the rule to all subdomains.
  • preload: Requests inclusion in the HSTS preload list, a list of sites hardcoded into browsers as HTTPS-only.

Content-Security-Policy (CSP)

The Content-Security-Policy (CSP) header helps prevent cross-site scripting (XSS), clickjacking, and other code injection attacks by specifying which sources of content are allowed to be loaded on the site.

Implementation

A typical CSP header might look like this:

Content-Security-Policy: default-src 'self'; script-src 'self' https://apis.google.com

Details

  • default-src 'self': Only allows resources from the site’s own origin.
  • script-src 'self' https://apis.google.com: Allows scripts from the site’s own origin and Google’s APIs.

X-Frame-Options

The X-Frame-Options header prevents clickjacking attacks by controlling whether a browser should be allowed to render a page in a <frame>, <iframe>, <embed>, or <object>.

Implementation

To implement, add one of the following headers:

X-Frame-Options: DENY

or

X-Frame-Options: SAMEORIGIN

Details

  • DENY: Prevents the page from being framed.
  • SAMEORIGIN: Allows framing only by the same origin.

X-XSS-Protection

The X-XSS-Protection header enables the cross-site scripting (XSS) filter built into most modern web browsers, providing a basic level of protection against XSS attacks.

Implementation

Add the following header:

X-XSS-Protection: 1; mode=block

Details

  • 1: Enables the XSS filter.
  • mode=block: Instructs the browser to block the page if an XSS attack is detected.

X-Content-Type-Options

The X-Content-Type-Options header prevents browsers from interpreting files as a different MIME type than what is specified, which can help mitigate drive-by download attacks.

Implementation

Add the following header:

X-Content-Type-Options: nosniff

Details

  • nosniff: Ensures the browser adheres to the MIME types specified in the Content-Type headers.

Cross-Origin-Embedder-Policy (COEP)

The Cross-Origin-Embedder-Policy header ensures that a document can only load resources that explicitly grant permission, enhancing the security of embedded content.

Implementation

Add the following header:

Cross-Origin-Embedder-Policy: require-corp

Details

  • require-corp: Requires cross-origin resources to explicitly grant permission using the Cross-Origin-Resource-Policy header.

Cross-Origin-Opener-Policy (COOP)

The Cross-Origin-Opener-Policy header helps protect against cross-origin attacks, such as cross-origin information leaks, by ensuring that a top-level document does not share a browsing context group with cross-origin documents.

Implementation

Add the following header:

Cross-Origin-Opener-Policy: same-origin

Details

  • same-origin: Ensures the document is isolated from other origins, reducing the risk of cross-origin attacks.

Regularly reviewing and updating these headers in response to new security threats is also crucial in maintaining robust security.

How to Set Up Hide My WP Ghost in Safe Mode in 3 Minutes

This video shows how to set up Hide My WP Ghost in Safe Mode with custom login and setup – in just 3 minutes!

NOTE: The plugin was configured on an Apache Server. Certain manual actions are required to configure Hide My WP Ghost on Nginx and IIS servers.

VIDEO OUTLINE

  1. Min. 00.04- 1.01: Select and Save SAFE Mode
  2. Min. 1.02 – 2.31: Change Paths Settings
  3. Min. 2.32 – 2.57: Run New Frontend Login Test
  4. Min. 2.58 – 3.28 : View Changes

Select SAFE Mode and Save Settings

👉Min. 00.04- 1.01

Recommended Actions:

  • Select Safe Mode
  • A pop-up will appear showing you all the predefined paths that Hide My WP Ghost sets in Safe Mode. READ the info.
  • Click on Continue, and then SAVE.
  • Run the Frontend Login test. 
  • SAVE your login URL (!very important that you do this)
  • SAVE your SAFE URL (!also very important, you’ll need this in case you can’t login)
  • If the test is successful, click on Yes, it’s working.

Change Paths Settings

👉 Min. 1.02 – 2.31

Admin Security

  • Custom Admin Path – Recommended action: Leave as is
  • Hide wp-admin – Recommended: ON 
  • Hide wp-admin From Non-Admin users – Recommended: OFF

Login Security

  • Custom Login Path – Recommended action: Customize
  • Hide wp-login.php – Recommended: ON 
  • Hide login Path – Recommended: ON
  • Custom Lost Password Path – Recommended action: Leave as is
  • Custom Register Path – Recommended action: Leave as is
  • Custom Logout Path – Recommended action: Leave as is

Ajax Security

  • Custom admin-ajax Path – Recommended action: Customize
  • Hide wp-admin from Ajax URL – Recommended: ON
  • Change Paths in Ajax Calls – Recommended: ON

User Security

  • Custom Author Path – Recommended action: Leave as is
  • Hide Author ID URL – Recommended: ON

WP Core Security

  • Custom wp-content Path – Recommended action: Leave as is
  • Custom wp-includes Path – Recommended action: Leave as is
  • Custom uploads Path – Recommended action: Leave as is
  • Custom comment Path – Recommended action: Leave as is
  • Hide WordPress Common Paths – Recommended: ON
  • Hide File Extensions – Recommended action: Leave as is
  • Hide WordPress Common Files – Recommended: ON
  • Hide Common Files – Recommended Action: ADD wp-comments-post.php
  • Disable Directory Browsing – Recommended: OFF

Plugins Security

  • Custom plugins Path – Recommended action: Leave as is
  • Hide Plugin Names – Recommended: ON
  • Hide All the Plugins – Recommended: OFF
  • Hide WordPress Old Plugins Path – Recommended: ON
  • Show Advanced Options– Recommended: OFF

Themes Security

  • Custom themes Path – Recommended action: Leave as is
  • Hide Theme Names – Recommended: ON
  • Hide WordPress Old Themes Path – Recommended: ON
  • Custom theme style name – Recommended action: Leave as is
  • Show Advanced Options – Recommended: OFF

API Security

  • Custom wp-json Path – Recommended action: Leave as is
  • Hide REST API URL link – Recommended: ON
  • Disable REST API access – Recommended: OFF
  • Disable XML-RPC access – Recommended: ON
  • Disable RSD Endpoint from XML- RPC – Recommended: ON

Firewall and Headers

  • Add Security Headers for XSS and Code Injection Attacks – Recommended: ON
  • Strict-Transport-Security – Recommended: ACTIVE, leave as is
  • Content-Security-Policy – Recommended: ACTIVE, leave as is
  • X-XSS- Protection – Recommended: ACTIVE, leave as is
  • X-Content-Type- Options – Recommended: ACTIVE, leave as is
  • Cross-Origin-Embedder- Policy – Recommended action: ADD then leave as is
  • Cross-Origin-Opener-Policy – Recommended action: ADD then leave as is
  • X-Frame-Options – Recommended action: ADD then leave as is
  • Remove Unsafe Headers – Recommended: ON
  • Block Theme Detectors Crawlers – Recommended: ON
  • Firewall Against Script Injection – Recommended: ON

Run New Frontend Login Test

👉 Min. 2.32 – 2.57

Recommended Actions:

  • After you save the new settings, Run a new Frontend Login test.
  • SAVE your NEW login URL (!very important that you do this)
  • SAVE your SAFE URL (!also very important, you’ll need this in case you can’t login)
  • If the test is successful, click on Yes, it’s working.

View Changes

👉 Min. 2.58 – 3.28

Recommended Actions: 

  • Click on Visit Site to see the changes you’ve enabled using Hide My Ghost take effect.
  • Take a look at your site’s source code to see the modified paths.

👋Note! The settings shown in this video will work best for most sites – and present a way to quickly, safely, and effectively set up SAFE Mode to increase your site’s protection.

However, the ideal settings can look different from case to case, and you can always further customize these settings based on your needs and wants.

We advise you to always read the documentation that we link to from within the plugin and ensure you clearly understand what each setting enables you to do.

How to Activate WordPress Debugging

Debugging is an essential process for identifying and fixing issues in WordPress. Activating debugging mode in WordPress provides detailed error messages and logs that can help diagnose problems. Here’s a step-by-step guide on how to enable debugging in WordPress:


Step 1: Access Your wp-config.php File

The wp-config.php file is located in the root directory of your WordPress installation. This file contains configuration settings for your WordPress site.

  1. Connect to Your Server: Use an FTP client or your web hosting file manager to access your WordPress files.
  2. Locate the wp-config.php File: Navigate to the root directory of your WordPress installation, where the wp-config.php file is located.

Step 2: Edit the wp-config.php File

To activate debugging, you need to edit the wp-config.php file and add or modify certain lines of code.

  1. Open the wp-config.php File: Open the file in a text editor.
  2. Add Debugging Code: Look for the line that says /* That's all, stop editing! Happy blogging. */. Just above this line, add or modify the following lines of code:
// Enable WP_DEBUG mode
define( 'WP_DEBUG', true );

// Enable Debug logging to the /wp-content/debug.log file
define( 'WP_DEBUG_LOG', true );

// Disable display of errors and warnings 
define( 'WP_DEBUG_DISPLAY', false );
@ini_set( 'display_errors', 0 );

// Use dev versions of core JS and CSS files (only needed if you are modifying these files)
define( 'SCRIPT_DEBUG', true );

Explanation of the Code

  • WP_DEBUG: This constant enables the debugging mode. Setting it to true activates debugging throughout your WordPress site.
  • WP_DEBUG_LOG: This constant allows logging of errors to a debug.log file within the wp-content directory. This is useful for reviewing errors at a later time.
  • WP_DEBUG_DISPLAY: By default, debugging information is displayed within the HTML of your pages. Setting this to false prevents this information from being shown on your site. The @ini_set line further ensures that errors are not displayed.
  • SCRIPT_DEBUG: This constant forces WordPress to use the non-minified versions of core JavaScript and CSS files. This is helpful if you are making changes to these files.

Step 3: Save and Upload the File

After adding the debugging code, save the wp-config.php file and upload it back to your server if you edited it locally.


Step 4: Review the Debug Log

When WP_DEBUG and WP_DEBUG_LOG are enabled, WordPress will log errors and warnings to a file named debug.log located in the wp-content directory. You can access and review this file to understand what issues are occurring on your site.

  1. Navigate to wp-content: Go to the wp-content directory in your WordPress installation.
  2. Open debug.log: Open the debug.log file to see the list of errors and warnings logged by WordPress.

Activating WordPress debugging is a straightforward process that involves editing the wp-config.php file and adding specific constants. This enables detailed logging of errors, which is crucial for troubleshooting and resolving issues on your WordPress site. Remember to disable debugging mode once you have finished troubleshooting to prevent potential security risks.

How To Change or Remove Login Logo Link

WordPress, by default, displays its logo on the login page, and this logo links to the official WordPress website. However, you might want to customize this link to redirect to your website’s homepage or another specific page. This tutorial will guide you through the process of changing the link on the login page logo using hooks. We’ll also cover how to change the alt text of the logo to display your site’s name.


1. Accessing the Theme’s Functions File

First, you need to access your theme’s functions.php file. This file allows you to add custom PHP code to your theme.

Via WordPress Admin Dashboard:

  • Navigate to Appearance > Theme Editor.
  • In the Theme Files list on the right, find and click on functions.php.

Via FTP or File Manager:

  • Use an FTP client or your web host’s file manager to navigate to wp-content/themes/your-theme/.
  • Open the functions.php file for editing.

To change the link of the login page logo from WordPress.org to your site’s homepage, you need to use the login_headerurl filter. Add the following code to your functions.php file:

// Changing the logo link from wordpress.org to your site
function mb_login_url() {
    return home_url();
}

add_filter('login_headerurl', 'mb_login_url');

Or, if you want to remove the link:

add_filter('login_headerurl', '__return_false');

Explanation:

  • mb_login_url: This function returns the URL of your site’s homepage using the home_url() function.
  • add_filter('login_headerurl', 'mb_login_url'): This line applies the mb_login_url function to the login_headerurl filter, changing the logo link.

3. Changing the Logo Alt Text

Next, to change the alt text of the login page logo to display your site’s name, use the login_headertitle filter. Add the following code to your functions.php file:

// Changing the alt text on the logo to show your site name
function mb_login_title() {
    return get_option('blogname');
}

add_filter('login_headertitle', 'mb_login_title');

Explanation:

  • mb_login_title: This function returns the site name by retrieving the blogname option from your site’s settings.
  • add_filter('login_headertitle', 'mb_login_title'): This line applies the mb_login_title function to the login_headertitle filter, changing the alt text of the logo.

4. Save Changes

After adding the above code to your functions.php file, save the changes. If you are using the Theme Editor, click the Update File button. If you are using an FTP client or file manager, upload the modified functions.php file back to your server.


5. Verify Changes

To ensure that the changes have been applied correctly:

  1. Log out of your WordPress admin dashboard.
  2. Navigate to your login page (typically found at yourdomain.com/wp-login.php).
  3. Verify that the logo now links to your homepage and that the alt text displays your site’s name.

Additional Tips

  • Custom Login Page Plugins: Consider using a custom login page plugin for more extensive customizations. Plugins like “LoginPress” offer a user-friendly interface for modifying the login page.

Geo Security & Country Blocking

As it is essential these days to have higher and higher security, we included the new Geo Security (Country Blocking) feature in the Hide My WP Ghost plugin.


What is Geo Security?

Geo Security, specifically the Country Blocking feature, allows website administrators to restrict access to their websites based on geographic locations.

This means that visitors from certain countries can be blocked from accessing the site, thereby reducing the risk of malicious activities originating from those regions.

The Hide My WP Ghost plugin integrates this feature to provide an additional layer of security for WordPress sites.


How does Country Blocking it work?

The Country Blocking feature is user-friendly and can be easily configured within the Hide My WP Ghost plugin settings. Administrators can select the countries and paths they wish to block from a list.

Entire website country blocking

This feature allows admins to block entire countries or specific IP addresses within those countries. This flexibility ensures that you can tailor your security measures to your specific needs.

Path-based country blocking

With path-based blocking, the admins can specify the paths and subpath they want to restrict on specific countries. This is useful to prevent any registration or login process on specific countries. It can also be used to restrict shopping on specific countries.


Benefits of Country Blocking

By blocking access from countries known for high levels of cybercrime, you can significantly reduce the risk of hacking attempts, DDoS attacks, and other malicious activities. This proactive approach enhances the overall security posture of your website.

Reducing unwanted traffic from certain regions can improve your website’s performance. With fewer malicious requests, your server can allocate more resources to legitimate users, resulting in faster load times and a better user experience.

The intuitive interface of the Hide My WP Ghost plugin simplifies the management of blocked countries. Administrators can easily add or remove countries from the block list, ensuring that security policies remain up-to-date and effective.


How to Enable Country Blocking in Hide My WP Ghost

country blocking in hide my wp ghost
  • Install and Activate the Plugin: Ensure you have the Hide My WP Ghost plugin installed and activated on your WordPress site.
  • Access Geo Security: Go to Hide My WP > Firewall > Geo Security and activate Country Blocking feature.
  • Select Countries: Choose the countries you wish to block from the provided list. For path-based blocking, add the list of paths you want to block for the specific countries.
  • Save Changes: Save your settings to activate the Country Blocking feature.

Conclusion

The new Geo Security feature in the Hide My WP Ghost plugin represents a significant advancement in website security.

With its easy configuration and powerful functionality, the Country Blocking feature is a must-have for any WordPress site looking to strengthen its security measures.

Embrace this new level of security and enjoy peace of mind knowing your site and business is protected against global hacker bots’ attacks.

How To Change File Permissions in WordPress

Why Are File Permissions Important in WordPress?

File permissions are a crucial aspect of website security. They determine who can access, modify, or delete files and directories on your server. Properly configured permissions help safeguard your WordPress site against unauthorized access and malicious activities. Here’s why they matter:

  1. Security: Incorrect permissions can expose sensitive files, making your site vulnerable to attacks. By setting appropriate permissions, you limit access to authorized users only.
  2. Protection Against Exploits: Some plugins, themes, or poorly coded scripts may have vulnerabilities. Proper permissions prevent these from being exploited by malicious actors.
  3. Data Integrity: Correct permissions ensure that critical files (such as configuration files) remain unchanged. Unauthorized modifications could lead to site malfunction.
  4. User Isolation: Different users (e.g., web server, FTP user, WordPress admin) require varying levels of access. Permissions allow you to isolate user roles effectively.

Changing File Permissions Using Plugin

Since Hide My WP Ghost 7.3 fixing file permission is one click away. When you run a Security Check in Hide My WP Ghost, if there are any file permission issues, you have the option to fix them right away.

Click to fix it and select if you want a complete fix of all directories, files and config files or just the main directories.

The default permissions chmod are:

  • Directories – 0755
  • Files – 0644
  • Config Files – 0444

After the fix, run the security check again and make sure all security tasks are completed.


Changing File Permissions Using FTP

FTP (File Transfer Protocol) is a widely used method for managing files on a web server. Follow these steps to adjust file permissions using an FTP client (e.g., FileZilla):

  1. Connect to Your WordPress Site:
    • Open your FTP client (e.g., FileZilla).
    • Enter your FTP server details (usually provided by your hosting provider).
    • Navigate to your WordPress installation directory.
  2. Set Folder Permissions:
    • Right-click your WordPress folder and select “File permissions.”
    • Set the numeric value to 755 for folders.
    • Ensure the “Recurse into subdirectories” box is checked.
    • Click OK to apply the changes.
  3. Adjust File Permissions:
    • Locate your index.php file within the WordPress folder.
    • Right-click the file and select “File permissions.”
    • Set the numeric value to 644 for files.
    • Click OK.
  4. Repeat for Other Files and Folders:
    • Apply similar permissions to other files and directories as needed.

Changing File Permissions Using cPanel File Manager

If your hosting uses cPanel, you can also modify permissions directly through the cPanel File Manager:

  1. Log in to cPanel:
    • Access your cPanel dashboard via your hosting account.
    • Navigate to the File Manager.
  2. Select Your WordPress Folder:
    • Right-click your WordPress folder and choose “Change Permissions.”
    • Set the permission value to 755.
  3. Modify Individual Files:
    • Double-click your WordPress folder to explore its contents.
    • Locate the index.php file.
    • Right-click it and select “Change Permissions.”
    • Set the permission value to 644.

Best Practices for File Permissions in WordPress

  • Folders: Set to 755 (read, write, execute for owner; read and execute for group and others).
  • Files: Set to 644 (read and write for owner; read-only for group and others).

Remember to test your site thoroughly after making changes to ensure everything functions as expected. Regularly review and update permissions to maintain security. If you encounter any issues, seek assistance from your hosting provider or WordPress community.

By following these guidelines, you’ll enhance your WordPress site’s security and protect it from potential threats. 🛡️🔒


Customize Permissions

You can easily customize the file permissions that Hide My WP Ghost sets by adding a simple definition to your wp-config.php file.

Use the following code snippet:

define( 'HMW_FILE_PERMISSION', 0640); 

This code modifies the default file permissions from 0644 to 0640. You can adjust the value 0640 to any permission level that suits your needs. Just place this code in your wp-config.php file, and it will automatically apply your custom settings.

To change the directory permissions:

define( 'HMW_DIR_PERMISSION', 0750);

This code modifies the default dir permissions from 0755 to 0750. You can adjust the value 0750 to any permission level that suits your needs. Just place this code in your wp-config.php file, and it will automatically apply your custom settings.

8g firewall

The New 8G Firewall Protection Is Here

Hide My WP Ghost has just introduced its latest game-changer layer of security: the 8G Firewall. Buckle up as we delve into what this feature brings to the table and how it can revolutionize your WordPress site’s security.


What Is the 8G Firewall?

The 8G Firewall is a formidable shield designed to fend off an array of threats targeting your WordPress site. Crafted by security guru Jeff Starr, this firewall packs a punch without compromising performance.


Key Features of the 8G Firewall:

  1. Robust Defense:
    • Say goodbye to malicious requests, bad bots, and automated attacks.
    • The 8G Firewall stands guard, preventing unauthorized access and suspicious activities.
  2. Rewrite Rules Magic:
    • Unlike traditional firewalls, the 8G Firewall operates through server rewrite rules.
    • No file or directory changes—your SEO and loading speed remain untouched.
  3. Compatibility and Performance:
    • Worried about clashes with existing security plugins? Fear not!
    • The 8G Firewall plays nice with plugins like Wordfence, iThemes Security, and Sucuri.
  4. Vulnerability Concealment:
    • By blocking common WordPress attacks (think wp-admin, wp-login.php, and wp-content), the 8G Firewall throws hackers off their game.
    • Themes, plugins, and core files? Stealth mode activated!

How to Activate the 8G Firewall:

Install Hide My WP Ghost:

  • If you haven’t already, install the Hide My WP Ghost plugin from the WordPress repository.

Navigate to Firewall Settings:

  • Go to your WordPress dashboard and find Hide My WP > Change Paths in the plugins section.
  • Activate a Level of Security like Safe mode or Ghost Mode

Enable the 8G Firewall:

  • Go to Hide My WP > Firewall and activate Firewall Against Script Injection.
  • Select 8G Firewall option from the list of firewalls.
  • If you have Apache server, select if you want to add the firewall on htaccess or load the firewall on WordPress initialization.
  • Activate it to start benefiting from its enhanced security features.

Test and Monitor:

  • Verify that your site is functioning correctly after enabling the firewall.
  • Regularly monitor your site’s security logs to stay informed about blocked threats.

Conclusion:

The 8G Firewall is your silent sentinel, tirelessly guarding your WordPress fortress.

Whether you’re a blogger, business owner, or code wizard, this feature ensures your site stays secure and resilient.

How To Setup Hide My WP on Local Flywheel

What is Flywheel?

Local by Flywheel is a user-friendly local WordPress development tool that simplifies site creation and management on your local machine. It provides features like automatic WordPress installation, advanced development tools, and seamless site synchronization with cloud services.

Local By Flywheel is a Nginx/Apache based solution and it will require some extra setup after you install Hide My WP Ghost plugin on Nginx version.

flywheel local server

Setup Hide My WP Ghost

Please follow this tutorial step by step to set up the Hide My WP Ghost for Local after you installed the plugin:

  1. First, go to Hide My WP > Advanced > Compatibility and select the server type as “Local by Flywheel” to identify the config path and setup.
Hide My WP and Local by Flywheel
  1. In your WordPress dashboard, go to Hide My WP > Change Paths
  2. Select the Safe Mode or Ghost Mode, scroll down and customize the paths as you like.
  1. Click the Save button to save the changes.

After the save process, you should receive a message with instructions to include the line in conf/nginx/site.conf.hbs file from the site folder.

  1. Copy the line include includes/hidemywp.conf .
  2. Open the site folder and edit the file conf/nginx/site.conf.hbs .

  1. Add the line before the WordPress Rules like in the image below.
  1. Restart the server from your panel
  1. After the flywheel server loads, click the “Frontend Test” and see if the frontend is loading correctly. You can also check the website with a different browser or from incognito mode.

  1. If everything loads fine in Frontend, click the button “Yes, it’s working” button. Otherwise click on “No, abort” to roll back to previous settings.

Preventing 404 Errors After Deactivating Hide My WP Ghost Plugin

404 errors can be a frustrating experience for both website owners and visitors alike. These errors occur when a requested page is not found on the server, often leaving users stranded and confused. While this plugin is designed to have custom paths indexed in Google for good SEO, deactivating it can leave behind custom paths that need proper handling to prevent 404 errors.

Fortunately, there are steps that can be taken to prevent 404 errors after deactivating the Hide My WP Ghost plugin, especially if custom paths were utilized in Safe Mode or Ghost Mode. Below, we’ll outline solutions for both Apache and Nginx servers to handle this issue effectively.


Apache Server Solution

If your website is hosted on an Apache server, you can prevent 404 errors by adding specific rules to your .htaccess file. Follow these steps:

  1. Access Your .htaccess File: Locate and access the .htaccess file in the root directory of your WordPress installation. If you can’t find it, ensure that your FTP client or file manager is configured to display hidden files.
  2. Add Rewrite Rules: Insert the following rewrite rules at the beginning of your .htaccess file:
<IfModule mod_rewrite.c>
RewriteEngine On
RewriteRule ^([_0-9a-zA-Z-]+/)?core/views/(.*) /wp-content/themes/$2 [QSA,L]
RewriteRule ^([_0-9a-zA-Z-]+/)?storage/(.*) /wp-content/uploads/$2 [QSA,L]
RewriteRule ^([_0-9a-zA-Z-]+/)?core/(.*) /wp-content/$2 [QSA,L]
RewriteRule ^([_0-9a-zA-Z-]+/)?lib/(.*) /wp-includes/$2 [QSA,L]
</IfModule>
  1. Save and Test: Save the changes to your .htaccess file and test your website to ensure that the 404 errors have been resolved.

Nginx Server Solution

For websites hosted on Nginx servers, the solution involves adding specific rules to the nginx.conf file. Follow these steps:

  1. Access Your nginx.conf File: Locate and access the nginx.conf file on your server. This file is often found in the /etc/nginx/ directory.
  2. Add Rewrite Rules: Insert the following rewrite rules within your Nginx configuration:
if (!-e $request_filename) {
    rewrite ^/([_0-9a-zA-Z-]+/)?core/views/(.*) /wp-content/themes/$2 last;
    rewrite ^/([_0-9a-zA-Z-]+/)?storage/(.*) /wp-content/uploads/$2 last;
    rewrite ^/([_0-9a-zA-Z-]+/)?core/(.*) /wp-content/$2 last;
    rewrite ^/([_0-9a-zA-Z-]+/)?lib/(.*) /wp-includes/$2 last;
}
  1. Save and Reload Nginx: After adding the rewrite rules, save the nginx.conf file and reload Nginx to apply the changes. You can do this by running sudo systemctl reload nginx in your terminal.

Remember, if you’ve used different custom paths, be careful to modify the rewrite rules accordingly to match your specific setup.

By implementing these solutions, you can effectively prevent 404 errors on your WordPress website after deactivating custom paths set by the Hide My WP Ghost plugin.

These rules ensure that custom paths are properly handled, avoiding the frustration of broken links and improving the overall user experience. Always remember to backup your files before making any changes to your website’s configuration.

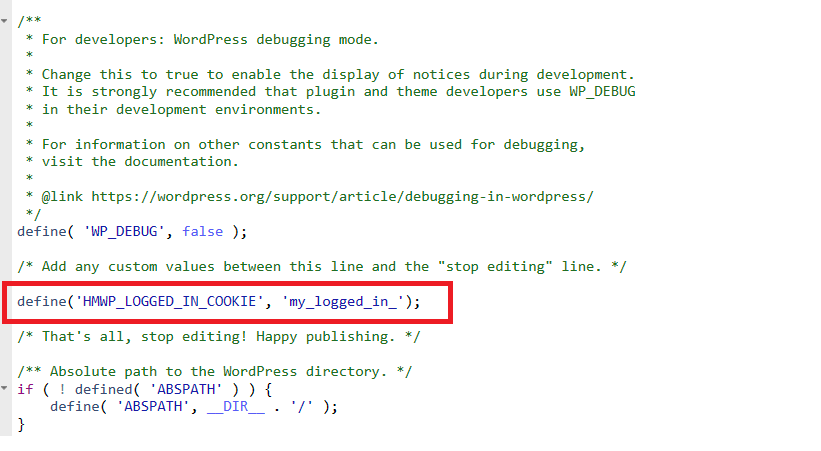
How To Customize hmwp_logged_in_admin & hmwp_logged_in_login

customize hmwp_logged_in cookie

To customize the cookie name with Hide My WP Ghost, it’s quite simple.

Just follow these steps:

  1. Open the wp-config.php file in your WordPress installation.
  1. Locate the line that mentions WP_DEBUG.
  2. Directly after this line, add the following code:
   define('HMWP_LOGGED_IN_COOKIE', 'my_logged_in_');

Here, ‘my_logged_in_’ is the prefix you desire for that cookie. You can replace it with any prefix you prefer.

  1. Save the wp-config.php file after making this change.
  2. Once saved, refresh the settings in Hide My WP Ghost and empty the session cookies to ensure that the changes take effect.

By following these steps, you can easily customize the cookie name according to your preference.

PDFs and Iframes not Loading in Frontend

Some users may encounter issues with PDFs and iframes not loading in the frontend when the plugin is set to Ghost Mode. This problem arises from the specific configuration of the Hide My WP > Firewall & Header options, particularly when the X-Frame-Options is set to SAMEORIGIN. In this article, we will explore the reasons behind this issue and provide solutions to ensure a seamless user experience.

The X-Frame-Options Challenge:

One of the security measures implemented by Hide My WP Ghost is the use of the X-Frame-Options header. When set to SAMEORIGIN, this option restricts web pages from being embedded within iframes on external sites. While this is an effective measure to prevent clickjacking and other security threats, it can inadvertently hinder the loading of PDFs and iframes in the frontend.

X-Frame-Options

The Impact on Iframes:

When the “X-Frame-Options” is set to SAMEORIGIN, it prevents iframes from displaying content that originates from a remote source. This means that if your iframe content is hosted on a different domain, it will be blocked from loading in the frontend. However, if the content is local, residing on the same domain, it should load without any issues.

The PDF Loading Challenge:

Similarly, when trying to embed a PDF in an iframe, the SAMEORIGIN setting can create problems. If the PDF is hosted externally, attempting to load it within an iframe may result in failure due to the restrictive X-Frame-Options policy.

Solutions:

  1. Adjust X-Frame-Options settings: To resolve the issue, consider adjusting the X-Frame-Options setting in the Firewall & Header options. Instead of using SAMEORIGIN, you can set it to ALLOW-FROM and specify the URLs of the domains from which you want to allow iframe embedding.
  2. Localize Content: If possible, host the content locally. This ensures that the iframe content, whether it be a webpage or a PDF, is on the same domain, allowing it to bypass the X-Frame-Options restriction.

By understanding the impact of the X-Frame-Options setting and implementing appropriate adjustments, website administrators can strike a balance between security and functionality, ensuring a smooth user experience for their audience.

Config .htaccess in OpenLiteSpeed: A Step-by-Step Guide

Source: linuxconfig.org

OpenLiteSpeed’s compatibility with Apache makes it an attractive choice for web administrators looking to migrate seamlessly. One of the essential features it inherits from Apache is the support for .htaccess files, allowing users to configure settings on a per-directory basis.

In this tutorial, we will explore how to enable .htaccess support in OpenLiteSpeed on a Linux system, ensuring a smooth transition for those accustomed to Apache’s configuration structure.

Step-by-Step Guide:

Step 1: Accessing OpenLiteSpeed Web Admin Panel: Start by navigating to the OpenLiteSpeed web admin panel at https://localhost:7080/login.php and log in with your administrator credentials.plaintextCopy code$ https://localhost:7080/login.php

Step 2: Enabling .htaccess Support: If you wish to enable .htaccess support for the entire web server, go to Server Configuration > General > Rewrite Control. Change the ‘Auto Load from .htaccess’ option to ‘Yes.’

Step 3: Virtual Host Configuration: If you prefer enabling .htaccess support for a specific virtual host, navigate to Virtual Hosts > Select your virtual host > Rewrite. Change both the ‘Enable Rewrite’ and ‘Auto Load from .htaccess’ options to ‘Yes.’

Step 4: Performing a Graceful Restart: After making these changes, perform a graceful restart for the configuration to take effect. This step is crucial for the web server or virtual host (depending on your configuration choice) to recognize the rewrite rules within the .htaccess files in each directory.plaintextCopy code# /path/to/openlitespeed/bin/lswsctrl restart

Conclusion:

In this tutorial, we have learned how to seamlessly integrate .htaccess support into OpenLiteSpeed on a Linux system.

Whether configuring it server-wide or for a specific virtual host, the process ensures that the web server recognizes and implements the specified rewrite rules within the .htaccess files.

This flexibility allows web administrators to retain the convenience of per-directory configuration while enjoying the benefits of OpenLiteSpeed’s performance and compatibility.

Does WordPress Have Built-in Security?

Hello everyone, and welcome to this video where we’ll be discussing WordPress’s built-in security features. If you’re new to WordPress, you might be wondering if it’s secure enough to use for your website. So, in this video, we’ll explore what security features WordPress offers and how they can protect your website from security threats.

Thankfully, WordPress has several built-in security features that can help keep your site safe.

https://www.youtube.com/watch?v=CLEUIg80a7w

How to Use Hide My WP Ghost with Nginx Hosting Without Editing Config Files

The transition of web hosting services from Apache to Nginx can sometimes lead to compatibility issues with WordPress plugins. This is particularly challenging when the hosting provider doesn’t permit direct editing of server configuration files, as is the case with Nginx sharing hosting.

In this tutorial, we will guide you through the process of using the Hide My WP Ghost plugin with Nginx hosting, ensuring your site remains secure and functional without the need to modify the nginx.conf file.

Fortunately, Hide My WP Ghost is designed to operate seamlessly on different server types, including Nginx, without requiring changes to the server configuration files. Here’s how you can maintain your website’s security with Hide My WP Ghost on an Nginx server:


Use Built-in Features Hide My WP Ghost offers several built-in functionalities that don’t require server file alterations

custom login with hmwp
  • Custom Login, Lost Password, and Signup paths can be set directly within the plugin.
  • Brute Force protection for login and author pages helps prevent unauthorized access attempts.
  • The Firewall feature monitors and blocks suspicious traffic.
  • The Hide Version function conceals your WordPress version number from public view.
  • Two-Factor Authentication (2FA) adds an additional security layer at login.


Use a preset security settings that only activates non-rewrite rules features

  • Go to Hide My WP > Backup / Restore > Preset Security
  • Select the Minimal (No Config Rewrites) security preset
  • Load the preset and follow the instructions is required

The login path will be set as /newlogin by default but it can be changed after loading the preset.


Alternative to security preset loading option

restore no-rewrite config from backup
  • Download no_custom_core_backup.txt file, which is a backup created by Hide My WP Ghost.
  • Restore your settings from Hide My WP > Backup/Restore.
  • After restoring, the default custom login path will be set to /newlogin. If needed, you can change this path according to your preference.

Testing the Plugin After you’ve restored the settings from the backup:

test custom login path with hmwp
  • Test the login functionality to ensure the custom path is working.
  • Verify that other features like Brute Force protection and 2FA are operational.
  • Check the Firewall’s activity log to confirm that it’s actively monitoring your site.

By following this guide, you can successfully use Hide My WP Ghost with any kind of hosting.

For any further assistance or queries, do not hesitate to contact the plugin support team.

Keep your WordPress site secure and running smoothly, regardless of the hosting infrastructure changes.

Is WordPress Website Easily Hacked?

Hey everyone, welcome back to our channel. In this video, we’ll be discussing a topic that’s been on the minds of many website owners. Can hackers easily breach your WordPress security? We’ll be exploring this topic in-depth and giving you valuable tips and insights to keep your WordPress site secure.

So, is WordPress easily hacked? The short answer is no, but it is a common target for cyberattacks due to its popularity.
According to data from W3Techs, WordPress is used by 65% of all the websites whose content management system we know. This is 43% of all websites.

The security of your WordPress site depends on multiple factors, such as the strength of your passwords, the use of security plugins, and regular updating of your software.

In this video, we’ll be covering common vulnerabilities and providing you with solutions to secure your WordPress site.

https://youtu.be/ZhID6ehVSLg

Why is website security important?

I’m here to guide you through website security issues and provide solutions to resolve them.

In today’s digital age, having a secure website has become a crucial aspect of any online presence. From e-commerce sites to personal blogs, every website is at risk of potential cyber threats.

In this video, we will delve into the reasons why website security is so crucial and discuss the potential consequences of neglecting it. Join us as we explore the importance of keeping your website secure.

Protecting a website is crucial for maintaining its security, protecting sensitive data, and ensuring the continued success of the website.

https://youtu.be/6ylhojSi-_E

How to Disable Hide My WP Ghost on Specific Pages

First, install and activated the Hide My WP Ghost plugin. Then, follow these solutions:


Using Settings:

  1. Access Hide My WP Ghost Settings:
    • From the left-hand sidebar, go to Hide My WP > Change Paths > Whitelist Options.
  2. Add the URLs of the Specific Pages:
    • Enter the slug or relative URL of the pages where you want to disable Hide My WP Ghost.
      (e.g., if you wish to exclude “sample-page”, you would add “/sample-page/”).
    • Click ‘Save Settings’ once done.

That’s the general method to exclude specific pages from being affected by Hide My WP Ghost. However, if you want more flexibility and control, you can use the add_filter function in your theme’s functions.php file or a custom plugin.


Using add_filter to Disable Hide My WP Ghost:

  1. Access Your Theme’s functions.php File:
    • From your WordPress Dashboard, navigate to Appearance > Theme Editor.
    • Find and click on the functions.php file in the right-hand column.
  2. Add the Custom Filter:
    • At the end of the file, paste the following code:

function disable_hmwp_on_specific_pages($process) {
    // Check if we're viewing a specific page by its slug
    if (is_page('your-page-slug')) {
        return false;
    }

    return $process;
}

add_filter('hmwp_process_init', 'disable_hmwp_on_specific_pages');
  1. Modify the Code:
    • Replace 'your-page-slug' with the slug of the page where you want to disable Hide My WP Ghost.
    • If you have multiple pages, you can add additional conditions.
  2. Save Changes:
    • Click ‘Update File’ to save the changes you’ve made to functions.php.

With that, Hide My WP Ghost should be disabled on the specific pages you’ve chosen.

Remember to always back up your website before making any code changes, and test your site afterward to ensure everything works as expected.

How to Customize Right Click Disable for Specific Pages

One of Hide My WP Ghost features is the ability to disable right-clicking on the frontend to prevent users from easily copying your content. However, you might want to selectively enable right-click on specific URLs. In this tutorial, we’ll show you how to customize the right-click disable feature in Hide My WP Ghost using the provided code snippet.

Before you can customize the right-click disable feature, you’ll need to access your WordPress files. You can do this via FTP or through your hosting control panel. Once you have access, locate either your theme’s functions.php file or the wp-config.php file, depending on where you want to add the customization.


Step-by-Step Guide:

Step 1: First, you need to activate Disable Right Click from Hide My WP > Tweaks > Disable Options

Step 2: Choose whether you want to add the code to your theme’s functions.php file or the wp-config.php file. Use a code editor to open the file for editing. Insert the following code:

/**
 * Deactivate disable right click on specific URLs
 * array $urls List of URLs where the right click should be active
 */
add_filter('hmwp_option_hmwp_disable_click', function($active){

    if(isset($_SERVER['REQUEST_URI'])) {

        $urls = array(
            home_url(), //home page
            home_url('hello-world'),
            home_url('sample-page'),
        );

        $path = rtrim($_SERVER['REQUEST_URI'], '/') . '/';
        $paths = array_map(function ($url){
            return trailingslashit(parse_url($url, PHP_URL_PATH));
        }, $urls);

        //don't activate on Home Page
        if (in_array($path, $paths)) {
            $active = false;
        }
    }

    return $active;
});

Step 3: Customize the URLs

In the code snippet, you can see an array called $urls. This array contains the URLs where you want to either enable or disable right-click. By default, the code allows right-click on the home page, ‘hello-world’, and ‘sample-page’.

You can customize this array by adding or removing URLs that match your specific requirements. Just make sure to follow the same format as the provided URLs.

Step 5: Save Your Changes

After adding the code and customizing the URLs, save the changes to the file.

Step 6: Check the Result

Now, visit the URLs you’ve customized in your browser and test the right-click functionality. It should be enabled or disabled based on your configuration.

Conclusion:

By following this tutorial and adding the provided code to your chosen file, you can selectively enable or disable right-click functionality on specific URLs, enhancing the user experience while maintaining security.

You can do the same for these HMWP hooks:

hmwp_option_hmwp_disable_inspect <- Disable Inspect Element

hmwp_option_hmwp_disable_source <- Disable View Source

hmwp_option_hmwp_disable_copy_paste <- Disable Copy Paste

hmwp_option_hmwp_disable_drag_drop <- Disable Drag-Drop Images

How to Add a Custom Config File for Nginx Servers

Hide My WP Ghost allows you to change the default configuration file/path when the website root path is not writable.

Prerequisites:

  • Access to your server’s Nginx configuration.

Step 1: Create a Custom Configuration File

  1. Connect to your server using SSH or your preferred method.
  2. Navigate to your WordPress root directory, typically located at /path_to_root/wp-content/.
  3. Create a new file named hidemywp_custom.conf inside the wp-content directory using the following command:
   touch /path_to_root/wp-content/hidemywp_custom.conf

Step 2: Modify Nginx Configuration

  1. Open your Nginx server configuration file using a text editor. The location of this file may vary depending on your system setup. Commonly, it’s located at /etc/nginx/nginx.conf or in a directory like /etc/nginx/sites-available/.
  2. Inside the server block of your Nginx configuration, add the following line:
   server {
       # Other existing configurations...

       include /path_to_root/wp-content/hidemywp_custom.conf;

       # Other existing configurations...
   }

path_to_root

Change path_to_root with the actual path to website root (WordPress instalation folder).

Step 3: Edit wp-config.php

  1. Access your WordPress installation folder on the server.
  2. Locate the wp-config.php file and open it in a text editor.
  3. Add the following code snippet at the end of the file, or after WP_DEBUG definition:
   add_filter('hmwp_config_file', function(){
       return ABSPATH . 'wp-content/hidemywp_custom.conf';
   });

Step 4: Save Hide My WP Ghost Settings

  1. Log in to your WordPress dashboard.
  2. Navigate to Hide My WP > Custom Paths
  3. Click the “Save Changes” button to save the new custom config path.

Step 5: Restart Nginx

  1. To apply the changes and load the new config path into memory, restart Nginx using the following command:
   sudo service nginx restart

Congratulations! You have successfully added a custom config path in Hide My WP Ghost for Nginx servers. This custom path enhances the security of your WordPress website by moving the configuration file to a different location, making it harder for potential attackers to locate it.

Please note that whenever you make changes to the custom config path, you must restart Nginx to ensure the modifications take effect.

How To Setup Plesk To Work As Apache

To set up Plesk to work like Apache and configure the Hide My WP Ghost plugin, follow these steps:

  1. Log in to Plesk as an administrator.
  2. Go to “Websites & Domains” and click on “Apache & nginx Settings” for the desired domain.
  3. Scroll down to the “nginx settings” section.
  4. Select the “Proxy mode” checkbox. This enables nginx to act as a reverse proxy for Apache.
  5. Clear the “Smart static files processing” checkbox. This ensures that all static files are passed through to Apache for processing.
  6. Clear the “Serve static files directly by nginx” checkbox. This instructs nginx to pass all static file requests to Apache for handling.
  7. Click “Apply” to save the changes.

With these settings, Apache will handle all content, both static and dynamic, while nginx acts as a reverse proxy. This configuration allows you to set up the Hide My WP Ghost plugin specifically for Apache.

Please note that using Apache as the sole handler for all content may have performance implications.

plesk apache handle

More details: https://docs.plesk.com/en-US/onyx/customer-guide/websites-and-domains/hosting-settings/web-server-settings/apache-and-nginx-settings.72320/#serve-all-static-and-dynamic-content-via-apache


Configure the Hide My WP Ghost plugin specifically for Apache

After setting up Plesk to work like Apache, follow these steps to configure the Hide My WP Ghost plugin specifically for Apache:

  1. Log in to your WordPress dashboard.
  2. Navigate to “Hide My WP” in the sidebar and click on it.
  3. From the sub-menu, choose “Advanced.”
  4. In the “Compatibility” tab, locate the “Server type” section.
  5. Select “Apache server” from the available options. This ensures that the plugin’s settings are compatible with Apache.
  6. Click “Save” to save the changes.
hidemywp apache server type

By specifying the server type as Apache within the Hide My WP Ghost plugin, you ensure that the plugin’s functionality aligns with the configuration you’ve set up in Plesk. This ensures proper compatibility and optimal performance when hiding your WordPress site’s information from prying eyes.

Redirect Images From The Old Paths to The New Paths

If you change the image paths using Hide My WP Ghost plugin, it is important not to have the same image on two different URLs on a website to avoid duplicate content issues and to maintain good search engine optimization (SEO) practices.

When search engines like Google detect duplicate content, it can negatively impact the website’s visibility and rankings in search results.

  1. Set a new uploads path. Choose a directory name in Hide My WP > Change Paths > WP Core Security like “storage” where you want to store the uploaded images.
custom uploads
  1. Select the MEDIA Files from Hide My WP > Change Paths > Hide WordPress Common Path > Hide File Extensions extension list.
redirect media files

By implementing this solution, any requests for images in the old /wp-content/uploads/ the directory will be redirected to the new /storage/ directory, preventing duplicate URLs for the same image.

Learn how to hide the old image paths from users:

https://hidemywpghost.com/faqs/how-can-i-hide-the-old-images-paths/

Cloud Panel Server – Hide My WP Ghost Setup

If you’re looking to protect your website from malicious attacks, Hide My WP Ghost is an excellent plugin that can help you secure your website. Hide My WP Ghost can be installed on a Cloud Panel server, and this article will guide you through the process.

Before you begin, make sure that you have a Cloud Panel server with Nginx installed and a WordPress websited.


Here are the steps to set up Hide My WP Ghost on a Cloud Panel server:

Step 1: Install Hide My WP Ghost on the Cloud Panel website.

The first step is to install Hide My WP Ghost on the Cloud Panel website. You can do this by downloading the plugin from the WordPress directory or the Hide My WP Ghost website and installing it like any other WordPress plugin.

Step 2: Select Cloud Panel server type

After you’ve installed Hide My WP Ghost, go to Hide My WP > Advanced > Compatibility and select the server type as Cloud Panel. This will ensure that the plugin is compatible with the Cloud Panel server.

Step 3: Setup new paths in Hide My WP Ghost

Once you’ve selected the server type as Cloud Panel, you’ll need to set up the custom paths in Hide My WP Ghost.

After you’ve set up the custom paths, save the settings and follow the notification to include the hidemywpghost.conf file in the Cloud Panel Vhost file on the Cloud Panel dashboard.

To do this, add the include file above the {{settings}} line in the Vhost file. Save the Vhost file and restart Nginx from the Cloud Panel admin section.

Step 4: Check the frontend and login page

Once you’ve restarted Nginx, check the frontend page and login page with Hide My WP Ghost. You can confirm that the plugin is working by clicking on “Yes, it’s working“.

Note! The custom wp-admin will be redirected to the default wp-admin once the used is logged to the server. This is because Cloud Panel can’t rewrite the wp-admin through Nginx config file.

Congratulations! You’ve successfully set up Hide My WP Ghost on a Cloud Panel server. With this plugin, you can protect your website from malicious attacks and ensure that your website is secure.

Use Hide My WP Ghost with Hummingbird Cache Plugin

If you’re looking to optimize your WordPress website’s performance, Hummingbird is a great plugin to help you achieve that. And the best part is that it’s compatible with Hide My WP Ghost, allowing you to keep your website secure while improving its speed.

To take full advantage of Hummingbird, you need to activate the caching feature, which will store your website’s files on the server for faster delivery to your visitors. Once caching is enabled, you can use the Identify Cached Files option to find out which files are cached and where they’re located.

However, if you’re using Hide My WP Ghost, you need to make sure that the paths to these cached files are changed to prevent detection by potential attackers. To do this, you can use the plugin’s Change Paths in Cache Files option, which will automatically update the paths to your cached files.

But that’s not all. Hummingbird also comes with an Assets Optimization feature that can minify and combine your website’s CSS and JS files for faster load times. To take advantage of this feature, you need to activate the Minification option in the Basic Options section.

Once the Minification option is activated, Hummingbird will automatically combine and minify your website’s CSS and JS files, reducing their size and improving your website’s performance. And as with the caching feature, you can use Hide My WP Ghost’s Change Paths in Cache Files option to change the paths to these optimized files and keep your website secure.

Another important thing to keep in mind is that Hummingbird allows you to change the location of your cache files. By default, Hummingbird stores your cache files in the /wp-content/cache/hummingbird/ directory. However, you can change this location to a custom directory like /wp-content/cache/optimization in the Assets Optimization > Settings section.

By changing the location of your cache files, you can further improve your website’s security by making it harder for potential attackers to find your cached files.

By combining it with Hide My WP Ghost, you can keep your website secure while improving its speed. Just remember to activate the Minification option in Hummingbird’s Basic Options section, use the Identify Cached Files option to find your cached files, and change their paths using Hide My WP Ghost.

Use Hide My WP Ghost with Breeze Cache Plugin

If you are looking for a cache plugin that works perfectly with Hide My WP Ghost, then Breeze is definitely the plugin for you. Breeze is a free, powerful and user-friendly WordPress cache plugin that helps improve the speed of your website. When you combine Breeze with Hide My WP Ghost, you can easily optimize your website speed and also secure it from hackers.

One of the features that make Breeze such a great match for Hide My WP Ghost is the plugin’s minification option, which is located in the Basic Options section. When you activate the minification option, Breeze will automatically minify and combine your CSS and JS files. This helps to reduce the number of HTTP requests and also the file size, which ultimately results in a faster loading website.

When using Hide My WP Ghost, it’s important to hide your plugins and themes from all Theme Detectors. With Breeze and Hide My WP Ghost, you can easily achieve this. By hiding your plugins and themes, you can make it more difficult for hackers to find vulnerabilities in your website. This is important because hackers often target websites that are easy to hack and leave themselves open to vulnerabilities.

In order to use Breeze with Hide My WP Ghost, you’ll need to follow these steps:

  1. Install and activate Breeze and Hide My WP Ghost plugins.
  2. Go to Breeze settings and activate the minification option in the Basic Options section.
  3. Once you have activated minification, go to the Advanced Options section and select the “Don’t cache these pages” option.
  4. Next, add the following pages to the “Don’t cache these pages” option: custom login path, custom admin, and any other pages that require user interaction.
  5. Finally, go to Hide My WP Ghost settings and activate the option “Change Paths in Cache Files”. This will automatically change the paths in background using the cron option.

By following these steps, you can easily optimize your website speed and secure it from hackers. With Breeze and Hide My WP Ghost working together, your website will load faster, and your plugins and themes will be hidden from all Theme Detectors.

In addition to minification, Breeze also offers other optimization features such as Gzip compression, browser caching, and database optimization. When combined with Hide My WP Ghost, you can achieve the perfect balance between website speed and security.

In conclusion, if you are looking for a cache plugin that works perfectly with Hide My WP Ghost, then Breeze is the plugin for you. With Breeze’s minification option and Hide My WP Ghost’s ability to hide plugins and themes from all Theme Detectors, you can easily optimize your website speed and secure it from hackers. By following the steps outlined above, you can achieve a faster-loading, more secure website.