How to Set Up WP Ghost on Bitnami Servers (Apache and Nginx)
March 15, 2017
This tutorial has moved to the new WP Ghost Knowledge Base where each feature is presented in detail.
Set up WP Ghost on Amazon Bitnami servers (AWS, Google Cloud, Azure). Bitnami uses custom configuration files instead of standard .htaccess. This tutorial covers both Apache (htaccess.conf / VirtualHost) and Nginx (server block) setups.
Why Bitnami Requires Special Configuration
Bitnami WordPress stacks (commonly deployed on AWS, Google Cloud Platform, and Microsoft Azure) use a custom server configuration structure that differs from standard hosting. On Apache, Bitnami disables .htaccess by default and uses its own htaccess.conf files for performance and security reasons. On Nginx, Bitnami uses custom server block files instead of the standard sites-available structure.
This means WP Ghost can not write rewrite rules to .htaccess automatically. You need to add the rules to Bitnami’s configuration files manually. The process is straightforward and takes about 5 minutes once you know which files to edit.
Bitnami runs on both Apache and Nginx depending on how you provisioned the stack. Follow the section below that matches your server type.
Setup for Bitnami with Apache
Step 1 – Install and Configure WP Ghost
1. Install and activate the WP Ghost plugin. For the full installation guide, see Install WP Ghost.
2. Go to WP Ghost > Change Paths.
3. Select Safe Mode (recommended) or Ghost Mode (Premium).
4. Customize your paths and click Save.
Step 2 – Add the Rewrite Rules to Bitnami’s Config File
You have two options for getting the rewrite rules into Bitnami’s Apache configuration.
Option A – Copy Rules into the VirtualHost Config (Recommended)
5. Connect to your server via SSH.
6. Open the Bitnami VirtualHost configuration file. The typical location is:
/opt/bitnami/apache/conf/vhosts/wordpress-vhost.conf
7. Find the <Directory> block inside the VirtualHost. Copy the WP Ghost rewrite rules from your .htaccess file (the block between #BEGIN HMWP_RULES and #END HMWP_RULES) and paste them inside the Directory block, before the WordPress rewrite rules.
The result should look like this (your actual rules will match the custom paths you configured):
<VirtualHost 127.0.0.1:80 _default_:80>
    ServerAlias *
    DocumentRoot /opt/bitnami/wordpress
    <Directory "/opt/bitnami/wordpress">
      Options -Indexes +FollowSymLinks -MultiViews
      AllowOverride None
      Require all granted

      # WP Ghost rewrite rules (paste your actual rules here)
      RewriteEngine On
      #START HIDEMYWP RULES
      RewriteRule ^([_0-9a-zA-Z-]+/)?your-ajax(.*) /wp-admin/admin-ajax.php$2 [QSA,L]
      RewriteRule ^([_0-9a-zA-Z-]+/)?your-admin/(.*) /wp-admin/$2 [QSA,L]
      RewriteRule ^([_0-9a-zA-Z-]+/)?your-login(.*) /wp-login.php$2 [QSA,L]
      ... (your other rules)
      #END HIDEMYWP RULES

      # BEGIN WordPress
      RewriteEngine On
      RewriteRule .* - [E=HTTP_AUTHORIZATION:%{HTTP:Authorization}]
      RewriteBase /
      RewriteRule ^index\.php$ - [L]
      RewriteCond %{REQUEST_FILENAME} !-f
      RewriteCond %{REQUEST_FILENAME} !-d
      RewriteRule . /index.php [L]
      # END WordPress

    </Directory>
    Include "/opt/bitnami/apache/conf/vhosts/htaccess/wordpress-htaccess.conf"
</VirtualHost>
Option B – Enable .htaccess Support
If you prefer WP Ghost to write rules to .htaccess automatically (like on standard Apache hosting), you can enable .htaccess support in Bitnami by changing AllowOverride.
5. Open the same VirtualHost configuration file.
6. Change AllowOverride None to AllowOverride All inside the Directory block:
<VirtualHost 127.0.0.1:80 _default_:80>
    ServerAlias *
    DocumentRoot /opt/bitnami/wordpress
    <Directory "/opt/bitnami/wordpress">
      Options -Indexes +FollowSymLinks -MultiViews
      AllowOverride All
      Require all granted
    </Directory>
    Include "/opt/bitnami/apache/conf/vhosts/htaccess/wordpress-htaccess.conf"
</VirtualHost>
With AllowOverride All enabled, Apache reads .htaccess files and WP Ghost can write its rewrite rules there automatically. This is easier to maintain but has a minor performance cost compared to the VirtualHost method.
Step 3 – Restart Apache
8. Restart Apache to apply the configuration changes:
sudo /opt/bitnami/ctlscript.sh restart apache9. Go back to WP Ghost, confirm the change, and click Frontend Login Test. If the login works, click “Yes, it’s working.”
Setup for Bitnami with Nginx
Step 1 – Install and Configure WP Ghost
Follow the same installation steps as the Apache section above. After saving your settings, WP Ghost generates a hidemywp.conf file and shows you the include line to add.
Step 2 – Add the Include Directive to Nginx
1. Connect to your server via SSH.
2. Open the Bitnami Nginx server block file. The typical location is:
/opt/bitnami/nginx/conf/server_blocks/myapp-server-block.conf
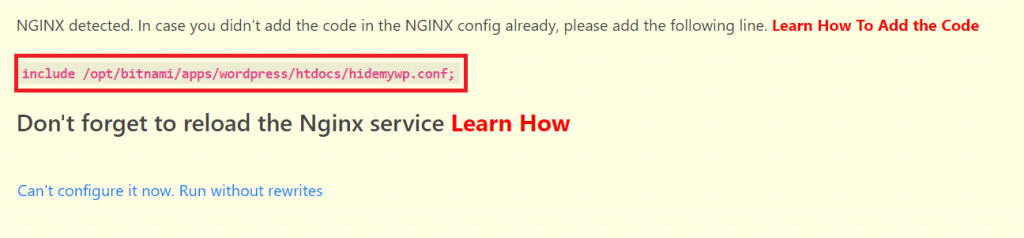
3. Add the include line for the hidemywp.conf file inside the server block:
server {
    listen 80 default_server;
    root /opt/bitnami/wordpress;
    server_name _;
    include "/opt/bitnami/nginx/conf/bitnami/*.conf";

    include /opt/bitnami/wordpress/hidemywp.conf;
}
Replace the hidemywp.conf path with the actual path shown in your WP Ghost notification.
Step 3 – Restart Nginx
4. Restart Nginx to apply the changes:
sudo /opt/bitnami/ctlscript.sh restart nginxStep 4 – Verify Your Setup
5. Go back to WP Ghost, confirm the change, and click Frontend Login Test.
6. If the test login is working, click “Yes, it’s working.”
7. Open your site in an incognito browser and confirm the old paths return 404 errors and the custom paths load correctly.
Troubleshooting
Rewrite rules are not working after restart. On Apache, verify that your rules are placed inside the Directory block, not outside it. On Nginx, verify the include path matches the actual file location. Use sudo nginx -t (Nginx) or sudo apachectl configtest (Apache) to check for configuration syntax errors before restarting.
Can not find the VirtualHost config file. Bitnami has changed file locations across different versions. If the file is not at the paths listed above, search for it with find /opt/bitnami -name "*vhost*" (Apache) or find /opt/bitnami -name "*server-block*" (Nginx).
Locked out after saving. Add define('HMWP_DISABLE', true); to wp-config.php via SSH to disable WP Ghost temporarily. See the emergency disable guide.
Using Bitnami on Google Cloud? You may also need to enable AllowOverride. See Enable AllowOverwrite on Google Cloud Platform.
Frequently Asked Questions
Should I use Option A (VirtualHost rules) or Option B (.htaccess)?
Option A (adding rules directly to the VirtualHost config) is Bitnami’s recommended approach. It performs slightly better because Apache does not need to scan for .htaccess files on every request. Option B (enabling .htaccess) is easier because WP Ghost can update the rules automatically when you change settings, but it adds a minor performance overhead.
Do I need to restart the server every time I change WP Ghost settings?
With Option A (VirtualHost rules), yes, you need to copy the updated rules and restart Apache. With Option B (.htaccess enabled), no – Apache reads .htaccess on every request, so changes take effect immediately. On Nginx, you always need to restart after path changes.
How do I know if my Bitnami stack uses Apache or Nginx?
Run sudo /opt/bitnami/ctlscript.sh status on your server. It will list the running services. If you see “apache” in the list, you are running Apache. If you see “nginx”, you are running Nginx.
Does this work on AWS Lightsail with Bitnami?
Yes. AWS Lightsail WordPress instances use Bitnami stacks. The setup is identical. For Lightsail-specific details, also see the AWS Lightsail Setup guide.
Does WP Ghost modify WordPress core files?
No. WP Ghost uses server rewrite rules and WordPress hooks. No core files are moved, renamed, or modified. Deactivating the plugin restores all default paths instantly.