How to Set WordPress Database Permissions in phpMyAdmin for Better Security
July 9, 2018
This tutorial has moved to the new WP Ghost Knowledge Base where each feature is presented in detail.
Restrict your WordPress database user to only the permissions WordPress needs: SELECT, INSERT, UPDATE, DELETE, ALTER, CREATE, DROP, and INDEX. Remove all other privileges using phpMyAdmin to reduce risk from SQL injection attacks.
Why Database Permissions Matter for Security
By default, many hosting setups grant the WordPress database user full privileges, including dangerous ones like FILE, PROCESS, GRANT, and SUPER. If an attacker successfully exploits an SQL injection vulnerability in a plugin, these extra permissions give them far more power than they should have. They could read server files, create new admin users, export your entire database, or even execute operating system commands.
Restricting database permissions to only what WordPress actually needs is a simple but effective hardening step. It limits the damage an attacker can do even if they find an SQL injection entry point. Combined with WP Ghost’s 8G Firewall (which blocks SQL injection patterns at the server edge) and path security (which makes vulnerable plugin paths invisible to bots), this creates a strong defense-in-depth approach.
Which Permissions WordPress Needs
WordPress requires only eight database permissions to function correctly, including during updates, plugin installations, and WooCommerce operations:
SELECT – read data from the database. Every page load, query, and search uses this.
INSERT – add new rows. Creating posts, comments, users, and options all require this.
UPDATE – modify existing rows. Editing posts, changing settings, and updating user profiles use this.
DELETE – remove rows. Trashing posts, deleting comments, and removing expired transients use this.
ALTER – modify table structure. WordPress core updates and plugin updates use this when they need to add columns or change table schemas.
CREATE – create new tables. Plugin installations and some updates create new database tables.
DROP – remove tables. Plugin uninstalls use this to clean up their database tables.
INDEX – create and manage indexes on tables. Some plugins and WordPress updates add indexes for performance.
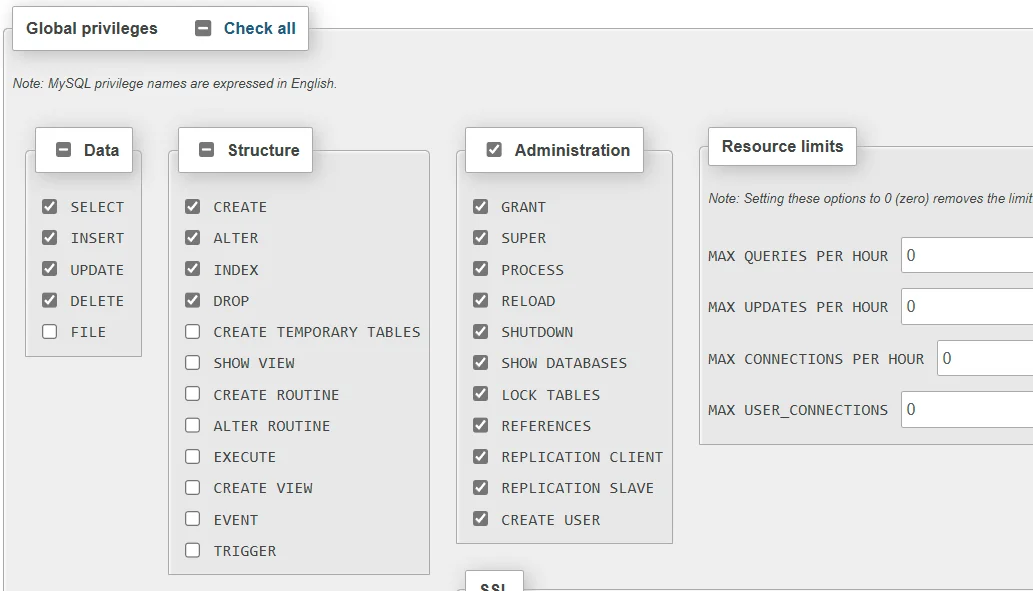
Everything else, including FILE, PROCESS, REFERENCES, GRANT, LOCK TABLES, CREATE TEMPORARY TABLES, CREATE ROUTINE, ALTER ROUTINE, EXECUTE, CREATE VIEW, SHOW VIEW, EVENT, and TRIGGER, can be safely removed for a standard WordPress installation.
How to Set Database Permissions in phpMyAdmin
Step 1 – Open phpMyAdmin and Find Your Database User
1. Log into phpMyAdmin from your hosting control panel (cPanel, Plesk, DirectAdmin, etc.).
2. Click the User accounts tab at the top to see all database users.
3. Find the user that your WordPress site uses. If you are not sure which user it is, check your wp-config.php file for the DB_USER value.
4. Click Edit privileges for that user.

Step 2 – Select the Database
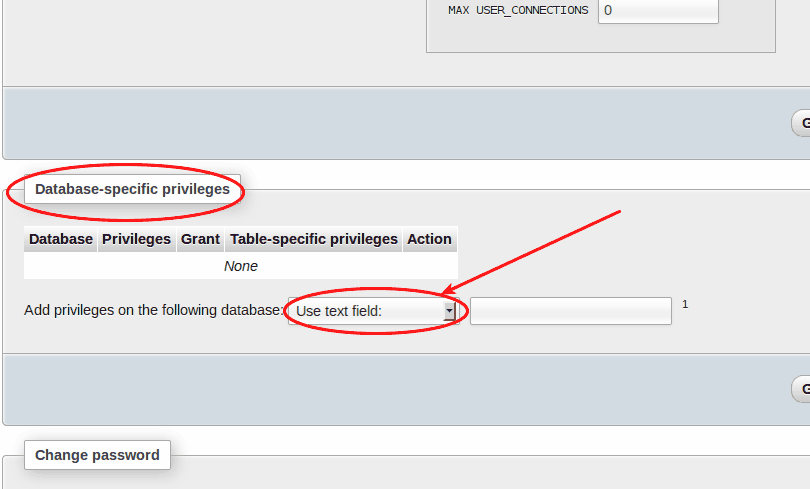
5. In the user’s privileges page, scroll down to the Database-specific privileges section.
6. Select your WordPress database from the dropdown and click Go.
Step 3 – Set the Correct Permissions
7. Check only these eight privileges: SELECT, INSERT, UPDATE, DELETE, ALTER, CREATE, DROP, INDEX.
8. Uncheck everything else.
9. Click Go to apply the changes.
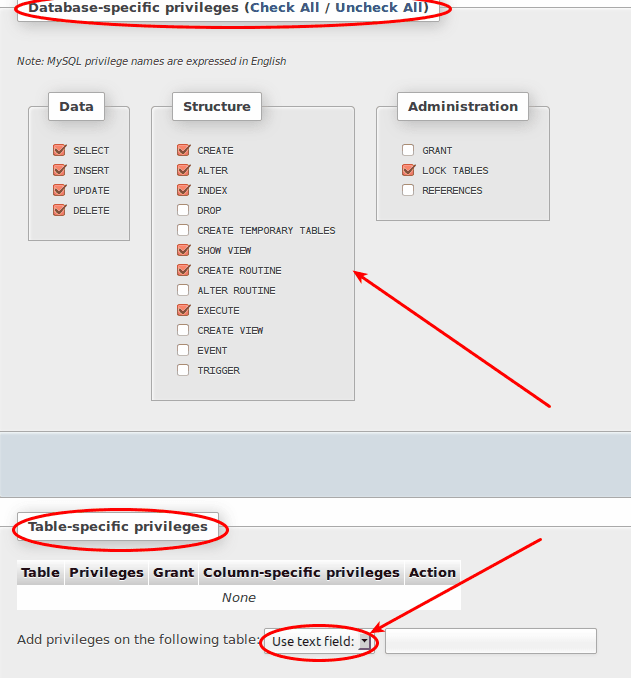
Step 4 – Verify Table-Level Permissions (Optional)
10. For even more granular control, you can set permissions at the individual table level. After selecting the database, click on a specific table and define the allowed operations.
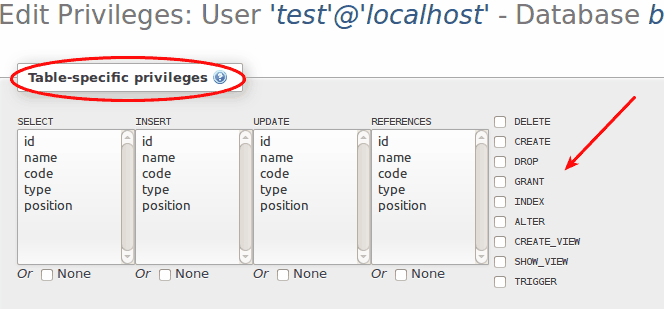
Table-level restrictions are optional and typically only used in high-security environments. For most WordPress sites, database-level restrictions with the eight permissions listed above provide a strong security baseline.
After Changing Permissions
After restricting permissions, test your WordPress site thoroughly. Log in to the admin dashboard, create a test post, install or update a plugin, and verify that WooCommerce checkout works if applicable. If anything breaks, you have likely removed a permission that a specific plugin requires. Add it back and test again.
WP Ghost’s Security Check includes a database prefix task that verifies whether your database is using the default wp_ prefix. Changing the database prefix is another hardening step that makes SQL injection attacks harder to execute. WP Ghost Premium can change the database prefix for you directly from the Security Check results.
Frequently Asked Questions
Will restricting database permissions break my WordPress site?
No, not if you keep the eight required permissions (SELECT, INSERT, UPDATE, DELETE, ALTER, CREATE, DROP, INDEX). These are all WordPress needs for normal operation including updates, plugin installations, and WooCommerce. Some advanced plugins may require additional permissions like CREATE TEMPORARY TABLES. If something breaks, add that specific permission back.
Can I do this on shared hosting?
It depends on your hosting provider. Some shared hosts give you access to phpMyAdmin but restrict your ability to change user privileges. Others let you manage database users through cPanel’s MySQL Databases tool. If your hosting panel does not allow privilege changes, contact your hosting support and ask them to restrict the permissions for you.
Does WP Ghost need any special database permissions?
WP Ghost uses the same database permissions as WordPress core. It stores its settings in the wp_options table (SELECT, INSERT, UPDATE) and creates log tables for the Security Threats Log and User Events Log (CREATE, INSERT, SELECT, DELETE). The eight standard permissions listed above are sufficient.
Should I also change my database prefix?
Yes. The default wp_ prefix is targeted by SQL injection scripts that hardcode table names like wp_users and wp_options. Changing the prefix means those hardcoded queries fail. WP Ghost Premium includes a database prefix change feature in the Security Check.
Does WP Ghost modify WordPress core files?
No. WP Ghost uses server rewrite rules and WordPress hooks. No core files are moved, renamed, or modified. Deactivating the plugin restores all default paths instantly.